INSTALLATION

FIREBRICK ASSEMBLY

BRICK FLUE BAFFLE &

Firebrick is included to extend the life of your

SECONDARY AIR TUBE

insert and radiate heat more evenly. Check to

INSTALLATION

see that all fi rebricks are in their correct posi-

tions and have not become misaligned during

The fl ue baffl e system located in the upper area

shipping.

of the fi rebox is removable to make cleaning


your chimney system easier. The brick baffl es


must be installed prior to your fi rst fi re. Smoke


spillage and draft problems may occur if the


baffles are improperly positioned. Check the


position of the brick baffl es on a regular basis as


they can be dislodged if too much fuel is forced


into the fi rebox.


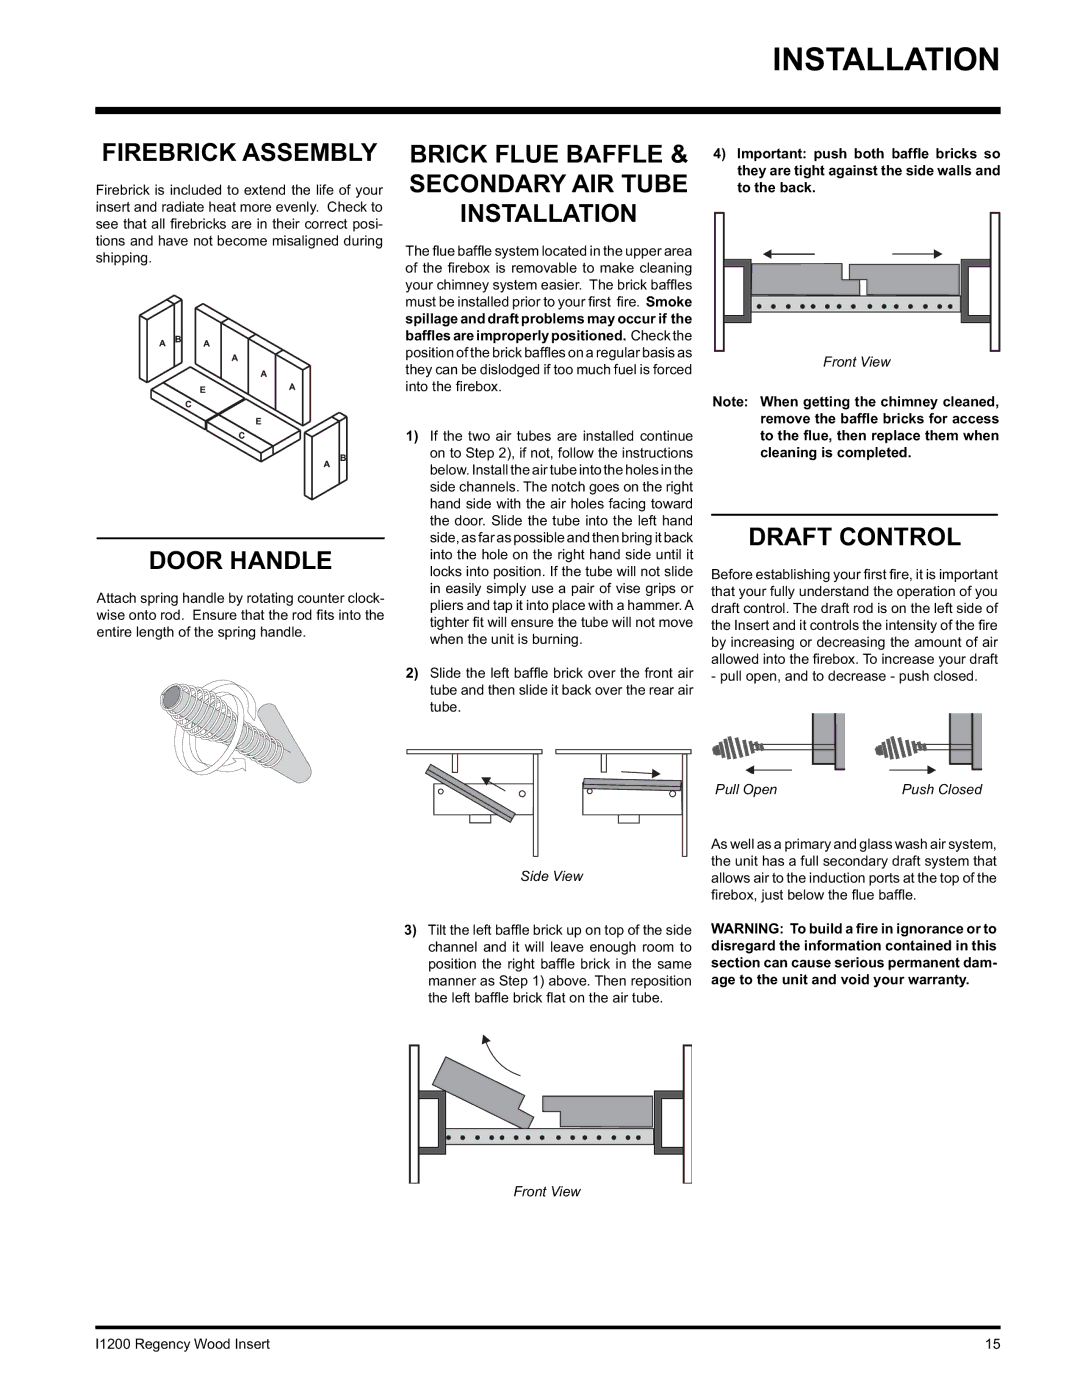
1) If the two air tubes are installed continue


on to Step 2), if not, follow the instructions


below. Install the air tube into the holes in the


side channels. The notch goes on the right


hand side with the air holes facing toward


the door. Slide the tube into the left hand


side, as far as possible and then bring it back


DOOR HANDLE


into the hole on the right hand side until it


locks into position. If the tube will not slide

Attach spring handle by rotating counter clock-

in easily simply use a pair of vise grips or

pliers and tap it into place with a hammer. A

wise onto rod. Ensure that the rod fi ts into the

tighter fi t will ensure the tube will not move

entire length of the spring handle.

when the unit is burning.


2) Slide the left baffl e brick over the front air


tube and then slide it back over the rear air


tube.

4)Important: push both baffle bricks so they are tight against the side walls and to the back.

Front View

Note: When getting the chimney cleaned, remove the baffle bricks for access to the flue, then replace them when cleaning is completed.

DRAFT CONTROL

Before establishing your fi rst fi re, it is important that your fully understand the operation of you draft control. The draft rod is on the left side of the Insert and it controls the intensity of the fi re by increasing or decreasing the amount of air allowed into the fi rebox. To increase your draft - pull open, and to decrease - push closed.

Pull Open

Push Closed

Side View

3)Tilt the left baffl e brick up on top of the side channel and it will leave enough room to position the right baffl e brick in the same manner as Step 1) above. Then reposition the left baffl e brick fl at on the air tube.

Front View

As well as a primary and glass wash air system, the unit has a full secondary draft system that allows air to the induction ports at the top of the fi rebox, just below the fl ue baffl e.

WARNING: To build a fire in ignorance or to disregard the information contained in this section can cause serious permanent dam- age to the unit and void your warranty.

I1200 Regency Wood Insert

15

Page 15
Image 15
Regency I1200S installation manual Draft Control

I1200S specifications

The Regency I1200S is a remarkable addition to the world of portable radios, combining advanced technology with user-friendly features designed for both casual listeners and audio enthusiasts. This model exemplifies Regency's commitment to quality, performance, and innovation in communication devices.

One of the standout features of the Regency I1200S is its impressive reception capabilities. Thanks to an advanced DSP (Digital Signal Processing) technology, users can enjoy crystal-clear sound quality across a wide range of frequencies. This technology helps in minimizing static and distortion, ensuring that every transmission is crisp and easy to understand.

The I1200S is designed for versatility, supporting multiple bands including AM, FM, and shortwave. This broad coverage allows users to tune into their favorite local stations or explore international broadcasts, making it an ideal companion for travelers and radio enthusiasts alike. The inclusion of a digital display enhances usability, providing clear information on frequency and signal strength.

Another key characteristic of the Regency I1200S is its durability. Constructed with high-quality materials, it is built to withstand the rigors of travel and outdoor use. The lightweight design and compact size make it easy to carry, while the ergonomic controls ensure that users can operate the device without hassle, even in challenging conditions.

Battery life is another critical aspect where the I1200S excels. The radio is equipped with an efficient power management system that allows for extended usage on either rechargeable or disposable batteries. This feature is particularly beneficial for outdoor enthusiasts who may be away from power sources for extended periods.

Moreover, the I1200S includes practical features such as a headphone jack for private listening and a built-in speaker for group enjoyment. The intuitive controls allow users to easily switch between modes, adjust volume, and navigate through channels without confusion.

In summary, the Regency I1200S stands out as a top-tier portable radio, merging advanced technologies with practical features. Its robust reception, user-friendly design, and durability make it an exceptional choice for anyone looking to enjoy high-quality audio and reliable communication, whether at home, on the road, or in nature.