OWNER’S MANUAL
CLEANING AND MAINTENANCE
Continued
Normal Guide Bar Maintenance
1.Remove guide bar from chain saw.
2.Remove sawdust from guide bar groove periodically. Use putty knife or wire.
3.Clean oil slots after each day of use.
4.Remove burrs from sides of guide bar. Use flat file to make side edges square.
Replace guide bar when
•bar is bent or cracked
•inside groove of bar is badly worn
Note: When replacing guide bar, see Re- placement Parts, page 14, for proper bar.
Cleaning Groove Flat File Burr With Putty Knife
Oil Slot
Guide
Bar
Figure 18 - Guide Bar Maintenance
Keep chain sharp. Your saw will cut faster and more safely. A dull chain will cause undue sprocket, guide bar, chain, and mo- tor wear. If you must force chain into wood and cutting creates only sawdust with few large chips, chain is dull.
Items Needed to Sharpen Chain
Purchase these items from your local dealer, hardware store, or chain saw supplies outlet.
•4 mm (5/32") round file
•File guide
•Medium sized flat file
•Depth gauge tool
•Vise
Sharpening Cutters
Use file guide for 30° filing.
1. | Adjust chain for proper tension (see Saw |
| Chain Tension Adjustment, page 8). |
2. | Clamp guide bar in vise to hold saw |
| steady. Note: Do not clamp chain. |
3. | Press four millimeter (5/32") round file |
| (attached to file guide) into groove be- |
| tween top plate and depth gauge on chain. |
| File guide should rest on both top plate |
| and depth gauge (see Figures 19 and 20). |
| Note: File at midpoint of guide bar. |
4. | Hold file guide level. Make sure 30° |
| mark on file guide is parallel to center |
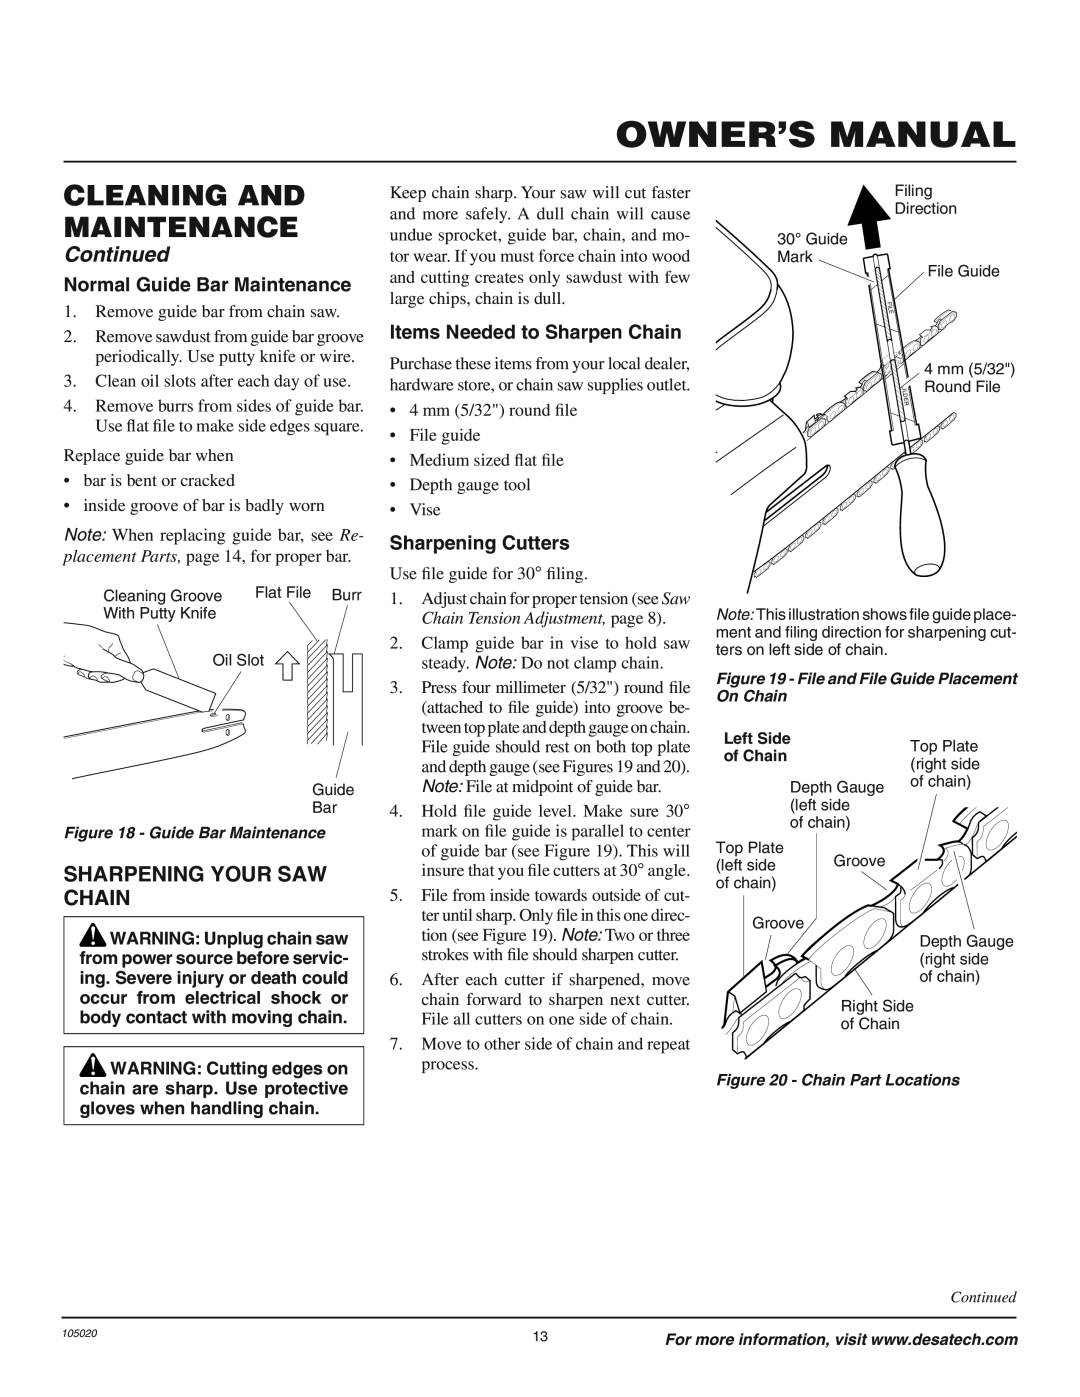
Filing
Direction
30° Guide
Mark
File Guide
4 mm (5/32") ![]() Round File
Round File
Note: This illustration shows file guide place- ment and filing direction for sharpening cut- ters on left side of chain.
Figure 19 - File and File Guide Placement On Chain
Left Side | Top Plate | |
of Chain | ||
(right side | ||
| ||
Depth Gauge | of chain) | |
| ||
(left side |
| |
of chain) |
|
SHARPENING YOUR SAW CHAIN
![]() WARNING: Unplug chain saw from power source before servic- ing. Severe injury or death could occur from electrical shock or body contact with moving chain.
WARNING: Unplug chain saw from power source before servic- ing. Severe injury or death could occur from electrical shock or body contact with moving chain.
| of guide bar (see Figure 19). This will |
| insure that you file cutters at 30° angle. |
5. | File from inside towards outside of cut- |
| ter until sharp. Only file in this one direc- |
| tion (see Figure 19). Note: Two or three |
| strokes with file should sharpen cutter. |
6. | After each cutter if sharpened, move |
| chain forward to sharpen next cutter. |
| File all cutters on one side of chain. |
7. | Move to other side of chain and repeat |
Top Plate (left side of chain)
Groove
Groove ![]()
Depth Gauge (right side of chain)
Right Side
of Chain
![]() WARNING: Cutting edges on chain are sharp. Use protective gloves when handling chain.
WARNING: Cutting edges on chain are sharp. Use protective gloves when handling chain.
process. |
Figure 20 - Chain Part Locations
Continued
105020 | 13 | For more information, visit www.desatech.com |
|