Monitor en blanco y negro+videograbadora, Monitor en colores+Videograbadora

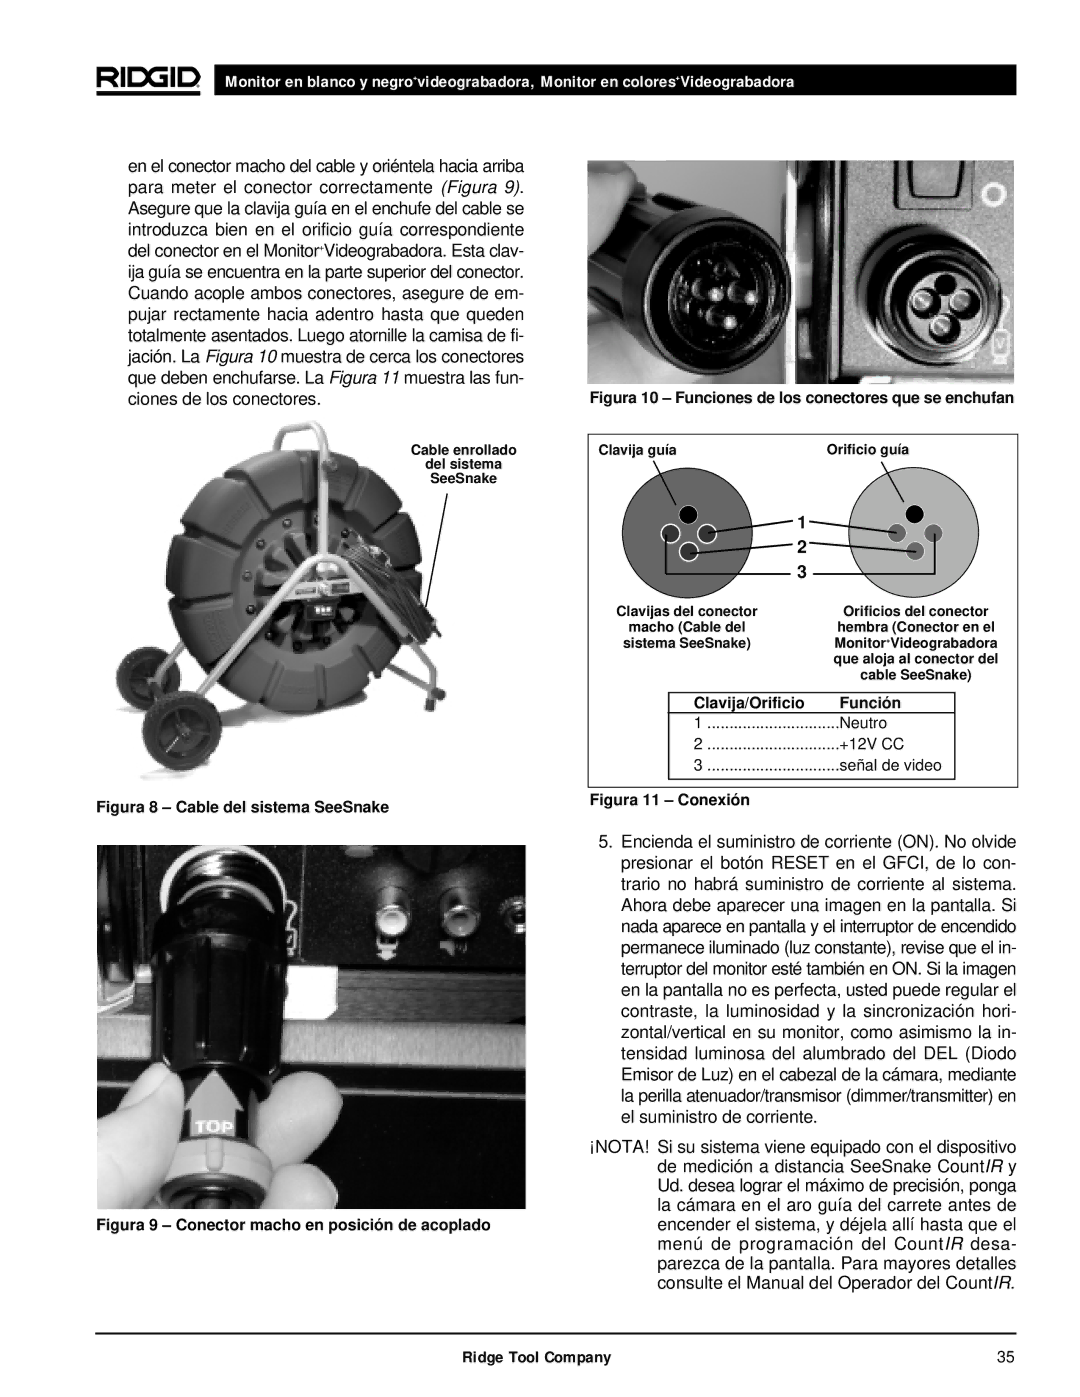
en el conector macho del cable y oriéntela hacia arriba para meter el conector correctamente (Figura 9). Asegure que la clavija guía en el enchufe del cable se introduzca bien en el orificio guía correspondiente del conector en el Monitor+Videograbadora. Esta clav- ija guía se encuentra en la parte superior del conector. Cuando acople ambos conectores, asegure de em- pujar rectamente hacia adentro hasta que queden totalmente asentados. Luego atornille la camisa de fi- jación. La Figura 10 muestra de cerca los conectores que deben enchufarse. La Figura 11 muestra las fun- ciones de los conectores.

Cable enrollado

del sistema

SeeSnake

Figura 8 – Cable del sistema SeeSnake

Figura 10 – Funciones de los conectores que se enchufan

Clavija guíaOrificio guía


1


2


3


Clavijas del conector


Orificios del conector

macho (Cable del


hembra (Conector en el

sistema SeeSnake)


Monitor+Videograbadora


que aloja al conector del


cable SeeSnake)


Clavija/Orificio


Función


1


Neutro


2


+12V CC


3


señal de video


Figura 11 – Conexión

5. Encienda el suministro de corriente (ON). No olvide presionar el botón RESET en el GFCI, de lo con- trario no habrá suministro de corriente al sistema. Ahora debe aparecer una imagen en la pantalla. Si nada aparece en pantalla y el interruptor de encendido permanece iluminado (luz constante), revise que el in- terruptor del monitor esté también en ON. Si la imagen en la pantalla no es perfecta, usted puede regular el contraste, la luminosidad y la sincronización hori- zontal/vertical en su monitor, como asimismo la in- tensidad luminosa del alumbrado del DEL (Diodo Emisor de Luz) en el cabezal de la cámara, mediante la perilla atenuador/transmisor (dimmer/transmitter) en el suministro de corriente.

¡NOTA! Si su sistema viene equipado con el dispositivo de medición a distancia SeeSnake CountIR y Ud. desea lograr el máximo de precisión, ponga la cámara en el aro guía del carrete antes de

Figura 9 – Conector macho en posición de acopladoencender el sistema, y déjela allíhasta que el menú de programación del CountIR desa- parezca de la pantalla. Para mayores detalles consulte el Manual del Operador del CountIR.

Ridge Tool Company

35

Page 37
Image 37
RIDGID 120V manual Figura 8 Cable del sistema SeeSnake, Clavija/Orificio Función Neutro +12V CC Señal de video

120V specifications

RIDGID, a trusted name in professional-grade tools, offers the RIDGID 120V, a powerful electric tool that embodies innovation and durability. Engineered for both heavy-duty applications and everyday tasks, this tool is designed to meet the demanding needs of professionals in various industries, including plumbing, construction, and HVAC.

One of the standout features of the RIDGID 120V is its robust 120V motor, providing ample power for cutting, drilling, and shaping materials swiftly and efficiently. This capability allows users to tackle challenging projects without interruption, enhancing productivity in any work environment. The motor is not only powerful but also designed to ensure consistent performance, even under heavy loads.

Incorporated within the RIDGID 120V are advanced technologies aimed at user convenience and safety. The tool features an ergonomic design that offers a comfortable grip, reducing user fatigue during extended periods of usage. This is especially vital for professionals who rely on their tools for several hours a day. Additionally, the safety features, including overload protection and a sturdy casing, ensure longevity and reliability, safeguarding the user against potential hazards.

Another key characteristic of the RIDGID 120V is its versatility. The tool is compatible with a variety of attachments and accessories, enabling users to customize their setup according to the specific requirements of the task at hand. This adaptability makes the RIDGID 120V a valuable addition to any toolbox, facilitating everything from precise drilling to aggressive cutting.

Portability is also a significant factor with the RIDGID 120V. Its lightweight yet durable construction enables easy transport from one job site to another, allowing professionals to work efficiently without being weighed down by cumbersome equipment. The integrated power cord is designed for easy maneuverability, ensuring that users can work freely without being confined to a limited range.

In summary, the RIDGID 120V distinguishes itself through a combination of power, safety, ergonomics, and versatility. It is designed to meet the rigorous demands of professionals while ensuring user comfort and operational efficiency. With its impressive features and innovative technologies, the RIDGID 120V stands out as a leader in the electric tool market, making it an essential tool for any professional's arsenal.