Black and White Monitor+VCR, Color Monitor+VCR

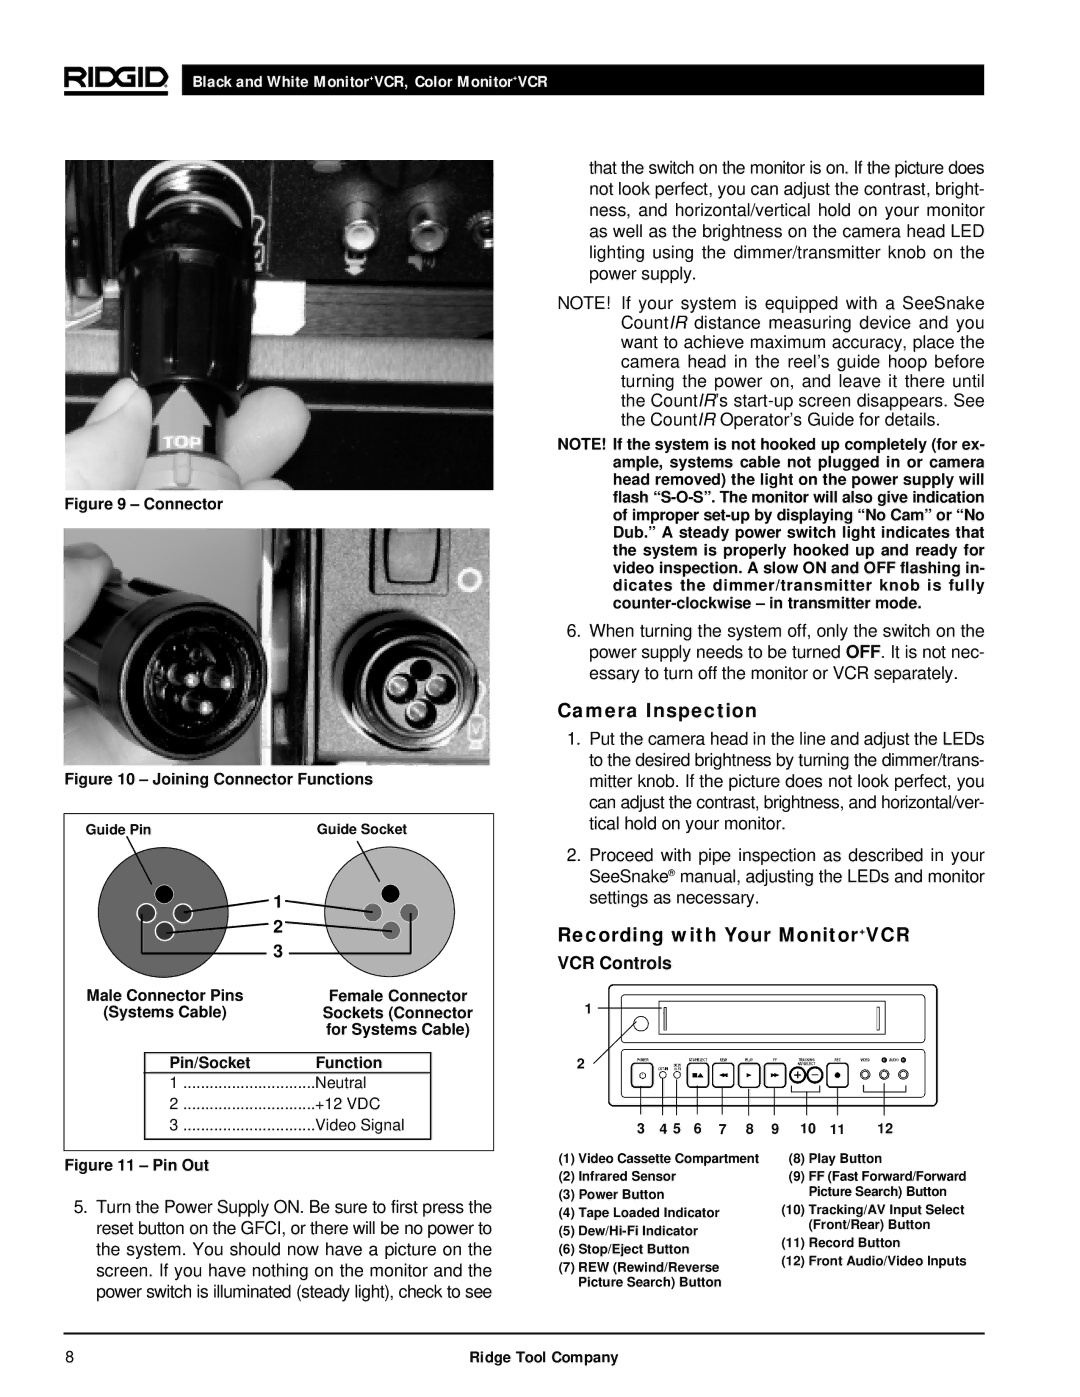
Figure 9 – Connector

Figure 10 – Joining Connector Functions

Guide PinGuide Socket


1


2


3


Male Connector Pins


Female Connector


(Systems Cable)


Sockets (Connector


for Systems Cable)


Pin/Socket


Function


1


Neutral


2


+12 VDC


3


Video Signal


Figure 11 – Pin Out

5.Turn the Power Supply ON. Be sure to first press the reset button on the GFCI, or there will be no power to the system. You should now have a picture on the screen. If you have nothing on the monitor and the power switch is illuminated (steady light), check to see

that the switch on the monitor is on. If the picture does not look perfect, you can adjust the contrast, bright- ness, and horizontal/vertical hold on your monitor as well as the brightness on the camera head LED lighting using the dimmer/transmitter knob on the power supply.

NOTE! If your system is equipped with a SeeSnake CountIR distance measuring device and you want to achieve maximum accuracy, place the camera head in the reel’s guide hoop before turning the power on, and leave it there until the CountIR’s start-up screen disappears. See the CountIR Operator’s Guide for details.

NOTE! If the system is not hooked up completely (for ex- ample, systems cable not plugged in or camera head removed) the light on the power supply will flash “S-O-S”. The monitor will also give indication of improper set-up by displaying “No Cam” or “No Dub.” A steady power switch light indicates that the system is properly hooked up and ready for video inspection. A slow ON and OFF flashing in- dicates the dimmer/transmitter knob is fully counter-clockwise – in transmitter mode.

6.When turning the system off, only the switch on the power supply needs to be turned OFF. It is not nec- essary to turn off the monitor or VCR separately.

Camera Inspection

1.Put the camera head in the line and adjust the LEDs to the desired brightness by turning the dimmer/trans- mitter knob. If the picture does not look perfect, you can adjust the contrast, brightness, and horizontal/ver- tical hold on your monitor.

2.Proceed with pipe inspection as described in your SeeSnake® manual, adjusting the LEDs and monitor settings as necessary.

Recording with Your Monitor+VCR

VCR Controls


1


2


3

4 5

6

7

8

9

10

11

12


(1)

Video Cassette Compartment


(8)

Play Button

(2)

Infrared Sensor


(9)

FF (Fast Forward/Forward

(3)

Power Button


Picture Search) Button

(4)

Tape Loaded Indicator


(10)

Tracking/AV Input Select

(5)

Dew/Hi-Fi Indicator


(Front/Rear) Button


(11)

Record Button

(6)

Stop/Eject Button


(12)

Front Audio/Video Inputs

(7) REW (Rewind/Reverse


Picture Search) Button

8

Ridge Tool Company

Page 10
Image 10
RIDGID 120V manual Camera Inspection, Recording with Your Monitor+VCR, VCR Controls

120V specifications

RIDGID, a trusted name in professional-grade tools, offers the RIDGID 120V, a powerful electric tool that embodies innovation and durability. Engineered for both heavy-duty applications and everyday tasks, this tool is designed to meet the demanding needs of professionals in various industries, including plumbing, construction, and HVAC.

One of the standout features of the RIDGID 120V is its robust 120V motor, providing ample power for cutting, drilling, and shaping materials swiftly and efficiently. This capability allows users to tackle challenging projects without interruption, enhancing productivity in any work environment. The motor is not only powerful but also designed to ensure consistent performance, even under heavy loads.

Incorporated within the RIDGID 120V are advanced technologies aimed at user convenience and safety. The tool features an ergonomic design that offers a comfortable grip, reducing user fatigue during extended periods of usage. This is especially vital for professionals who rely on their tools for several hours a day. Additionally, the safety features, including overload protection and a sturdy casing, ensure longevity and reliability, safeguarding the user against potential hazards.

Another key characteristic of the RIDGID 120V is its versatility. The tool is compatible with a variety of attachments and accessories, enabling users to customize their setup according to the specific requirements of the task at hand. This adaptability makes the RIDGID 120V a valuable addition to any toolbox, facilitating everything from precise drilling to aggressive cutting.

Portability is also a significant factor with the RIDGID 120V. Its lightweight yet durable construction enables easy transport from one job site to another, allowing professionals to work efficiently without being weighed down by cumbersome equipment. The integrated power cord is designed for easy maneuverability, ensuring that users can work freely without being confined to a limited range.

In summary, the RIDGID 120V distinguishes itself through a combination of power, safety, ergonomics, and versatility. It is designed to meet the rigorous demands of professionals while ensuring user comfort and operational efficiency. With its impressive features and innovative technologies, the RIDGID 120V stands out as a leader in the electric tool market, making it an essential tool for any professional's arsenal.