RIDGID MS1250LZA manual Cutting crown molding, Laying molding flat on the miter table

Models: MS1250LZA

1 34
Download 34 pages 36.72 Kb
Page 28
Image 28

OPERATION

cutting crown molding

Your compound miter saw does an excellent job of cutting crown molding. In general, compound miter saws do a better job of cutting crown molding than any other tool made.

In order to fit properly, crown molding must be compound mitered with extreme accuracy.

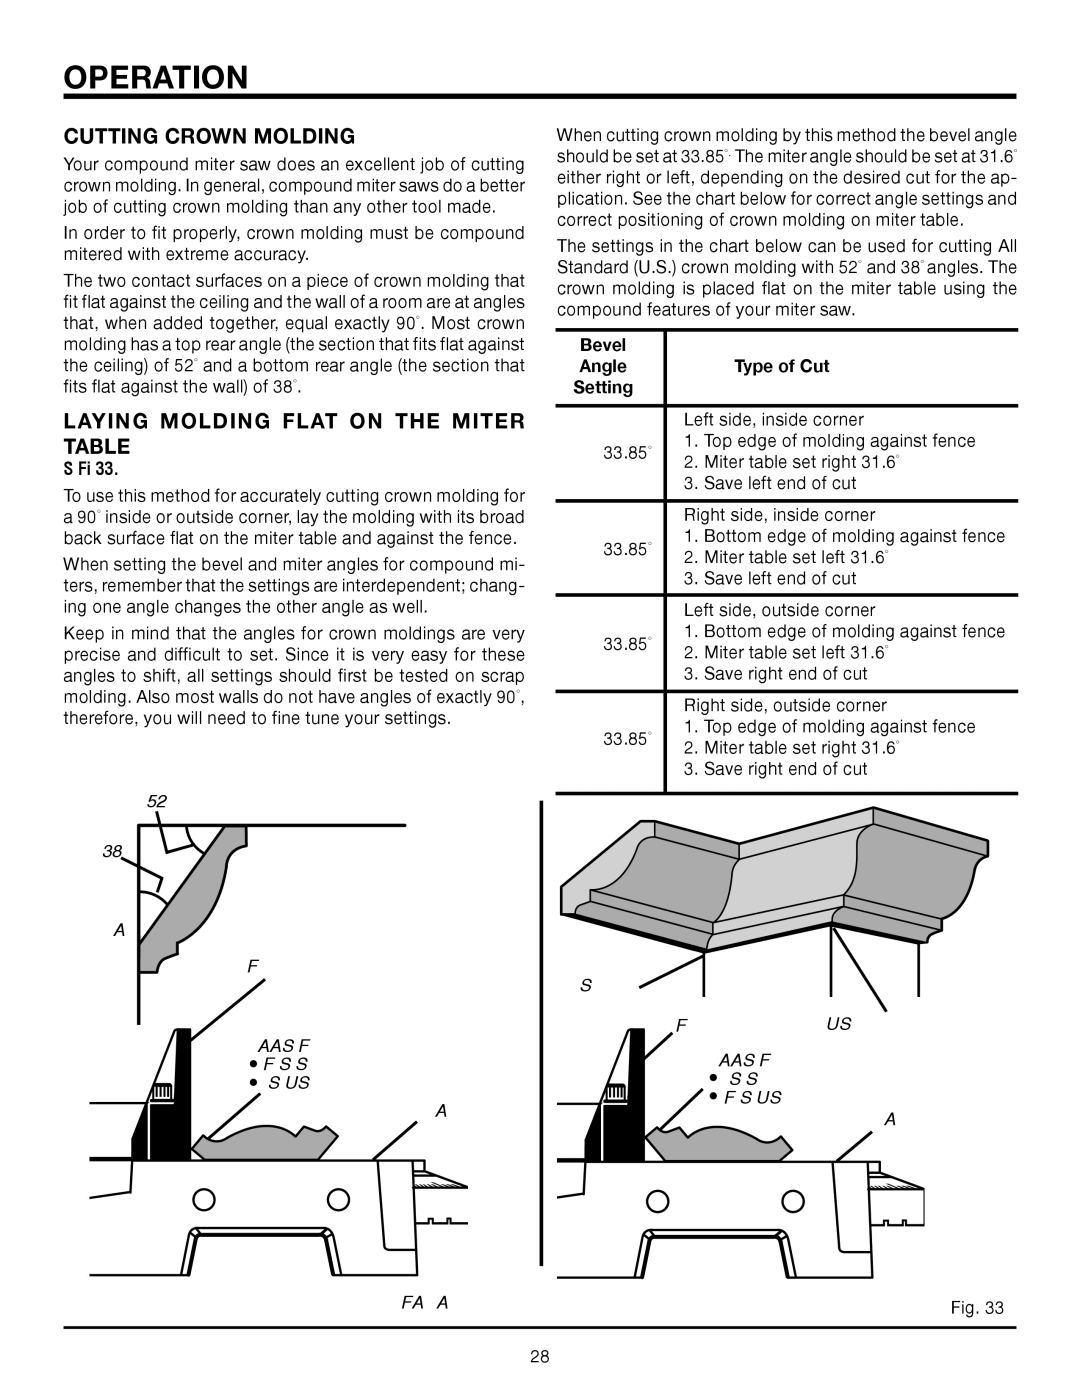
The two contact surfaces on a piece of crown molding that fit flat against the ceiling and the wall of a room are at angles that, when added together, equal exactly 90°. Most crown molding has a top rear angle (the section that fits flat against the ceiling) of 52° and a bottom rear angle (the section that fits flat against the wall) of 38°.

Laying molding flat on the miter table

See Figure 33.

To use this method for accurately cutting crown molding for a 90° inside or outside corner, lay the molding with its broad back surface flat on the miter table and against the fence.

When setting the bevel and miter angles for compound mi- ters, remember that the settings are interdependent; chang- ing one angle changes the other angle as well.

Keep in mind that the angles for crown moldings are very precise and difficult to set. Since it is very easy for these angles to shift, all settings should first be tested on scrap molding. Also most walls do not have angles of exactly 90°, therefore, you will need to fine tune your settings.


52°

ceiling


38°


w


a


l


Fence

l


Top edge against fence =

LEFT SIDE, INSIDE CORNER

RIGHT SIDE, OUTSIDE CORNER

MITER Table

When cutting crown molding by this method the bevel angle should be set at 33.85°. The miter angle should be set at 31.6° either right or left, depending on the desired cut for the ap- plication. See the chart below for correct angle settings and correct positioning of crown molding on miter table.

The settings in the chart below can be used for cutting All Standard (U.S.) crown molding with 52° and 38° angles. The crown molding is placed flat on the miter table using the compound features of your miter saw.

Bevel


Angle


Type of Cut

Setting


Left side, inside corner

33.85°


1.

Top edge of molding against fence


2. Miter table set right 31.6°


3.

Save left end of cut


Right side, inside corner

33.85°


1.

Bottom edge of molding against fence


2. Miter table set left 31.6°


3.

Save left end of cut


Left side, outside corner

33.85°


1.

Bottom edge of molding against fence


2. Miter table set left 31.6°


3.

Save right end of cut


Right side, outside corner

33.85°


1.

Top edge of molding against fence


2. Miter table set right 31.6°


3.

Save right end of cut


inside corner

Fence

outside corner

BOTTOM edge against fence =

RIGHT SIDE, INSIDE CORNER

LEFT SIDE, OUTSIDE CORNER

MITER Table

crown molding flat on miter table

Fig. 33


28

Page 28
Image 28
RIDGID MS1250LZA manual Cutting crown molding, Laying molding flat on the miter table

MS1250LZA specifications

The RIDGID MS1250LZA is a versatile and robust miter saw designed for professionals and DIY enthusiasts alike. This powerful tool is engineered to deliver precision cutting for a wide range of materials, including wood, plastic, and light metals, making it an ideal choice for carpenters, contractors, and hobbyists.

One of the standout features of the MS1250LZA is its impressive 15-amp motor, which provides ample power to handle tough cutting tasks with ease. The motor is capable of reaching up to 5000 RPM, ensuring clean and accurate cuts every time. Whether you are making crosscuts, miters, or bevel cuts, this saw can handle it all with precision and efficiency.

The MS1250LZA incorporates a dual bevel design, allowing for both left and right angles of bevel cuts. This flexibility enhances the saw's usability, enabling users to create compound cuts without needing to flip the workpiece, which saves time and increases accuracy. The intuitive bevel adjustment lever allows for quick and straightforward adjustments, ensuring that you can easily switch between angles as needed.

Another significant technological advancement in the MS1250LZA is the laser guide system. This feature projects a clear, precise line on the cutting surface, providing enhanced visibility and accuracy. Users can easily line up their cuts without the guesswork, making it especially beneficial for intricate projects or when working with small pieces.

The saw's sliding feature is also noteworthy, as it allows for larger cuts with ease. The sliding arm can handle wider materials, making it perfect for framing lumber, larger boards, or even plywood sheets. Additionally, the positive stops on the miter table provide easy access to commonly used angles, streamlining the workflow for repetitive cuts.

Safety is paramount in any power tool, and the RIDGID MS1250LZA includes several safety features that protect both the user and the workpiece. The electric brake stops the blade quickly after the trigger is released, minimizing the risk of accidents. A transparent blade guard allows users to see the cutting area while keeping hands and fingers safe from the blade.

In terms of portability, the MS1250LZA is relatively lightweight and features a sturdy carrying handle, making it easy to transport between job sites. The durable construction ensures that it can withstand the rigors of professional use while delivering reliable performance over time.

Overall, the RIDGID MS1250LZA miter saw presents an impressive combination of power, flexibility, and safety features, making it an indispensable tool for any serious woodworking or construction project. With its user-friendly design and high-performance capabilities, it is sure to enhance the productivity and efficiency of its users.