Rosen Entertainment Systems T12 Specifications, English, Service and Optional Parts List, Fmm Out

Models: T12 T10

1 18
Download 18 pages 40.04 Kb
Page 3
Image 3
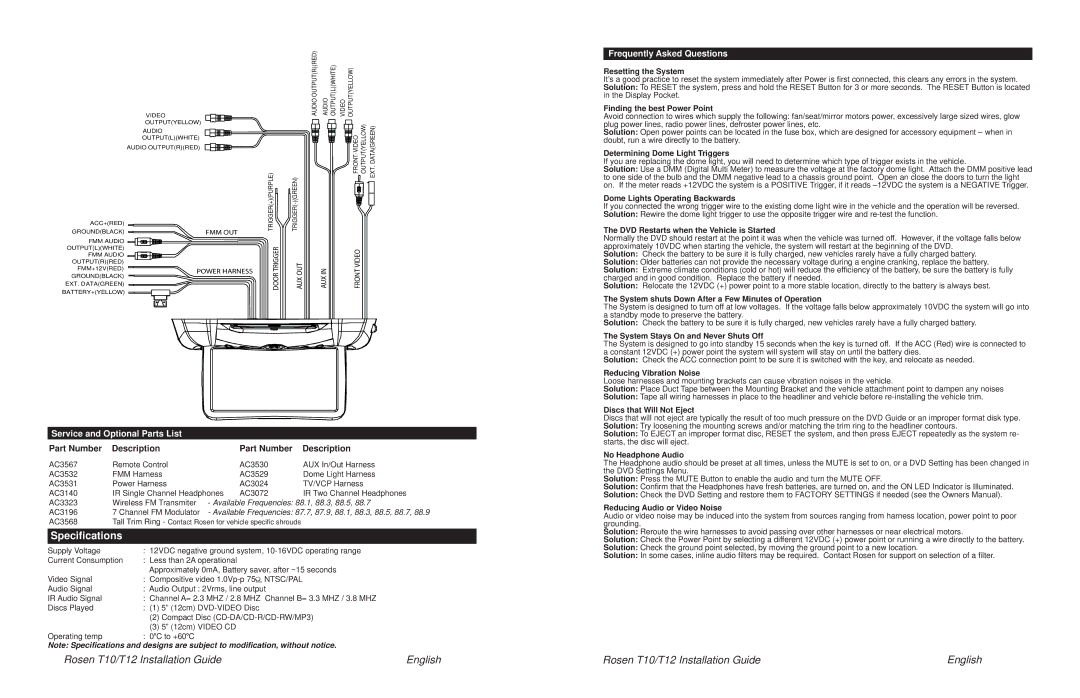
FMM OUT


VIDEO


AUDIO OUTPUT(R)(RED)

AUDIO OUTPUT(L)(WHITE)

VIDEO OUTPUT(YELLOW)


OUTPUT(YELLOW)

(PURPLE))+TRIGGER(

(GREEN))-TRIGGER(


VIDEO-FRONT OUTPUT(YELLOW) EXT.DATA(GREEN)


AUDIO


OUTPUT(L)(WHITE)


AUDIO OUTPUT(R)(RED)


ACC+(RED)


GROUND(BLACK)

FMM OUT


FMM AUDIO


OUTPUT(L)(WHITE)


TRIGGERDOOR

OUTAUX

INAUX

VIDEOFRONT

FMM AUDIO


OUTPUT(R)(RED)


FMM+12V(RED)

POWER HARNESS


GROUND(BLACK)


EXT. DATA(GREEN)


BATTERY+(YELLOW)


Service and Optional Parts List

Part Number

Description

Part Number

Description

AC3567

Remote Control

AC3530

AUX In/Out Harness

AC3532

FMM Harness

AC3529

Dome Light Harness

AC3531

Power Harness

AC3024

TV/VCP Harness

AC3140

IR Single Channel Headphones

AC3072

IR Two Channel Headphones

AC3323

Wireless FM Transmiter - Available Frequencies: 88.1, 88.3, 88.5, 88.7

AC3196

7 Channel FM Modulator - Available Frequencies: 87.7, 87.9, 88.1, 88.3, 88.5, 88.7, 88.9

AC3568

Tall Trim Ring - Contact Rosen for vehicle specific shrouds


Specifications


Supply Voltage


: 12VDC negative ground system, 10-16VDC operating range

Current Consumption

: Less than 2A operational


Approximately 0mA, Battery saver, after ~15 seconds

Video Signal


: Compositive video 1.0Vp-p 75 , NTSC/PAL

Audio Signal


: Audio Output : 2Vrms, line output


IR Audio Signal


: Channel A= 2.3 MHZ / 2.8 MHZ Channel B= 3.3 MHZ / 3.8 MHZ

Discs Played


: (1) 5” (12cm) DVD-VIDEO Disc


(2) Compact Disc (CD-DA/CD-R/CD-RW/MP3)


(3) 5” (12cm) VIDEO CD


Operating temp


: 0 C to +60 C


Note: Specifications and designs are subject to modification, without notice.

Frequently Asked Questions

Resetting the System

It’s a good practice to reset the system immediately after Power is first connected, this clears any errors in the system. Solution: To RESET the system, press and hold the RESET Button for 3 or more seconds. The RESET Button is located in the Display Pocket.

Finding the best Power Point

Avoid connection to wires which supply the following: fan/seat/mirror motors power, excessively large sized wires, glow plug power lines, radio power lines, defroster power lines, etc.

Solution: Open power points can be located in the fuse box, which are designed for accessory equipment – when in doubt, run a wire directly to the battery.

Determining Dome Light Triggers

If you are replacing the dome light, you will need to determine which type of trigger exists in the vehicle.

Solution: Use a DMM (Digital Multi Meter) to measure the voltage at the factory dome light. Attach the DMM positive lead to one side of the bulb and the DMM negative lead to a chassis ground point. Open an close the doors to turn the light on. If the meter reads +12VDC the system is a POSITIVE Trigger, if it reads –12VDC the system is a NEGATIVE Trigger.

Dome Lights Operating Backwards

If you connected the wrong trigger wire to the existing dome light wire in the vehicle and the operation will be reversed. Solution: Rewire the dome light trigger to use the opposite trigger wire and re-test the function.

The DVD Restarts when the Vehicle is Started

Normally the DVD should restart at the point it was when the vehicle was turned off. However, if the voltage falls below approximately 10VDC when starting the vehicle, the system will restart at the beginning of the DVD.

Solution: Check the battery to be sure it is fully charged, new vehicles rarely have a fully charged battery.

Solution: Older batteries can not provide the necessary voltage during a engine cranking, replace the battery.

Solution: Extreme climate conditions (cold or hot) will reduce the efficiency of the battery, be sure the battery is fully charged and in good condition. Replace the battery if needed.

Solution: Relocate the 12VDC (+) power point to a more stable location, directly to the battery is always best.

The System shuts Down After a Few Minutes of Operation

The System is designed to turn off at low voltages. If the voltage falls below approximately 10VDC the system will go into a standby mode to preserve the battery.

Solution: Check the battery to be sure it is fully charged, new vehicles rarely have a fully charged battery.

The System Stays On and Never Shuts Off

The System is designed to go into standby 15 seconds when the key is turned off. If the ACC (Red) wire is connected to a constant 12VDC (+) power point the system will system will stay on until the battery dies.

Solution: Check the ACC connection point to be sure it is switched with the key, and relocate as needed.

Reducing Vibration Noise

Loose harnesses and mounting brackets can cause vibration noises in the vehicle.

Solution: Place Duct Tape between the Mounting Bracket and the vehicle attachment point to dampen any noises

Solution: Tape all wiring harnesses in place to the headliner and vehicle before re-installing the vehicle trim.

Discs that Will Not Eject

Discs that will not eject are typically the result of too much pressure on the DVD Guide or an improper format disk type. Solution: Try loosening the mounting screws and/or matching the trim ring to the headliner contours.

Solution: To EJECT an improper format disc, RESET the system, and then press EJECT repeatedly as the system re- starts, the disc will eject.

No Headphone Audio

The Headphone audio should be preset at all times, unless the MUTE is set to on, or a DVD Setting has been changed in the DVD Settings Menu.

Solution: Press the MUTE Button to enable the audio and turn the MUTE OFF.

Solution: Confirm that the Headphones have fresh batteries, are turned on, and the ON LED Indicator is Illuminated.

Solution: Check the DVD Setting and restore them to FACTORY SETTINGS if needed (see the Owners Manual).

Reducing Audio or Video Noise

Audio or video noise may be induced into the system from sources ranging from harness location, power point to poor grounding.

Solution: Reroute the wire harnesses to avoid passing over other harnesses or near electrical motors.

Solution: Check the Power Point by selecting a different 12VDC (+) power point or running a wire directly to the battery.

Solution: Check the ground point selected, by moving the ground point to a new location.

Solution: In some cases, inline audio filters may be required. Contact Rosen for support on selection of a filter.

Rosen T10/T12 Installation Guide

English

Rosen T10/T12 Installation Guide

English

Page 3
Image 3
Rosen Entertainment Systems T12, T10 Specifications, English, Service and Optional Parts List, Frequently Asked Questions