HOW TO ASSEMBLE

6

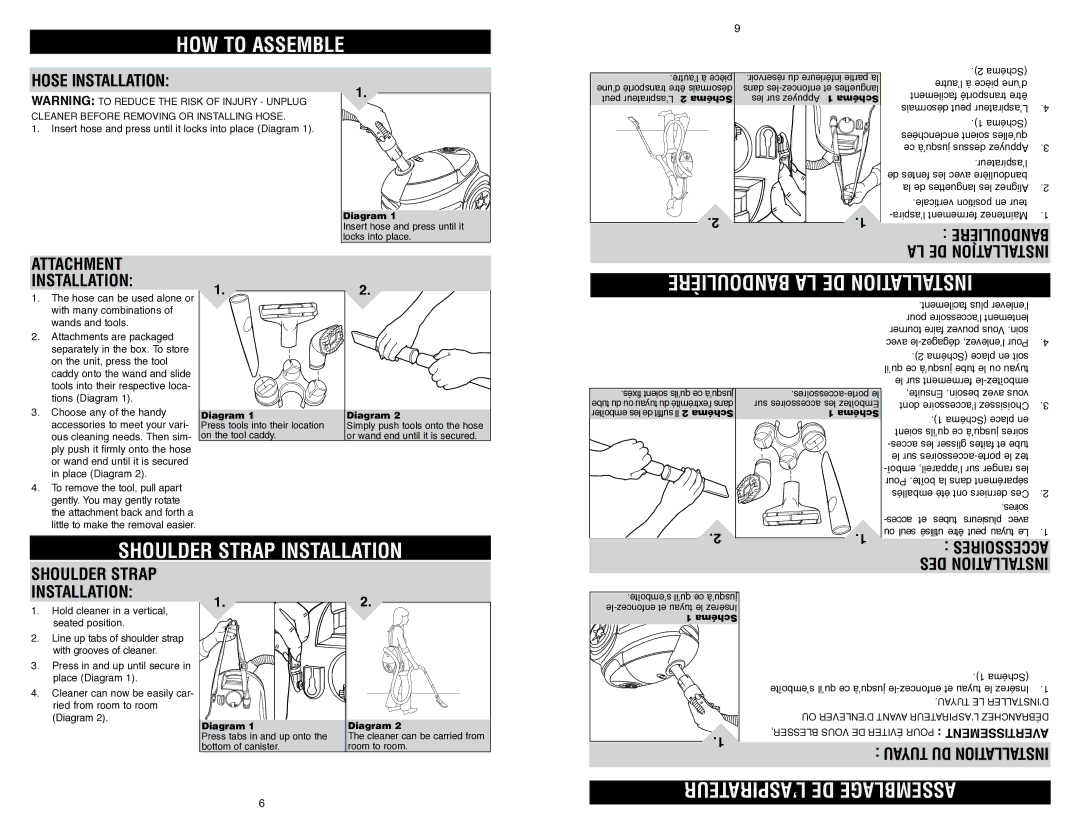
HOSE INSTALLATION:

warning: to reduce the risk of injury - Unplug cleaner before REMOVING OR INSTALLING HOSE.

1. Insert hose and press until it locks into place (Diagram 1).

1.

Diagram 1

Insert hose and press until it locks into place.

.l’autre à pièce

.réservoir du inférieure partie la

.2) (Schéma


l’autre à pièce d’une


d’une transporté être désormais

dans les-enfoncez et languettes


facilement transporté être


peut ’aspirateurL 2 Schéma

les sur Appuyez 1 Schéma

.4


désormais peut ’aspirateurL


.1) (Schéma


enclenchées soient qu’elles

.3


ce jusqu’à dessus Appuyez


.l’aspirateur


de fentes les avec bandoulière

.2


la de languettes les Alignez


.verticale position en teur

.1

.2

.1

-l’aspira fermement Maintenez

: BANDOULIÈRE


LA DE INSTALLATION

ATTACHMENT

INSTALLATION:

1. The hose can be used alone or

1.

2.

BANDOULIÈRE LA DE INSTALLATION

with many combinations of

wands and tools.

2. Attachments are packaged

separately in the box. To store

on the unit, press the tool

caddy onto the wand and slide

tools into their respective loca-

tions (Diagram 1).

3. Choose any of the handy

accessories to meet your vari-

ous cleaning needs. Then sim-

ply push it firmly o­nto the hose

or wand end until it is secured

in place (Diagram 2).

4. To remove the tool, pull apart

gently. You may gently rotate

the attachment back and forth a

little to make the removal easier.

Diagram 1

Press tools into their location on the tool caddy.

Diagram 2

Simply push tools onto the hose or wand end until it is secured.

.fixés soient qu’ils ce jusqu’à tube du ou tuyau du l’extrémité dans emboîter les de suffit Il 2 Schéma


.facilement plus l’enlever


pour l’accessoire lentement


tourner faire pouvez Vous .soin

.4

avec le-dégagez l’enlevez, Pour

.2) (Schéma place en soit


qu’il ce jusqu’à tube le ou tuyau


le sur fermement le-emboîtez


.accessoires-porte le

nsuite,E.besoin avez vous


sur accessoires les mboîtezE

dont l’accessoire hoisissezC.3

1 Schéma

.1) (Schéma place en


soient qu’ils ce jusqu’à soires


acces les glisser faites et tube


le sur accessoires-porte le tez


emboî l’appareil, sur ranger les


Pour .boîte la dans séparément


emballés été ont derniersC.2 es

acces

.soires


et tubes plusieurs avec


Shoulder Strap Installation

.2

.1

ou seul utilisé être peut tuyau Le

.1

: ACCESSOIRES

Shoulder Strap

DES INSTALLATION

Installation:

1.Hold cleaner in a vertical, seated position.

2.Line up tabs of shoulder strap with grooves of cleaner.

3.Press in and up until secure in place (Diagram 1).

4.Cleaner can now be easily car- ried from room to room (Diagram 2).

1.

Diagram 1

Press tabs in and up onto the bottom of canister.

2.

Diagram 2

The cleaner can be carried from room to room.

.s’emboîte qu’il ce jusqu’à

le-enfoncez et tuyau le Insérez

1 Schéma

.1


.1) (Schéma


s’emboîte qu’il ce jusqu’à le-enfoncez et tuyau le Insérez .1

LE


.AU

LETU YD’INSTA

D’ avantENLEOUVER

Débran


blevoussser d,e

pour

évit


ertissementav


: TUYAU DU INSTALLATION


6

L’ASPIRATEUR DE ASSEMBLAGE

Page 6
Image 6
Royal Appliance S10 owner manual HOW to Assemble, Bandoulière LA DE Installation, Shoulder Strap Installation

S10 specifications

The Royal Appliance S10 is a state-of-the-art vacuum cleaner designed to meet the diverse needs of modern households. With its sleek design and advanced technology, the S10 promises not only efficiency but also ease of use. This versatile cleaning machine combines power, convenience, and innovative features that make it a standout in the market.

One of the main features of the Royal Appliance S10 is its powerful suction capability. Equipped with a high-efficiency motor, it effortlessly picks up dirt, dust, and debris from various surfaces, including carpets, hardwood floors, and tiled areas. The adjustable suction settings allow users to tailor the cleaning power based on the surface type, ensuring optimal performance without damaging delicate fabrics.

The S10 also incorporates advanced filtration technology. It boasts a multi-stage filtration system that captures 99.9% of allergens and fine particles, making it an excellent choice for allergy sufferers. The HEPA filter is washable, ensuring longevity and cost-effectiveness while maintaining a clean and healthy home environment.

Another notable characteristic of the Royal Appliance S10 is its user-friendly design. It features a lightweight body that makes it easy to maneuver around furniture and tight spaces. The vacuum is also equipped with ergonomic handles and an intuitive control panel, allowing for effortless operation. With a cord length that allows for extensive reach without constant unplugging, users can clean larger areas efficiently.

Moreover, the S10 comes with a range of attachments to enhance its versatility. It includes a crevice tool for narrow spaces, a dusting brush for delicate surfaces, and a turbo brush designed specifically for pet hair removal. These accessories make it an ideal choice for homes with pets, as they effortlessly tackle fur and dander.

The Royal Appliance S10 embodies durability and quality with its robust construction and premium materials. This not only enhances its performance but also extends its lifespan. With a focus on efficiency and user satisfaction, the S10 is designed for long-term use.

In summary, the Royal Appliance S10 is a powerful, versatile, and user-friendly vacuum cleaner that leverages cutting-edge technology to provide exceptional cleaning results. Its multi-stage filtration system, powerful motor, ergonomic design, and versatile attachments make it a perfect fit for any home, ensuring that cleaning is not just a chore but a satisfying experience. Investing in the S10 means investing in a cleaner, healthier living space.