Bag removal and replacement

8 .tuyau du l’orifice avec alignée est poussière à sac du l’embouchure que Vérifiez

.tuyau le Rebranchez

.5

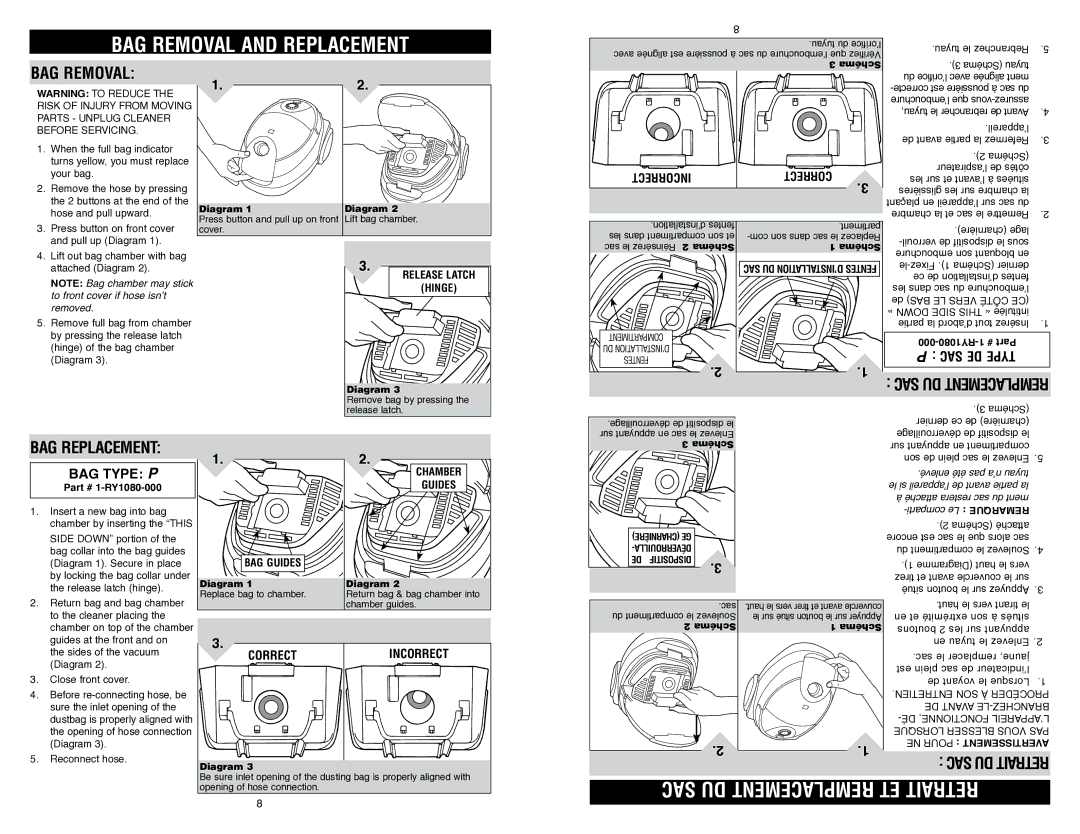
Bag Removal:

WARNING: TO REDUCE THE RISK OF INJURY FROM MOVING PARTS - UNPLUG CLEANER BEFORE SERVICING.

1.

When the full bag indicator


turns yellow, you must replace


your bag.

2.

Remove the hose by pressing


the 2 buttons at the end of the


hose and pull upward.

1.2.

Diagram 1

Diagram 2

Press button and pull up on front

Lift bag chamber.

3 Schéma

INCORRECT

CORRECT


.3

.3) (Schéma tuyau


du l’orifice avec alignée ment


correcte est poussière à sac du


l’embouchure que vous-assurez

.4

tuyau, le rebrancher de Avant

.l’appareil

.3

de avant partie la Refermez

.2) (Schéma


l’aspirateur de côtés


les sur et l’avant à situées


glissières les sur chambre la


plaçant en l’appareil sur sac du

.2

chambre la et sac le Remettre

3.

Press button on front cover


and pull up (Diagram 1).

4.

Lift out bag chamber with bag


attached (Diagram 2).


NOTE: Bag chamber may stick


to front cover if hose isn’t


removed.

5.

Remove full bag from chamber


by pressing the release latch


(hinge) of the bag chamber


(Diagram 3).

cover.

3.


Release Latch


(Hinge)


Diagram 3

Remove bag by pressing the

.d’installation fentes les dans compartiment son et sac le Réinsérez 2 Schéma

TIMAERNTCOMP DNS’I TALLATIO DUN FE NTE S .2

.partiment com son dans sac le Replacez 1 Schéma

SAC DU D’INSTALLATION FENTES

.1

.(charnière) lage


-


-verrouil de dispositif le sous


embouchure son bloquant en


le-Fixez .1) (Schéma dernier


ce de d’installation fentes


les dans sac du l’embouchure

RSE

de BAS)LE

CÔT CEÉ(V

SID THIS « intitulée

.1


partie la d’abord tout Insérez


000-RY1080-1 # Part


P : SAC DE TYPE 


sac du:

emplacementR

release latch.

.3) (Schéma

Bag Replacement:

BAG TYPE: P

Part # 1-RY1080-000

1. Insert a new bag into bag

chamber by inserting the “THIS 

SIDE DOWN” portion of the

bag collar into the bag guides

(Diagram 1). Secure in place

by locking the bag collar under

the release latch (hinge).

2. Return bag and bag chamber

to the cleaner placing the

chamber on top of the chamber

1.

BAG GUIDES

Diagram 1

Replace bag to chamber.

2.

CHAMBER

GUIDES

Diagram 2

Return bag & bag chamber into chamber guides.

.déverrouillage de dispositif le


sur appuyant en sac le nlevezE


3 Schéma


() GE


-DÉVERROUILLA


DE DISPOSITIF

.3


.sac

.haut le vers tirer et avant couvercle

du compartiment le Soulevez

le sur situé bouton le sur Appuyer

2 Schéma

1 Schéma

dernier ce de (charnière)

déverrouillage de dispositif le

sur appuyant en compartiment

son de plein sac .le5 nlevezE

.enlevé été pas n’a tuyau

le si l’appareil de avant partie la

à attaché restera sac du ment

comparti Le

-


: REMARQUE

.2) (Schéma attaché

encore est sac le que alors sac

du compartiment le Soulevez .4

.1) (Diagramme haut le vers

tirez et avant couvercle le sur

situé bouton le sur Appuyez .3

.haut le vers tirant le

en et extrémité son à situés


guides at the front and on


the sides of the vacuum


(Diagram 2).

3.

Close front cover.

4.

Before re-connecting hose, be


sure the inlet opening of the


dustbag is properly aligned with


the opening of hose connection


(Diagram 3).

5.

Reconnect hose.

3.

INCORRECT

CORRECT

Diagram 3

Be sure inlet opening of the dusting bag is properly aligned with

.2

.1

boutons 2 les sur appuyant


en tuyau le Enlevez .2


.sac le remplacer jaune,


est plein sac de l’indicateur


de voyant le Lorsque .1

DSONCÉ

NTRE

ETI E.N

PRO


BRAN


CHD

ORSQUL

FON TIONNC’APPARLED ,

É

EB VOUS PAS


: ERTISSEMENTAV


sac du: RETRAIT


opening of hose connection.

8

sac du remplacement et RETRAIT

Page 8
Image 8
Royal Appliance S10 owner manual Bag removal and replacement, Sac du remplacement et Retrait, Bag Removal, Bag Replacement

S10 specifications

The Royal Appliance S10 is a state-of-the-art vacuum cleaner designed to meet the diverse needs of modern households. With its sleek design and advanced technology, the S10 promises not only efficiency but also ease of use. This versatile cleaning machine combines power, convenience, and innovative features that make it a standout in the market.

One of the main features of the Royal Appliance S10 is its powerful suction capability. Equipped with a high-efficiency motor, it effortlessly picks up dirt, dust, and debris from various surfaces, including carpets, hardwood floors, and tiled areas. The adjustable suction settings allow users to tailor the cleaning power based on the surface type, ensuring optimal performance without damaging delicate fabrics.

The S10 also incorporates advanced filtration technology. It boasts a multi-stage filtration system that captures 99.9% of allergens and fine particles, making it an excellent choice for allergy sufferers. The HEPA filter is washable, ensuring longevity and cost-effectiveness while maintaining a clean and healthy home environment.

Another notable characteristic of the Royal Appliance S10 is its user-friendly design. It features a lightweight body that makes it easy to maneuver around furniture and tight spaces. The vacuum is also equipped with ergonomic handles and an intuitive control panel, allowing for effortless operation. With a cord length that allows for extensive reach without constant unplugging, users can clean larger areas efficiently.

Moreover, the S10 comes with a range of attachments to enhance its versatility. It includes a crevice tool for narrow spaces, a dusting brush for delicate surfaces, and a turbo brush designed specifically for pet hair removal. These accessories make it an ideal choice for homes with pets, as they effortlessly tackle fur and dander.

The Royal Appliance S10 embodies durability and quality with its robust construction and premium materials. This not only enhances its performance but also extends its lifespan. With a focus on efficiency and user satisfaction, the S10 is designed for long-term use.

In summary, the Royal Appliance S10 is a powerful, versatile, and user-friendly vacuum cleaner that leverages cutting-edge technology to provide exceptional cleaning results. Its multi-stage filtration system, powerful motor, ergonomic design, and versatile attachments make it a perfect fit for any home, ensuring that cleaning is not just a chore but a satisfying experience. Investing in the S10 means investing in a cleaner, healthier living space.