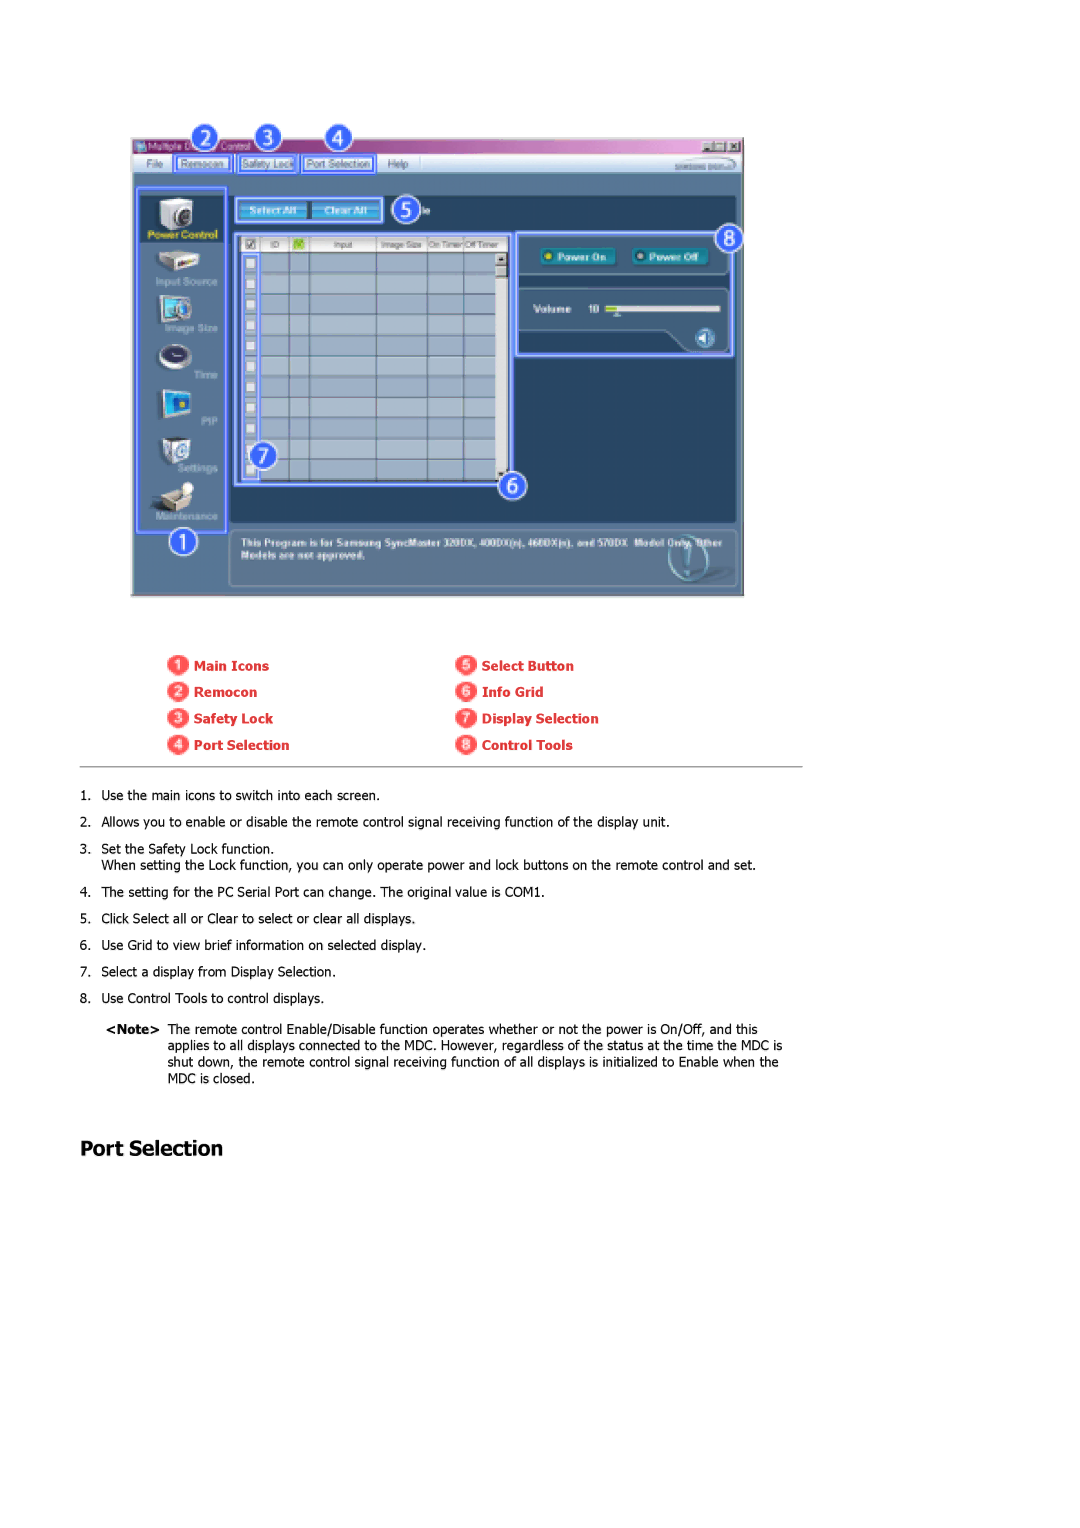
SyncMaster 400DX / 460DX
Model
Notational Power Installation Clean Others
Safety Instructions
Safety Instructions
Introduction Connections Using the Software Adjusting the LCD Display
Installation
Use only a properly grounded plug and receptacle
Do not drop the LCD Display when moving it
Clean
Put down the LCD Display carefully
Make sure to unplug the power cord before cleaning the product
Others
Do not cover the vents on the LCD Display cabinet
Make sure there are more than two people when moving the product
z A falling product may cause injury to the person or even fatality
1995~2007 SAMSUNG. ALL Rights Reserved
Package Contents Your LCD Display Machanical Layout
Introduction
Safety Instructions Introduction
Connections Using the Software Adjusting the LCD Display
Semi Stand
Remote Control
Batteries AAA X
Wall Mount KIT
9 Power indicator
3 Adjust buttons Left-Right buttons/ Volume buttons
7 Power button
10 Remote Control Sensor
6 HDMI IN
2 POWER IN
3 REMOTE OUT/IN
7 DVI / PC IN RGB PC Video Connection Terminal
13 AV OUT VIDEO VIDEO Connection Terminal AV mode Output
Remote Control
12 AV AUDIO IN L-AUDIO-R LCD Display Audio Connection Terminal Input
14 AV IN VIDEO VIDEO Connection Terminal Input
14. ENTER/PRE-CH 15 . CH/P 16. SOURCE 17. INFO 18. EXIT
2. MAGICNET 3. MDC 4. LOCK 5. MagicNet buttons 6.+100
9. TTX/MIX 10. MENU 11. ENTER 12. P.MODE 13. AUTO
19. Up-Down Left-Right buttons 20. S.MODE 21. STILL 22. FM RADIO
13 AUTO
10 MENU
11 ENTER
14 ENTER/PRE-CH
FM Stereo
Default
Audio Type MTS/SMode
26 PIP
NETWORK MODEL SIZE PROTECTION GLASS + NETWORK MODEL SIZE Weight
SyncMaster 400DX
1. Mechanical Layout
2. Monitor Head
3. Stand
NETWORK MODEL SIZE PROTECTION GLASS + NETWORK MODEL SIZE
4. Speaker
5. Installation VESA Bracket
Dimensions
6. Wall Bracket Installation
Wall Bracket Assembly
Components
To mount the product on the wall bracket
Wall Bracket Angle Adjustment
1. Mechanical Layout
SyncMaster 460DX
NETWORK MODEL SIZE PROTECTION GLASS + NETWORK MODEL SIZE Weight
z Set 31.30 kg with Basic Stand
37.6 kg with Basic Stand
2. Monitor Head
3. Stand
42.4 kg with Basic Stand / option protection glass
4. Speaker
5. Installation VESA Bracket
Dimensions
6. Wall Bracket Installation
Wall Bracket Assembly
Components
To mount the product on the wall bracket
Wall Bracket Angle Adjustment
Installing the Stand KIT Connecting the LCD Display
Connections
Safety Instructions Introduction Connections
Using the Software Adjusting the LCD Display Troubleshooting
Connecting the LCD Display
Using a Power cord with Earth
Connecting a Computer
Connecting a VCR
Connecting a DVD Player
Connecting a Camcorder
Connecting a DTV Set Top Box
Connecting Speakers
Connecting to an Audio System
Connecting to a Wired Remote Control
Connecting HDMI
Connecting Using a DVI to HDMI Cable
Introduction
Main Screen
Main Icons
Port Selection
Safety Lock
Select Button
Power Control
Info Grid shows some basic information necessary to Power Control
1 Power Status 2 Input 3 Image Size 4 On Timer 5 Off Timer
Input Source
The Power Control feature is available for all displays
Image Size PC, BNC, DVI
Image Size TV, AV, S-Video, Component, DVIHDCP
The Input source of MagicNet works only on MagicNet model
The Input source of TV works only on TV model
Time
PIP PIP Size
PIP PIP Source
PIP Size can be controlled with turning on the LCD Display power
1 PIP Source
PIP Source can be controlled with turning on the LCD Display power
PIP S-Video Mode
2 PC Changes the source of the PIP of the selected display to PC
Settings Picture
The Input source of MagicNet works only on MagicNet model
Settings Picture PC
Color Temp is only enabled if the Color Tone is set to Off
The Input source of TV works only on TV model
The Input source of MagicNet works only on MagicNet model
Settings Audio
Color Temp is only enabled if the Color Tone is set to Off
The Input source of TV works only on TV model
Settings Image Lock
Maintenance Lamp Control
Maintenance Scroll
Maintenance Video Wall
Troubleshooting
Settings Value Display In Multiple Display Mode
Adjusting the LCD Display
Safety Instructions Introduction Connections Using the Software
Component / HDMI Mode Sound Setup Multi Control Direct Functions
The direct button on the remote control is the SIZE button 5 Position
The direct button on the remote control is the SOURCE button 3 Swap
The direct button on the remote control is the SWAP button 4 Size
6 Transparency
2 Internet
The direct button on the remote control is the M/B button
1 Entertain
3 Text
1 Coarse
The direct button on the remote control is the AUTO button
1 On 2 Off
2 Fine
1 Contrast
1 Signal Balance
2 Signal Control
2 Brightness
2 Brightness
The direct button on the remote control is the P.MODE button
1 Contrast
3 Sharpness
1 Off 2 On
1 Off 2 On
1 Off 2 On
1 Off 2 On
1 Standard
You can hear the sound even when sound value is set to
1 Off 2 On The direct button on the remote control is the SRS button
2 Music
3 On Timer
2 Sub Available Modes PIP ON Setup Available Modes
2 Sleep Timer
4 Off Timer
1 Off 2 On
Five adjustment levels 1, 2, 3, 4, and 4 Vertical
3 Low 4 Opaque
1 Normal 2 Low
Off On 2 Interval
Five adjustment levels 1, 2, 3, 4, and 5 Screen Divider
1 Safety Screen
1~10 Hour 3 Second
Caution Set the Power On time to be loger to avoid overvoltage
1 Image Reset
2 Color Reset
5 1366 X
Direct Functions Available Modes
1 ID Setup
2 ID Input
1 Lock On
Adjusting the LCD Display Troubleshooting
Troubleshooting
Safety Instructions Introduction Connections Using the Software
Self-Test Feature Check Check List Q & A
Problems related to the Installation PC Mode
Maintenance and Cleaning
Symptoms and Recommended Actions
Problems
The screen is blank and the power indicator is off
Problems related to the Screen
Problems
Check Signal Cable message Not Optimum Mode message
Problems related to the Remote Control
Problems
Solutions
Problems
Adjusting the Monitor Troubleshooting Specifications
Specifications
Safety Instructions Introduction Connections Using the Software
General PowerSaver Preset Timing Modes
Preset Timing Modes
PowerSaver
PowerSaver
Preset Timing Modes
Horizontal Frequency
Vertical Frequency
Adjusting the Monitor Troubleshooting Specifications
Specifications
Safety Instructions Introduction Connections Using the Software
General PowerSaver Preset Timing Modes
Preset Timing Modes
PowerSaver
PowerSaver When used as a normal monitor
Preset Timing Modes
Horizontal Frequency
Vertical Frequency
Adjusting the LCD Display Troubleshooting Specifications Information
Information
Safety Instructions Introduction Connections Using the Software
What is Image Retention ?
Power Off, Screen Saver, or Power Save Mode
Change the Color Information periodically
Change the characters color periodically
Apply the Screen Scroll function on Product
Apply the Screen Pixel function on Product
Apply the Screen Erasing function on Product
Adjusting the LCD Display Troubleshooting Specifications Information
Appendix
Safety Instructions Introduction Connections Using the Software
Appendix
REPUBLIC OF IRELAND SLOVAKIA SPAIN SWEDEN SWITZERLAND U.K ESTONIA
CZECH REPUBLIC DENMARK FINLAND FRANCE GERMANY HUNGARY ITALIA
LUXEMBURG NETHERLANDS NORWAY POLAND PORTUGAL
LATVIA LITHUANIA KAZAKHSTAN KYRGYZSTAN RUSSIA UKRAINE UZBEKISTAN
THAILAND
Terms Sync Signal
Resolution
TAIWAN
Correct Disposal
Authority