DVD-HR720
Advertencia
Precaución
Mantenimiento del aparato
Precaución
Precauciones de manejo
Instrucciones importantes de seguridad
Especificaciones de discos
Manejo de discos
Almacenamiento de discos
Copia de un título
Copia de discos
Especificaciones de copia de contenidos Índice
Jpeg foto
Disco CD-RW/-R, DVD-RAM/-RW/-R
Formato de discos
Protección
¡No utilice los siguientes discos
Índice
Cambio de nombre de una entrada
Eliminación de la sección de un título
104
Vista preliminar de un título seleccionado
Grabación y reproducción simultáneas
Grabación en Disco Duro
Copia entre el Disco Duro y el DVD
Barrido progresivo de alta calidad
Esto implica una función
Pueden cancelarse los ajustes
Icono Término Definición
Disponible en el Disco Duro
Mismo tiempo
En un DVD-RW puede utilizar el modo
VR o el modo Vídeo, pero no ambos al
Puede cambiar el formato DVD-RW a
Ajuste del mando a distancia
Accesorios
Preparación del mando a distancia
Instale las pilas en el mando a distancia
Códigos de TV controlables
Otro hasta encontrar el que funciona
Las diversas funciones no estarán
Panel frontal
Pantalla del panel frontal
Panel posterior
La conexión de antena no pasa señales de
Manejo del mando a distancia
Conexión y configuración
Conexión a la entrada de AV3 y a la toma De entrada de DV
Enchufe el otro extremo al conector apropiado del televisor
Conexiones adicionales
Conecte el cable de RF como se muestra
Modo DVD
Otro tipo de conexión del cable de salida de vídeo
Consulte las páginas 22 y
Caso 1 Conexió n a una toma de
Salida de Vídeo Compuesto Salida de S-Video
Amplificador de AV
Caso 3 Tomas de salida de Vídeo componente
Caso 1 Conexió n a un TV
Componente Y, PB, PR del Grabador DE
Rojo blanco
La selección de la entrada de AV 3 se realizará
Caso 2 Conexió n de una videocá mara a la toma DV
Si la entrada no se selecciona
No es posible grabar contenido protegido contra copia
Botón OK
Botón Menu
Botón …†, œ √
Botón Return
Enchufe Grabador DE DVD Y Disco Duro a
Pulse el botón OK para iniciar la configuración automática
Conexión del Grabador DE DVD Y Disco
Ahora, el Grabador DE DVD Y Disco
La función Auto Configuración puede
Ajuste de la hora
Instalación y pulse el botón OK o √
Pulse los botones …† hasta seleccionar Sí para
Hora Automática
Pulse el botón OK. Para salir, pulse el botón
Pulse los botones …† hasta seleccionar Auto
Consulte la siguiente tabla al seleccionar el país
Seleccione Modif. , Eliminar o Swap
Pulse los botones …† hasta seleccionar Ajuste
Manual y pulse el botón OK o √
Pulse los botones …† hasta seleccionar Idioma y
Configuración de las opciones de Idioma
Pulse el botón Return o el botón œ
Pulse el botón OK o √ Aparecerá el menú Sistema
Ajuste de Desconexión automática
Pulse los botones …† hasta seleccionar Sistema
Pulse los botones …† hasta seleccionar Descon
Pulse los botones …† hasta seleccionar CM Skip
Ajuste del intervalo CM Skip
CM Skip no funciona en un modo de imagen fija
Tiempo y pulse el botón OK o √
Pulse los botones …† hasta seleccionar Hora del
Modo EP y pulse el botón OK o √
Pulse los botones …† para seleccionar el
Pulse los botones …† hasta seleccionar Panel
Frontal y pulse el botón OK o √
Elemento que desea y pulse el botón OK o √
Del capítulo y pulse el botón OK o √
Modo
Pulse los botones …† hasta seleccionar Creador
Consulte la página 126 y pulse el botón Title
Pulse el botón Parar para detener la grabación
Para ver los títulos creados, finalice el disco
MENU. Aparecerá el menú Título
Pulse los botones …† hasta seleccionar Audio y
Configuración de las opciones de audio
Registro de DivXR
Compresión dinámica
Salida Digital
Compatibilidad de modo
Pulse los botones …† hasta seleccionar Vídeo y
Formato TV
De vídeo que desea y pulse el botón OK o √
Pb, Pr
Terminal de salida de vídeo disponible
Modo Componente
Configuración de barrido progresivo
Cancelación del
Pulse los botones …† hasta seleccionar Control
Configuración del Control Paterno
Si olvida la contraseña
Paterno y pulse el botón OK o √
Consulte la página 44 si ha olvidado la contraseña
Información sobre el cambio de contraseña
Información sobre el nivel de calificación
Discos que no pueden reproducirse
Antes de reproducir
Código de región sólo DVD-Video
Tipos de discos que pueden reproducirse
Reproducción
Con el estándar DVD-RAM versión
Encendido inicial
La reproducción
Búsqueda en un capítulo o pista
Utilización de funciones de búsqueda o salto
Disco DVD-VIDEO
Reproducción real La cámara lenta sólo está operativa en
Reproducción a cámara lenta
Salto de capítulos, pistas o marcadores
Adelante
El movimiento escalonado sólo está
Traslado a una escena directamente con Anykey
Reproducción de movimiento escalonado
Pulse los botones …† para seleccionar
La pantalla de información
Discos. Cuando se inserta un disco de
Audio CD CD-DA o de MP3, según el
La función de búsqueda de tiempo no
Con la unidad en modo de parada
Utilización del botón Title List
Información sobre el botón Info
Reproducción, pulse el botón Menu
Modo VR
Menú Navegación
Navegación por escenas
La navegación por escenas no estará
Navegación por tiempo
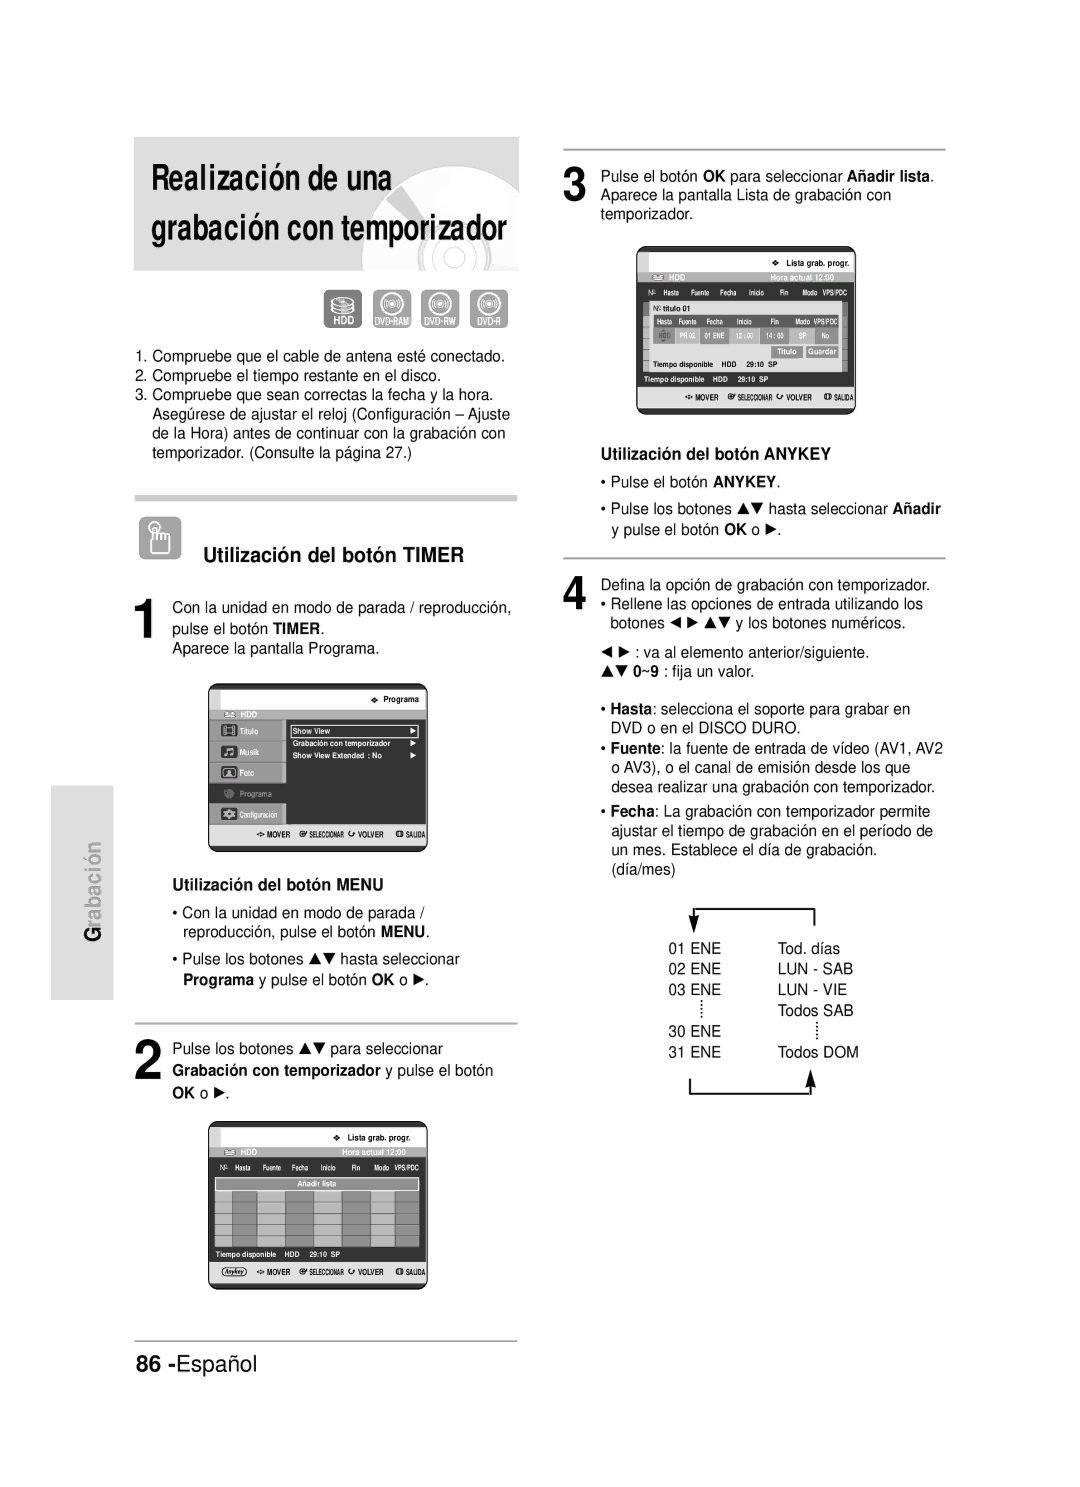
Utilización del botón Anykey
Por Escenas y pulse el botón OK o √
OK o Reproducir
El cursor no se mueve si el título grabado
Por Tiempo y pulse el botón OK o √
El número 01 aparece y la escena se memoriza
Utilización del botón Marker
Pulse el botón Marker durante la reproducción
Escena marcada
Pulse el botón Marker durante la reproducción
Pulse los botones œ √ para seleccionar una
Va al siguiente Marcador
Pulse el botón Marker durante la reproducción
Cuando se abra y se cierre la bandeja de
Disco, desaparecerán los marcadores
Reproducción
Diferente dependiendo del tipo de disco
Utilización del botón Subtitle
Es posible que la pantalla de subtítulos sea
Es posible que las bandas sonoras o el
Selección del audio
Utilización del botón Audio
Pulse el botón Audio durante la reproducción
Pulse el botón Repeat durante la reproducción
Repetición de la reproducción
Utilización del botón Repeat
Los discos DVD-RAM/-RW modo VR
Repetir A-B
Utilización del botón Repeat A-B
Modo V no repiten ningún capítulo
Si define el punto B antes de que
Aplicación del Zoom
Para volver a reproducción normal
Marca de prohibición
Elementos de pantalla del CD de audio CD-DA
Reproducción de CD
Reproducción de un CD de audio CD-DA
Pulse los botones …† para seleccionar la pista
Si un disco contiene únicamente archivos
Reproducción de un disco de MP3
Elementos de la pantalla MP3
MP3 a únicamente archivos Jpeg
Orden aleatorio
Repetición de CD CD-DA y MP3
MP3
Pulse los botones …† hasta seleccionar Nueva
Modo de reproducción
Nueva lista de reproducción
Pulse los botones …† para seleccionar las
Pulse los botones …† hasta seleccionar Lista de
Lista de reproducción
Pulse el botón Anykey
Se creará una nueva lista de reproducción
Eliminar lista de reproducción y pulse el
Eliminar lista de reproducción
Ir a la lista de reproducción
Botón OK o √
Ir a la lista de música
DVD y pulse el botón OK o √
Seleccionar medio MP3
Pulse los botones …† hasta seleccionar HDD o
MP3 + DivX en la bandeja del disco
Desactivar presentación y pulse el botón OK
Presentación
Presentación y pulse el botón OK o √
Desactivar el giro y pulse el botón OK o √
Girar
Para detener el zoom
X2 X4 X2 Normal
Utilización del botón Menu
Reproducción de archivos MPEG4
Ir a la lista de fotos
Funciona, no se admite el soporte
Codificación de subtítulos DivX
Si el idioma de subtítulos aparece con
Descripción de la función MPEG4
Realizar ninguna grabación adicional No finalizar
Discos grabables
Finalizar Cierra el DVD-RW/-R para no poder
Este grabador puede grabar en los siguientes discos
Imágenes no grabables
Formatos de grabación
Modo de grabación
Información sobre señales de control de copia
Si se utiliza un disco DVD-RW sin usar, se
Soporte
Con Cprm
Pulse los botones Prog Número para
Para detener temporalmente la grabación
Para detener la grabación
SP LP EP XP
Pasos preliminares
Número de PR AV1 AV2 AV3 DV
Pulse el botón REC
Videocámara al terminal de entrada de DV del
Pulse el botón REC Mode de forma repetida
Conecte el terminal de salida de DV de la
Panel frontal del Grabador DE DVD Y Disco
El contador del temporizador se reduce
Grabación mediante una tecla OTR
Información sobre el botón Info
Inmediatamente de 800 a 000 y el
Parada de reproducción / grabación
Reproducción mientras se graba
Durante la grabación
Grabación y reproducción simultáneas
Se reproducirá la lista de títulos seleccionada
Utilización del botón Timer
OK o √
Porque la unidad utiliza el sistema de
DVD-RW modo V/R, es posible que no
Se graben las 6 u 8 horas completas
Codificación VBR Velocidad de bits
Edición de la lista de grabación con temporizador
Editado
Pulse el botón OK hasta seleccionar Guardar y
Pulse el botón OK para confirmar el ajuste
Pulse el botón Menu tras finalizar la operación
Pulse los botones œ √ hasta seleccionar Sí y
Historial
Aparecen las opciones Añadir, Modif. , Eliminar e Historial
Pulse el botón Menu tras finalizar la operación
Pulse los botones …† hasta seleccionar Historial
Información sobre Historial
Delete History List Eliminar Historial
Pulse el botón OK o √. Aparece la pantalla
Pulse los botones …† hasta seleccionar Eliminar
Go To Timer Rec List Ir a Grabación con temporizador
Clear History List Borrar Historial
Pulse los botones …† hasta seleccionar Lista
Código de ShowView
Utilización de la función ShowView
Aparece un mensaje que permite introducir el
ShowView Extended
Edición
Lista de Títulos
Cambio de nombre etiquetas de un título
Estado de bloqueado
Bloqueo protección de un título
Pulse los botones œ √ hasta seleccionar Sí y pulse
Eliminación de un título
Con la unidad en modo de parada/reproducción
División de la sección de un título Dividir
Aparece el menú Editar
Eliminación de la sección de un título Eliminación parcial
La ventana del punto de final de eliminación de
Pulse el botón OK en el punto final
La imagen y el tiempo del punto final aparecen en
Sección
Reproducción Reproducir , Buscar
Siga estas instrucciones para crear una nueva entrada
De la lista de reproducción a partir de un título grabado
Reproducción de entradas de la lista de reproducción
Utilización del botón Play List
Seleccionada
Cambio de nombre de una entrada de la lista de reproducción
Lista de títulos , Controlador Discos
Lista de reproducción y pulse el botón OK o √
Edición de una escena de la lista de reproducción
Pulse los botones …† hasta seleccionar Editar
Aparece la pantalla Editar escena
Para configurar, siga los pasos del 1 al 3 de la página
Botones relacionados con la reproducción
Posición a la que desea trasladar la escena y
No puede trasladar la escena
Lo cual no requiere de ninguna acción
Pulse el botón OK
Escena que tendrá una nueva escena incluida
Con la reproducción Reproducir
Pulse los botones …† œ √ hasta seleccionar la
Delante de ella y pulse el botón Anykey
Eliminación de una entrada de la lista de reproducción
Escena que desea eliminar y pulse el botón
Admitido
Información sobre la pantalla de copia
Especificaciones de copia de contenidos Contenido
No admitido
Información sobre el uso del botón Copy
Sobre la pérdida de calidad con cada
Copia de un título sin editar
Copia de un título que haya sido editado con anterioridad
Que la copia se puede realizar con la
Cambio de la modalidad de grabación
Describe en la página
Título que no se puede copiar a alta
Velocidad, ejecuta el paso 9 como se
De lo contrario, realiza el paso
Pulse el botón ANYKEY. Pulse los botones …† para
Eliminación del título no deseado de la lista de copias
Pulse el botón ANYKEY. Pulse los botones …† hasta
Seleccionar Modo Rec. y pulse el botón OK o √
Disco Duro
Copia de archivo
Pulse los botones …† hasta seleccionar Música o
Copia de carpeta
Introduzca un disco Jpeg o MP3 en la bandeja
El botón OK o √ Se inicia la copia de archivos
No soportada
Si se pulsa el botón Cancel durante la
Edición del nombre del disco
Jpeg foto No soportada
Pulse los botones …† œ √ para seleccionar
Protección de discos
Disco antes de iniciar la edición
Es posible que tenga que desproteger el
Formateo de discos
DVD-RW
Música
Música o Foto y pulse el botón OK
Título
Foto
Eliminar todo y pulse el botón OK
Eliminación de todas las listas de
Títulos
Aparecerá el mensaje de confirmación ¿Desea
Eliminar las entradas de la lista de grabación
Finalización de discos
Una vez finalizado el disco, no podrá
Un DVD-RW puede finalizarse o no en modo VR
No finalización de discos modo V/VR
Un DVD-RW puede finalizarse o no en Modo Vídeo
Controlador de Discos y pulse el botón OK o √
Alimentación
Grabación
Reproducción
DVD. Consulte las páginas 40~41
Sonido
Video
Grabación con temporizador
Compruebe si ha seleccionado las
Mando a distancia
Otros
Salida de audio
España Spain
AK68-00819K-00