Samsung DVD-HR757/XEF manual Impostazione dell’orologio, Possibile impostare l’ora corrente

Models: DVD-HR755/XET DVD-HR755/XEB DVD-HR757/XET DVD-HR755/XEF DVD-HR757/XEF

1 106
Download 106 pages 46.21 Kb
Page 27
Image 27

Sintonia Automatica

Attendere, prego.

63%

Stop

Ricerca automatica canali completata. Premere il tasto [OK] per impostare l’orologio automatico.

No

Attendere, prego. Impostazione dell’orologio in corso...

Se si desidera uscire dall’impostazione dell’orologio, premere il tasto [MENU].

Impostazione Orologio

m. g. a. h. min. Auto

Gen 01 2007 12 00 Si

Lunedì


HDD & DVD RECORDER


Configurazione


HDD


Libreria


Sistema


Impostazione Orologio


Reg. progr.


Imposta canale


Gestione Dischi


Lingua


Configurazione


Audio


Video


Controllo genitori


1


mSPOSTA

sSELEZIONA


rRITORNA


eEXIT


HDD & DVD RECORDER


Configurazione


HDD


Libreria


Sistema


Reg. progr.


Impostazione Orologio


Imposta canale


Gestione Dischi


Lingua


Configurazione


Audio


Video


Controllo genitori


1


mSPOSTA

sSELEZIONA


rRITORNA


eEXIT


HDD & DVD RECORDER


Impostazione Orologio


HDD


Libreria


Reg. progr.


m.

g.

a.

h. min.

Auto


Gestione Dischi


Gen

01 2007 12 00 Si


Configurazione


Lunedì


<SPOSTA

sSELEZIONA


rRITORNA


eEXIT

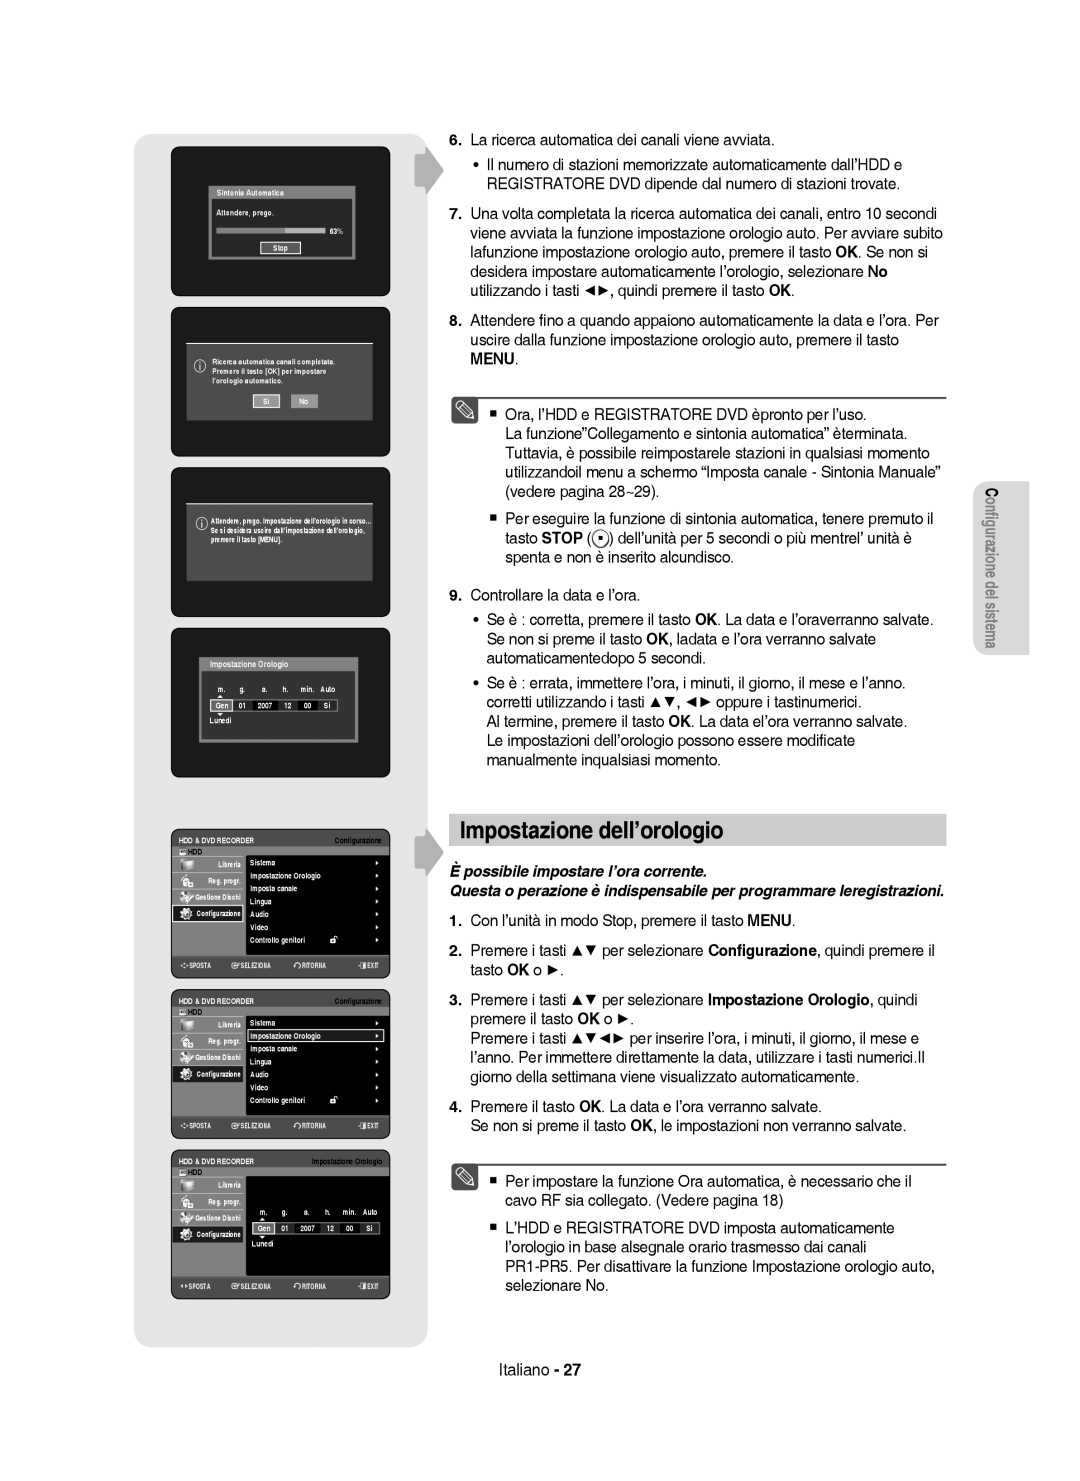
6.La ricerca automatica dei canali viene avviata.

Il numero di stazioni memorizzate automaticamente dall’HDD e REGISTRATORE DVD dipende dal numero di stazioni trovate.

7.Una volta completata la ricerca automatica dei canali, entro 10 secondi viene avviata la funzione impostazione orologio auto. Per avviare subito lafunzione impostazione orologio auto, premere il tasto OK. Se non si desidera impostare automaticamente l’orologio, selezionare No utilizzando i tasti ◄►, quindi premere il tasto OK.

8.Attendere fino a quando appaiono automaticamente la data e l’ora. Per uscire dalla funzione impostazione orologio auto, premere il tasto MENU.

MOra, l’HDD e REGISTRATORE DVD èpronto per l’uso.

La funzione”Collegamento e sintonia automatica” èterminata. Tuttavia, è possibile reimpostarele stazioni in qualsiasi momento utilizzandoil menu a schermo “Imposta canale - Sintonia Manuale” (vedere pagina 28~29).

Per eseguire la funzione di sintonia automatica, tenere premuto il

tasto STOP () dell’unità per 5 secondi o più mentrel’ unità è spenta e non è inserito alcundisco.

9.Controllare la data e l’ora.

Se è : corretta, premere il tasto OK. La data e l’oraverranno salvate. Se non si preme il tasto OK, ladata e l’ora verranno salvate automaticamentedopo 5 secondi.

Se è : errata, immettere l’ora, i minuti, il giorno, il mese e l’anno. corretti utilizzando i tasti ▲▼, ◄► oppure i tastinumerici.

Al termine, premere il tasto OK. La data el’ora verranno salvate. Le impostazioni dell’orologio possono essere modificate manualmente inqualsiasi momento.

Impostazione dell’orologio

È possibile impostare l’ora corrente.

Questa o perazione è indispensabile per programmare leregistrazioni.

1.Con l’unità in modo Stop, premere il tasto MENU.

2.Premere i tasti ▲▼ per selezionare Configurazione, quindi premere il tasto OK o ►.

3.Premere i tasti ▲▼ per selezionare Impostazione Orologio, quindi premere il tasto OK o ►.

Premere i tasti ▲▼◄► per inserire l’ora, i minuti, il giorno, il mese e l’anno. Per immettere direttamente la data, utilizzare i tasti numerici.Il giorno della settimana viene visualizzato automaticamente.

4.Premere il tasto OK. La data e l’ora verranno salvate.

Se non si preme il tasto OK, le impostazioni non verranno salvate.

MPer impostare la funzione Ora automatica, è necessario che il cavo RF sia collegato. (Vedere pagina 18)

L’HDD e REGISTRATORE DVD imposta automaticamente l’orologio in base alsegnale orario trasmesso dai canali PR1-PR5. Per disattivare la funzione Impostazione orologio auto, selezionare No.

Configurazione del sistema

Italiano - 27

Page 27
Image 27
Samsung DVD-HR757/XEF, DVD-HR755/XEB, DVD-HR755/XEF manual Impostazione dell’orologio, Possibile impostare l’ora corrente

DVD-HR755/XET, DVD-HR755/XEB, DVD-HR757/XET, DVD-HR755/XEF, DVD-HR757/XEF specifications

The Samsung DVD-HR755 and DVD-HR753 models are part of a sophisticated lineup of DVD recorders that combine traditional DVD functionality with modern recording and playback features. These devices are designed to meet the demands of today's consumers who seek both versatility and quality in their home entertainment systems.

The DVD-HR755/AUS, DVD-HR753/EUR, DVD-HR755/XEB, DVD-HR755/EUR, and DVD-HR755/XEC share several key features that set them apart in the market. One of the standout characteristics is the built-in hard disk drive (HDD), which allows users to record and store large quantities of video content. With a storage capacity typically around 160GB, these models enable numerous hours of recording, making it easy to capture and save favorite shows, movies, and other content without the clutter of physical DVDs.

In terms of recording formats, these DVD recorders support a variety of media types, including DVD-R, DVD-RW, and DVD+R formats. The flexibility in recording options allows users to choose from one-time recordings or rewritable media for ongoing use. Furthermore, these devices boast various recording modes, which adjust the quality and duration of recordings based on user preference and available storage space.

Samsung's digital tuner technology enhances the viewing experience by enabling the receipt of digital broadcasts, ensuring high-definition recording capabilities. Additionally, the built-in HDMI output allows for simple connection to modern televisions, providing pristine video quality and enhancing the overall experience. Coupled with the S-Video and Composite video outputs, users can connect to various devices, ensuring compatibility with older models as well.

A user-friendly interface makes navigating through the DVD-HR755 and DVD-HR753 much easier, allowing for quick access to settings, recordings, and schedules. The program guide simplifies the recording process, enabling users to set timers and plan recordings with ease.

Notably, these models include Samsung’s Smart Recording technology, which optimizes the recording process by intelligently selecting the best available quality based on the content being captured. This feature, along with a range of supported formats for playback, including MP3, JPEG, and DivX, ensures a versatile viewing and listening experience.

In summary, the Samsung DVD-HR755 and DVD-HR753 series models provide a perfect blend of functionality, modern recording capabilities, and user-friendly features. They cater to a diverse range of home entertainment needs, making them a solid choice for anyone looking to invest in a reliable DVD recording solution.