DVD
Vorsicht
Warnung
Wichtiger Hinweis
Es besteht somit die Gefahr von
Wichtige Sicherheitshinweise
Vorsichtsmassnahmen
Vorsichtsmaßnahmen für den Betrieb
Verwenden Sie nur vom Hersteller spezifi ziertes Zubehör
Die Festplatte HDD
Pflege des Gehäuses
Hinweise zu Disks
Disk-Typen
Disk-Spezifikationen
Titel Kopierformate Inhalt
Disks kopieren
HDD € DVD DVD € HDD
Unterstützte Kopierformate Inhalt
Disk-Formate
Schutz
Kopierschutz
Viele DVDs sind durch Kodierung gegen Kopieren geschützt
Kompatible USB-Geräte am Hostport
Nicht geeignete Disk-Typen
MP3 Player
DSC Digitale Standbild-Kamera Anbieter Marke
Andere
Vorsichtsmaßnahmen
Warnung
Überblick über die Gerätefunktionen
Wichtige Informationen zur
Timeraufnahme programmieren
Aufnahmewiedergabe als Live-Signal
Beschreibbare Disks
Aufnahmeformate
Überblick Über DIE Gerätefunktionen
EPG
Wichtige Informationen ZUR Bedienungsanleitung
Symbole in dieser Bedienungsanleitung
Informationen zum Gebrauch dieser Bedienungsanleitung
Copyright
Schritt 1 Disktyp oder Festplatte auswählen
HDD- UND DVD-RECORDER Verwenden
Schritt 2 Disk vor Aufnahmen formatiere
Schritt 3 Aufnehmen
Schritt 5 Aufnahmen auf Disk bearbeiten
Zubehör
Auspacken
Fernbedienung vorbereiten
Batterien für die Fernbedienung Typ AAA
TV STANDBY/ON
Fernbedienungscodes für Fernsehgeräte
Input SEL
TV Mute
Vorderseite DVD-SH873/875/877
Geräteabbildungen
Vorderseite DVD-SH874/876
SUCHLAUF/SPRINGEN
EXT
Rückseite
OUT
Display auf der Gerätevorderseite
Batterien in die Fernbedienung einsetzen
Fernbedienung
Anschliessen UND Einrichten
HDD- UND DVD-RECORDER Anschliessen
Zusätzliche Anschlüsse
Wand
Antenne + HDD- UND DVD-RECORDER+EXTERNE Decoderbox + TV
Decoder
Option Anschluss an den Composite- Video-Ausgang
Weitere Möglichkeiten ZUM Anschliessen DES Videokabels
Hinweis zum Progressive Scan-Modus 576p
Eine solche Video-Verbindung liefert Standard-Bildqualität
Option Anschluss an den Komponenten-Video-Ausgang
Option Anschluss an ein Fernsehgerät
Weitere Möglichkeiten ZUM Anschliessen DES Audiokabels
Rot Weiß
Oder
Option Anschluss an ein Fernsehgerät mit HDMI-Eingang
Über HDMI-/DVI-KABEL AN EIN Fernsehgerät Anschliessen
Option Anschluss an ein Fernsehgerät mit DVI-Eingang
Beschreibung der HDMI-Verbindung
AN DEN Eingang AV3 in Oder DV in Anschliessen
Was ist HDCP?
Option DV-Gerät an den Eingang DV in anschließen
Option Camcorder an den Eingang DV in anschließen
USB-GERÄTE Anschliessen
SYSTEM- Setup
Inbetriebnahme UND Automatisches Setup
Navigation in DEN Bildschirmmenüs
Durch Drücken auf OK oder die Taste wird die Sommerzeit
Angezeigt
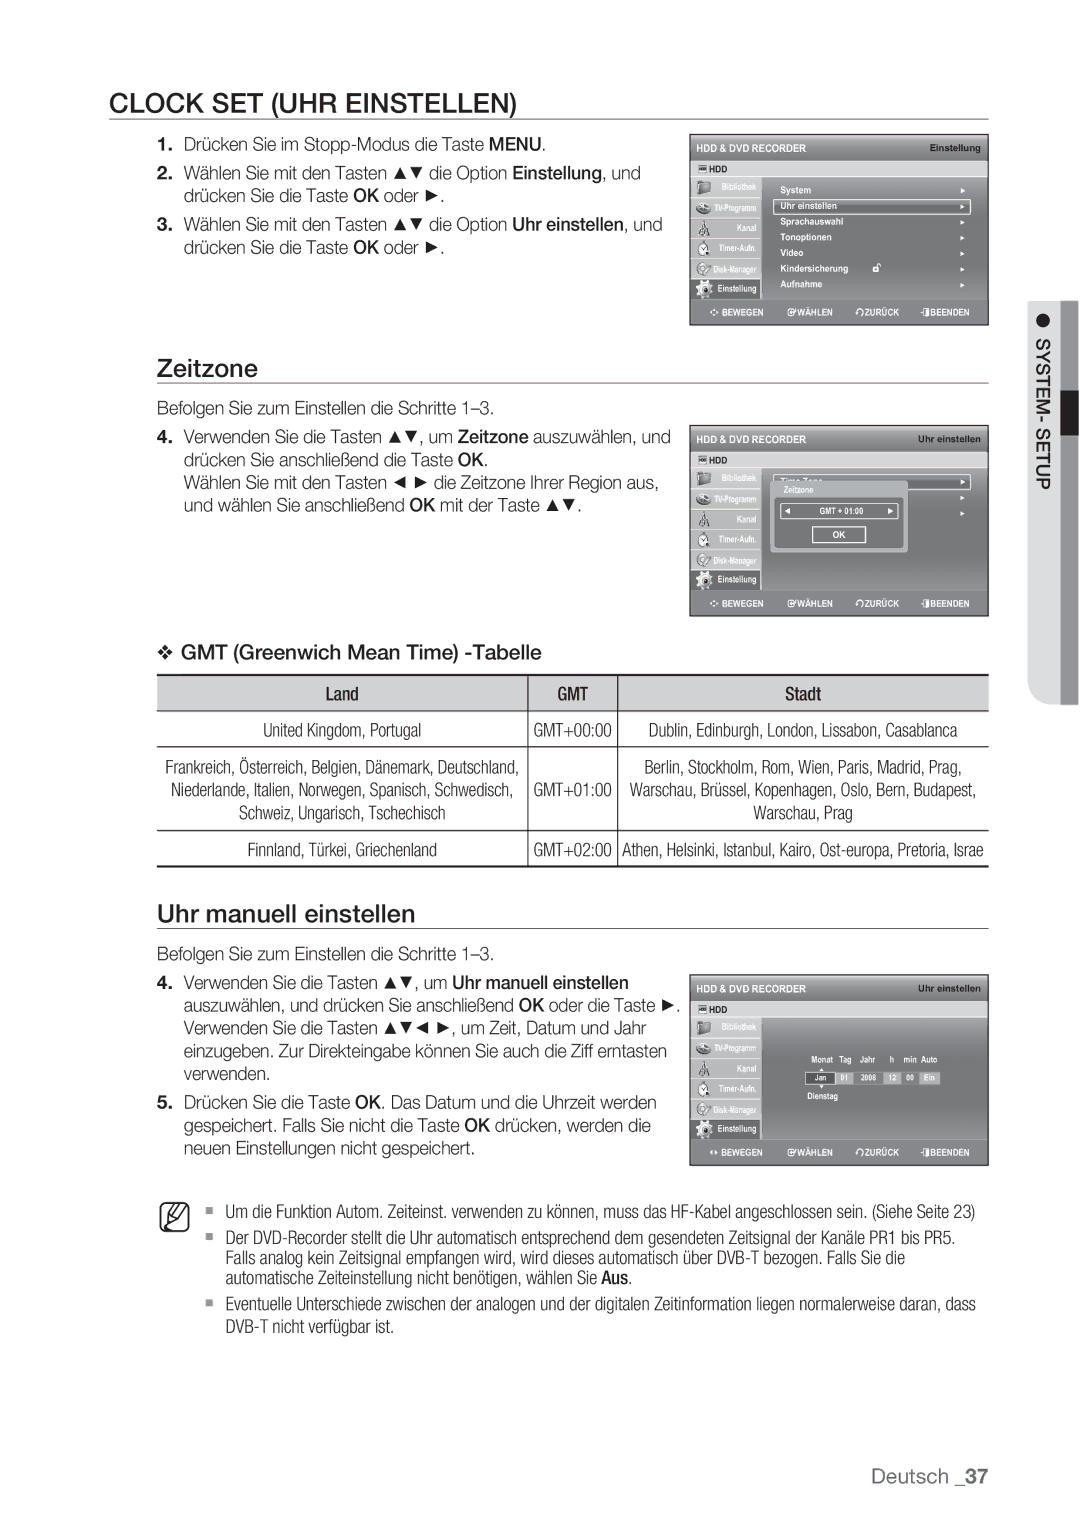
Zeitzone
Clock SET UHR Einstellen
Uhr manuell einstellen
GMT
Kanal Einstelln
Autom. Setup
Sommerzeit
Analog-Setupman
Digtal-Setupman
Befolgen Sie zum Einstellen die Schritte 1-2 auf Seite
Digitalkanäle Favoriten
Digitalkanalliste
Automatische Abschaltung einstellen
Systemoptionen Einstellen
Anynet+ Hdmi CEC
DivXR-Registrierung
DVB-T Auto. Untertitel
Einstellung der Funktion Anynet+ Hdmi CEC
Tonoptionen Einstellen
Sprachoptionen Einstellen
Ein NICAM-Modus
Digital-Ausgang
Bildformat
Videooptionen Einstellen
Videoausgang
Das Einstellmenü Video wird geöff net
Einstellung der Wiedergabe
Hdmi Resolution
AV1-SCART
Kindersicherung Einstellen
KOMPONENTEN-AUSGANG Progressive Abtastung
Falls Sie Ihr Passwort vergessen haben
Einstellen von Programmqualität
Aufnahmeoptionen Einstellen
Cvkl
Einstellen von DVD-Ebene
Passwort für die Kindersicherung ändern
EZ-Aufnahme
EP-Aufnahmezeit einstellen
Drücken Sie die Taste EXIT, um das Menü zu verlassen
Legen Sie eine Disk ein
Kompatib. zu V-Modus
EPG’ hat die gleiche Bedeutung wie ‘TNT’
Grundfunktione
Display
Audiospur auswählen
Untertitelsprache ändern
Programmführer
Videotextanzeige einstellen
#/$ VORHER./NÄCH. TAG Info Information
Timeraufnahmen mit dem Programmführer
Logos VON Abspielbaren Disks
Ländercode NUR BEI DVD-VIDEOS
Abspielbare Disktypen
MP3
Audio
Nicht geeignete Disks
CD-R/-RW Jpeg
VCD/SVCD/CVD/CD-ROM/CDV/CD-G/CD-I BD, HD-DVD
Disk Wiedergeben
Sxcvkl
DISK- UND Titelmenü Verwenden
Bei DVD-VIDEOs
Sxcv KL
Szxcv KL
Szxcvkld
Tasten FÜR Erweiterte Wiedergabeoptionen
Untertitelsprache Wählen
Taste Info Verwenden
Einzelbild-Wiedergabe
Eine Szene mit Info direkt auswählen
Wiedergabesprache BZW. Audiomodus Auswählen
Szxckld
Anderen Kamerawinkel Wählen
Wiederholfunktion Verwenden
Zoomfunktion Verwenden
Szxcvkl
Wiederholen
Zcvkl
SXC
Indexmarken Verwenden
Lesezeichen Verwenden
Lesezeichen wiedergeben
AUDIO-CDS UND MP3-DATEIEN Wiedergeben
Lesezeichen löschen
Audio-CD CD-DA wiedergeben
CD CD-DA und MP3-Dateien wiederholen
MP3-Dateien wiedergeben
Bildschirmoptionen für Audio-CDs CD-DA
MP3-Bildschirmoptionen
Neue Wiedergabeliste
CD-Import
Es wird eine neue Wiedergabeliste erstellt
Eine Wiedergabeliste können Sie maximal 30 Tracks aufnehmen
Wiedergabeliste löschen
Wiedergabeliste
Editor für die Wiedergabeliste aufrufen
Taste a
Inhalt auswählen
Zur Musikliste wechseln
JPEG-CDS UND BILD-DATEIEN Wiedergeben
Musik UND Fotos Simultan Wiedergeben
Diashow
Zoom
Rotieren
Zur Fotoliste wechseln
Funktion Sortieren verwenden
DivX-Funktionsbeschreibung
Divx Wiedergeben
Größe Nach Größe der DivX-Datei
DivX-Untertitel
HDD
Beschreibbare Disks
DVD-RW DVD+RW
DVD-RAM
DVD-RAM/-RWVR Modus
Aufnahmeformate
DVD-RWV Modus/-R
DVD-SH873/874 Aufnahmemodus Aufnahmezeit u
Aufnahmemodus
DVB-T-Aufnahmen sind nur im FR-Modus möglich
DVD-SH877 Aufnahmemodus Aufnahmezeit u
Kopiergeschütztes Material
Über Kopierschutzsignale
Sofortaufnahme
Vor dem Start
Von einem aktuell eingeschaltetem externen Gerät aufnehmen
Laufendes Fernsehprogramm aufnehmen
Aufnahme unterbrechen
Aufnahme anhalten
VON Einem Camcorder Aufnehmen
Gleichzeitig Aufnehmen UND Wiedergeben
Aufnahme AUF Tastendruck OTR ONE Touch Recording
Die Taste Play
Wiedergabe / Aufnahme anhalten
Zeitleiste von Time Shift Zeitversetzte Aufnahmewiedergabe
Funktion Time Shift verwenden
Mit Taste Timer
Timeraufnahme Programmieren
Jan
Jeden Tag
Timer-Übersicht bearbeiten
Aus, und drücken Sie anschließend die Rote Taste a
Aufnahmeliste hinzufügen
Seiten 81~82
Bestätigen
SHOWVIEW-FUNKTION Verwenden
Timer-Übersicht löschen
Showview ZEIT+
Timer
ZUR Liste D. Aufnahmen Wechseln
Informationen zur Liste d. Aufnahmen
Liste d. Aufnahmen löschen
Zur Timer-Übersicht wechseln
Drücken Sie die Gelbe Taste C
Titel abspielen
Einfache BEARBEITUNGS-FUNKTIONEN Titelliste
Einen Titel umbenennen
Taste Title List
Den Sie schützen möchten, und drücken Sie die Taste
Einen Titel sperren schützen
Sie die Taste MARKER, bis das Häkchen verschwindet
Das Menü Bearb. wird angezeigt
Einen Titelabschnitt trennen teilen
Einen Titel löschen
Einen Titelabschnitt löschen teilweise löschen
Sxck
Navigationsmenü Verwenden
Funktion Sortieren Verwenden Titelliste
Szene suchen über Zeitnavigation
Szene suchen über Szenennavigation
Inhalt Auswählen
Eine Wiedergabeliste erstellen
Erweiterte BEARBEITUNGS-FUNKTIONEN Wiedergabeliste
Einen Eintrag in der Wiedergabeliste umbenennen
Einen Eintrag aus der Wiedergabeliste abspielen
Eine ausgewählte Szene wiedergeben
Eine Szene für die Wiedergabeliste bearbeiten
Szene ändern Szene ersetzen
Eine Szene löschen
Eine Szene verschieben die Position einer Szene ändern
Funktion Sortieren verwenden Wiedergabeliste
Einen Eintrag aus der Wiedergabeliste löschen
Über den Kopierbildschirm
VON Festplatte AUF DVD Kopieren UND Umgekehrt
Ordner markiert
DVD-Video kopieren
MP3, Jpeg Oder Divx Kopieren
Ordner kopieren
Datei kopieren
Legen Sie eine JPEG-Disk, MP3-Disk oder DivX-Disk ein
Legen Sie eine Disk JPEG, MP3 oder DivX in das Diskfach ein
Bearbeitung
Namen Einer MUSIK-/FOTO-/DIVX-DATEI Ändern
DISK-MANAGER
Xcvkl
Disk-Name bearbeiten
Der Bildschirm Umbenennen wird angezeigt
Disk-Schutz
XCV
Alle Titellisten löschen
Die Taste OK
Eine Disk formatieren
Alle Titel, DivX und Musik, Fotolisten löschen
HDD/DVD-RAM/+RW
Eine Disk fixieren
CVL
Funktionsweise
Fixierung einer Disk aufheben V-/VR-Modus
Weitere Informationen
Fehlerbehebung
Sonstige Probleme
Timer-Anzeige blinkt
Kein Ton
Keine Audioausgabe
PAL-B/G, D/K, I, DVB-T
Technische Daten
MPEG-II
DVD-SH877
„ Garantiebedingungen
Deutschland
Contact Samsung World Wide
Korrekte Entsorgung von Altgeräten Elektroschrott
Code No. AK68-01627A

