
EC-ST500ZBPSDX, EC-ST500Z, ES-ST500ZSASCN, ES-ST500ZSAUCN, EC-ST500ZBPRDX specifications
The Samsung EC-ST500 series of cameras, which includes models EC-ST500ZBPRE2, EC-ST500ZBPSE2, EC-ST510ZBPSE2, and EC-ST500ZBPUE2, represent a blend of cutting-edge technology and user-friendly design. Tailored for both amateur photographers and seasoned enthusiasts, these compact cameras boast a variety of features that elevate the photography experience.At the heart of the ST500 series is a robust 12.2-megapixel resolution, allowing for stunning high-quality images with exceptional clarity. The cameras come equipped with a powerful 5x optical zoom lens, making it easy to capture distant subjects without sacrificing image quality. This feature is particularly useful for outdoor photography and sports events where maintaining proximity to the action is not always possible.
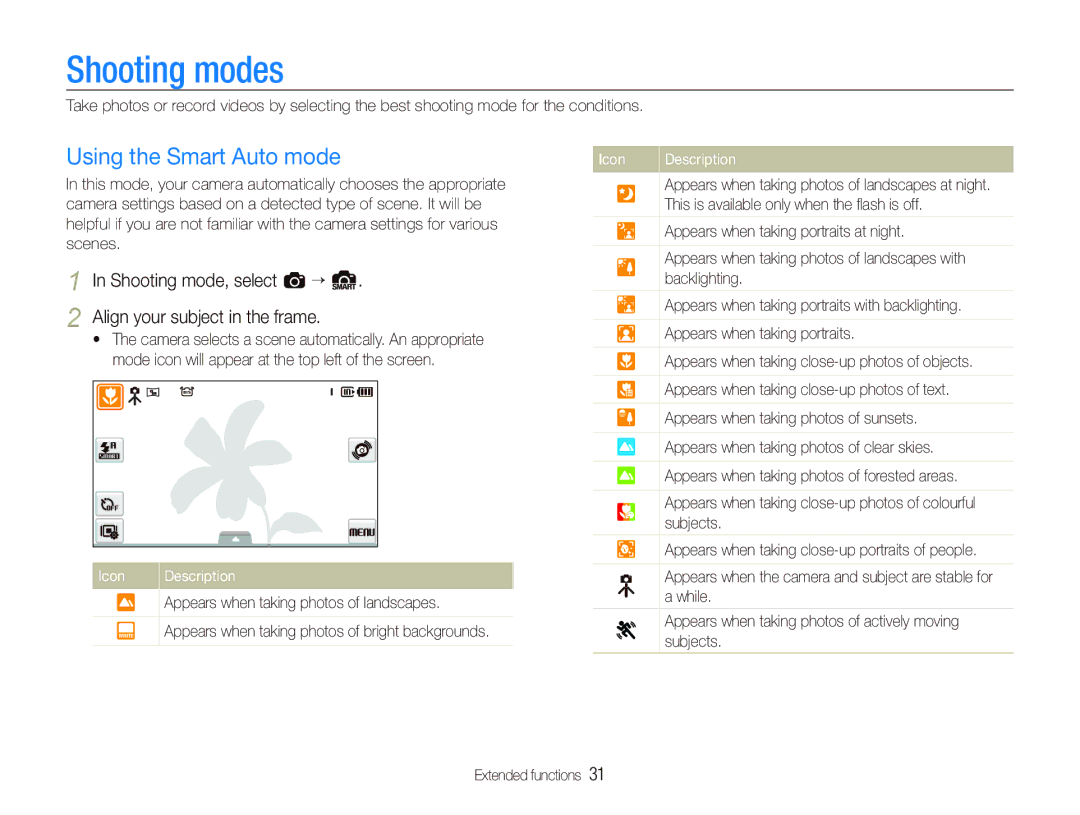
One of the standout technologies integrated into the ST500 series is the Smart Auto mode. This intelligent feature analyzes the environment and automatically adjusts settings such as exposure, focus, and white balance. Whether you're shooting in bright daylight, low light, or even under challenging conditions, the Smart Auto mode ensures optimal results by taking the guesswork out of photography.
The ST500 series models also offer innovative features like Face Detection, which identifies and optimizes faces in photographs, ensuring that your subjects are always in focus. Coupled with Smile Shot, which automatically captures an image when a smile is detected, these technologies enhance the overall ease of use, perfect for social gatherings and family events.
In terms of photography flexibility, the ST500 series includes various scene modes, allowing users to choose from options like Portrait, Landscape, Night, and more. These preset modes help users achieve desired visual effects, even if they lack extensive photographic knowledge.
The camera series is further complemented by a 3-inch touchscreen display, which simplifies navigation through menus and settings. This vibrant LCD screen provides clear previews of shots, ensuring that users can frame their subjects accurately.
Moreover, the ST500 series features HD video recording, allowing users to capture high-definition video clips with impressive detail. This extends the capabilities of the camera beyond still photography, enabling users to document life’s precious moments in motion.
Compact and stylish, the Samsung EC-ST500 series of cameras are designed for portability without compromising on performance. With their blend of advanced technologies and user-centric features, these cameras stand out as an excellent choice for anyone looking to enhance their photography skills and capture life's most memorable moments.