enregistrement avancé

OPÉRATIONS LIÉES AUX MENUS ET AUX Q.MENUS.

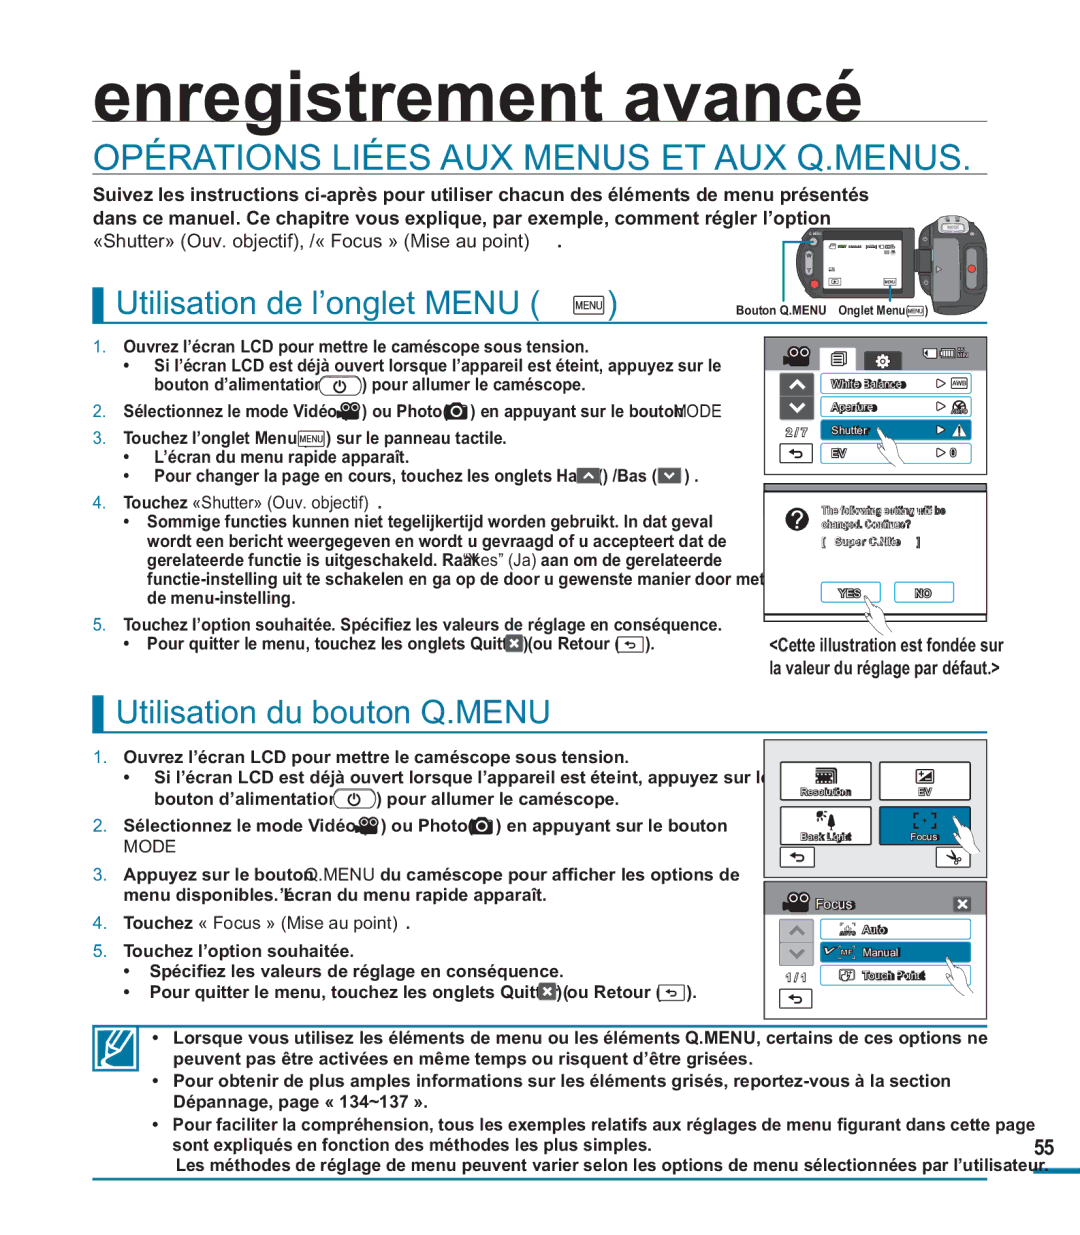
Suivez les instructions ci-après pour utiliser chacun des éléments de menu présentés dans ce manuel. Ce chapitre vous explique, par exemple, comment régler l’option

«Shutter» (Ouv. objectif), /« Focus » (Mise au point).


MODE


Q. MENU


STBY 00:00:00 [80Min]


Utilisation de l’onglet MENU (

)


Bouton Q.MENU

Onglet Menu(

)

1.

Ouvrez l’écran LCD pour mettre le caméscope sous tension.


MIN


85


• Si l’écran LCD est déjà ouvert lorsque l’appareil est éteint, appuyez sur le


bouton d’alimentation (


) pour allumer le caméscope.


White Balance


2.

Sélectionnez le mode Vidéo (

) ou Photo(

) en appuyant sur le bouton MODE


Aperture


Shutter


3.

Touchez l’onglet Menu (

) sur le panneau tactile.


2 / 7


• L’écran du menu rapide apparaît.


) /Bas (

) .


EV

0


• Pour changer la page en cours, touchez les onglets Haut (


4.

Touchez «Shutter» (Ouv. objectif).


90


The following setting will be


MIN


• Sommige functies kunnen niet tegelijkertijd worden gebruikt. In dat geval


changed. Continue?


wordt een bericht weergegeven en wordt u gevraagd of u accepteert dat de


조리개


[

Super C.Nite

]


gerelateerde functie is uitgeschakeld. Raak “Yes” (Ja) aan om de gerelateerde


셔터


functie-instelling uit te schakelen en ga op de door u gewenste manier door met

2 / 6

노출 보정

0


de menu-instelling.


YES

NO


3D-NR


5.Touchez l’option souhaitée. Spécifiez les valeurs de réglage en conséquence.

• Pour quitter le menu, touchez les onglets Quitter ( ) ou Retour (

).

<Cette illustration est fondée sur


la valeur du réglage par défaut.>

Utilisation du bouton Q.MENU

1.Ouvrez l’écran LCD pour mettre le caméscope sous tension.

Si l’écran LCD est déjà ouvert lorsque l’appareil est éteint, appuyez sur le bouton d’alimentation () pour allumer le caméscope.

2.Sélectionnez le mode Vidéo () ou Photo() en appuyant sur le bouton

MODE

3.Appuyez sur le bouton Q.MENU du caméscope pour afficher les options de menu disponibles. L’écran du menu rapide apparaît.

4.Touchez « Focus » (Mise au point).

5.Touchez l’option souhaitée.

Spécifiez les valeurs de réglage en conséquence.

Pour quitter le menu, touchez les onglets Quitter () ou Retour ().

Resolution

EV

Back Light

Focus

Focus


AUTO

Auto


Manual

1 / 1

Touch Point

Lorsque vous utilisez les éléments de menu ou les éléments Q.MENU, certains de ces options ne peuvent pas être activées en même temps ou risquent d’être grisées.

Pour obtenir de plus amples informations sur les éléments grisés, reportez-vous à la section Dépannage, page « 134~137 ».

Pour faciliter la compréhension, tous les exemples relatifs aux réglages de menu figurant dans cette page

sont expliqués en fonction des méthodes les plus simples.

55

Les méthodes de réglage de menu peuvent varier selon les options de menu sélectionnées par l’utilisateur.


Page 55
Image 55
Samsung HMX-M20BP/EDC manual Enregistrement avancé, Opérations Liées AUX Menus ET AUX Q.MENUS, Utilisation de l’onglet Menu

HMX-M20SP/EDC, HMX-M20BP/EDC specifications

The Samsung HMX-M20BP/EDC and HMX-M20SP/EDC are compact camcorders designed for users who value portability and high-quality video recording. These models showcase Samsung’s commitment to innovation in the video recording space, combining advanced technology with user-friendly features.

One of the standout features of the HMX-M20 series is its ability to capture full HD video at 1920 x 1080 resolution. This allows users to record their memories with stunning clarity and detail. The camcorders are equipped with a 10x optical zoom, enabling users to get closer to their subjects while maintaining high image quality. This feature is particularly beneficial for capturing distant subjects during events or nature outings.

The HMX-M20BP/EDC and HMX-M20SP/EDC models are designed with a dual codec format, offering users the flexibility to choose between MP4 and H.264 formats for video recording. This versatility allows for easy sharing and playback across various devices without compromising the quality of the footage. Additionally, the inclusion of a built-in HDMI port facilitates seamless connectivity to HDTVs for an enhanced viewing experience.

In terms of design, these camcorders stand out for their ergonomic build. They are compact and lightweight, making them easy to carry and handle. The intuitive controls and a large touchscreen LCD provide a user-friendly interface, allowing users to navigate through settings and playback effortlessly.

Samsung has also integrated advanced stabilization technology in the HMX-M20 series, which minimizes the effects of camera shake during recording. This feature ensures that users can capture smooth, steady footage even while on the move, making it ideal for vlogging or recording active scenes.

Moreover, the HMX-M20BP/EDC model comes with enhanced low-light performance capabilities, allowing users to capture quality video even in dimly lit environments. This is achieved through improved sensor technology that increases sensitivity to light, making nighttime and indoor recordings clearer.

The camcorders also support various shooting modes, including time-lapse, which enables creative filming possibilities. Users can experiment with different settings and effects, enhancing the storytelling aspect of their videos.

Overall, the Samsung HMX-M20BP/EDC and HMX-M20SP/EDC camcorders are an excellent choice for anyone seeking a reliable, high-performance video recording solution. With their combination of advanced technology, compact design, and user-friendly features, these camcorders are perfect for casual users and aspiring videographers alike.