Digital Home Theater System
Class 1 Laser Product
Safety Warnings
Preparation
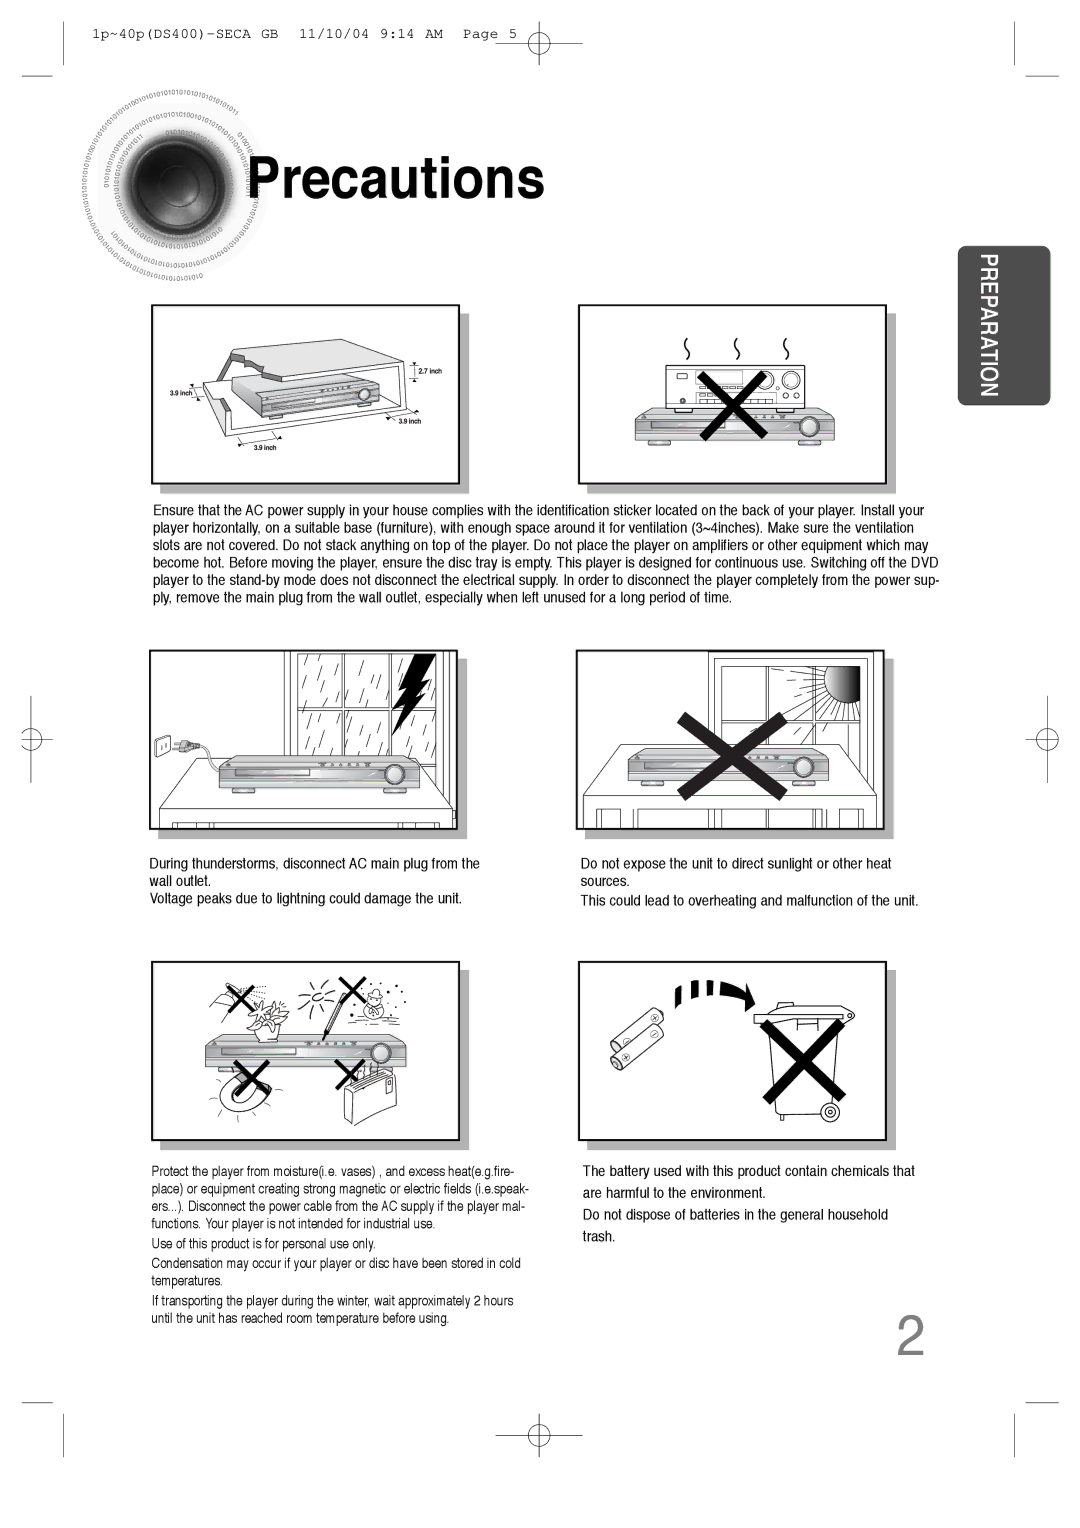
Precautions
Features
Contents
Copy Protection
Playable Discs
Disc Recording Format
Front Panel
Description
Rear Panel
Remote Control
Insert Remote Batteries
Range of Operation of the Remote Control
Position of the DVD Player
Connecting the Speakers
Back of the Speakers
Composite Video Good Quality
Connecting the Video Out to TV
Selecting the Video Format
What is Progressive or Non-Interlaced Scanning?
Connecting an External Digital Component
Connecting External Components
Connect Video Out on the DVD player to Video In on the TV
Connecting an External Analog Component
What is Anynet?
How to Connect to Anynet
Connecting the FM and AM Antennas
Press TV/VIDEO button to select Video mode
Power supply
Press the Power button to turn on the TV
On the remote control flashes
Press DVD button to select DVD/CD mode
To stop playback Press Stop during playback
Disc Playback
Press OPEN/CLOSE button to open the disc tray
Load a discs
Groups and tracks DVD-AUDIO
Disc terminology
Press the Remain button
Checking the Remaining Time
Press the Stop button to stop playback
MP3 -CD Playback
Press
To change the album
Press To skip to the next slide
Slide Mode
Press Slide Mode button
Jpeg File Playback Jpeg
Press Cursor , , , buttons during playback
Digest Function
Rotate/Flip Function
Press Digest
Zoom Function
DivX Playback
Skip Forward/Back
Fast playback
Subtitle Display
Minute Skip function
Press Info button
Displaying Disc Information
Press and hold
Fast/Slow Playback
Fast Playback DVD VCD CD MP3
Slow Playback
Skipping Scenes/Songs
Briefly press
Playing Frame by Frame DVD
Press Repeat button
Repeat Playback
Press Info button twice
Press Enter
Desired
Press Cursor button
Angle Function
Move to Angle
Display
Button
Zoom Function
Zoom Screen Enlarge Function DVD VCD
Press Zoom
Bonus Group DVD
Bonus Group / Navigating Pages
Audio Language Selection Function DVD
1Press Info button twice
Desired audio language
Press the numeric
1Press Info button
Time display
Chapter display
Buttons to
Using Disc Menu
Stop mode
Press Cursor
Press Cursor
Using the Title Menu
Press Menu button to exit the setup screen
Button to move to ‘Title Menu’
Press Return button to return to the previous level
Setting the Language
Stop mode Press Cursor
Press Menu button to exit the setup screen
Code Language
Language Code List
Setting TV Screen type
Adjusting the TV Aspect Ratio Screen Size
43LB
43PS
‘Setup’ and then
Setting Parental Controls Rating Level
Press Cursor , button
Enter the password
Setting the Password
Button Enter button
During playback, press
Setting the Wallpaper Jpeg DVD VCD
Then press
Stop mode Press Cursor Button to move to
Press Menu ‘Setup’ and then
Press to select Press Menu
Press the Menu
DVD Playback Mode
Press the Menu button Press Cursor , buttons
AV Sync Setup
Setting the Speaker Mode
Speaker
Press Enter button Press Cursor
Setting the Test Tone
Press Menu ‘Audio’ and then
Press Test Tone button
Setting the Delay Time
Stop mode
Press Cursor button
Setting Center Speaker
Press Cursor , to set the Delay time
Button to move to
Setting the Audio Quality
Press Sound
Method 2 When manually adjusting with the Sound Edit button
Press Enter button
Press Cursor , to adjust the ‘DRC’
Stop mode, press
Menu button
Press DSP/EQ button
Sound Field DSP/EQ Function
Press PL II Mode button
Dolby Pro Logic II Mode
Mode
Press PL II Mode
Buttons to select the mode
Dolby Pro Logic II Effect
Main Unit
Remote Control Unit Press Tuner
Listening to Radio
Band button
You can store up to
Presetting Stations
To confirm the sleep timer setting, press Sleep button
Convenient Functions
Press Sleep button
Press Dimmer button Press Mute button
Mute Function
Corresponding to your brand of TV
When operating a TV with the remote control
Brand Code
TV Brand Code List
Surround Sound is not
Before Calling for Service
Playback does not start
Sound is not produced
Level has been forgotten
Password for rating
Handling discs
Disc Storage
Handling and Storing Discs
Input
Specifications
Number
Samsung Limited Warranty
Samsung Electronics CANADA, INC Headquarters


 Precautions