1CH Blu-ray
Please register your product at
Match Wide Blade of Plug to Wide
Safety Information
English
SLOT, Fully Insert
Licence
Disc Storage & Management
Handling Cautions
Open Source Licence Notice
Using the 3D Function
Important Health and Safety Information for 3D Pictures
Contents
Disk and Format Compatibility
Disc Types and content your Product can Play
Getting Started
Disc Types your Product cannot Play
BD-LIVE
Region Code
Logos of Discs the Product can Play
DTS
Supported Formats
Flac
Music File Support
Picture File Support
PNG
FM Antenna
Accessories
Avchd Advanced Video Codec High Definition
Front Panel
Rear Panel
For the Speaker Cable
For the Power Cord
Toroidal Ferrite Core
Main Unit
Use the RDS function to receive FM stations
Remote Control
Tour of the Remote Control
Battery size AAA
Installing batteries in the Remote Control
Setting up the Remote Control
TV Control Codes
Speaker Components
Connecting the Speakers
Connections
Installing the Speakers on the Tallboy Stand
Connecting The Speakers
Subwoofer Surround Speaker L Centre Speaker
Speaker R
Connecting to External Devices
Connecting to TV/External Devices
Connecting to a TV
Method 2 AUX in Connecting an External Analogue Component
WEP OPEN/SHARED, WPA-PSK TKIP/AES, WPA2-PSK TKIP/AES
Connecting to a Network Router
Wired Network
Accessing the Settings Screen
Settings
Initial Settings Procedure
Access steps may differ depending on the menu you selected
Detailed Function Information
Buttons on the Remote Control Used for the Settings Menu
Settings Menu Functions
Auto and you are using an Hdmi
Conversion When Movie Frame 24Fs is set to Smart Hub
Settings Distance Lets you adjust
Converts DVD playback to
Video. You can set the delay
When the product is attached to a
Delay so that the audio syncs with
Configure the network connection
Enter the default PIN to access
Wired USB keyboards are not
Default security PIN is
Are restored, all the user stored
Measurement
Auto Sound Calibration
Auto Sound Calibration
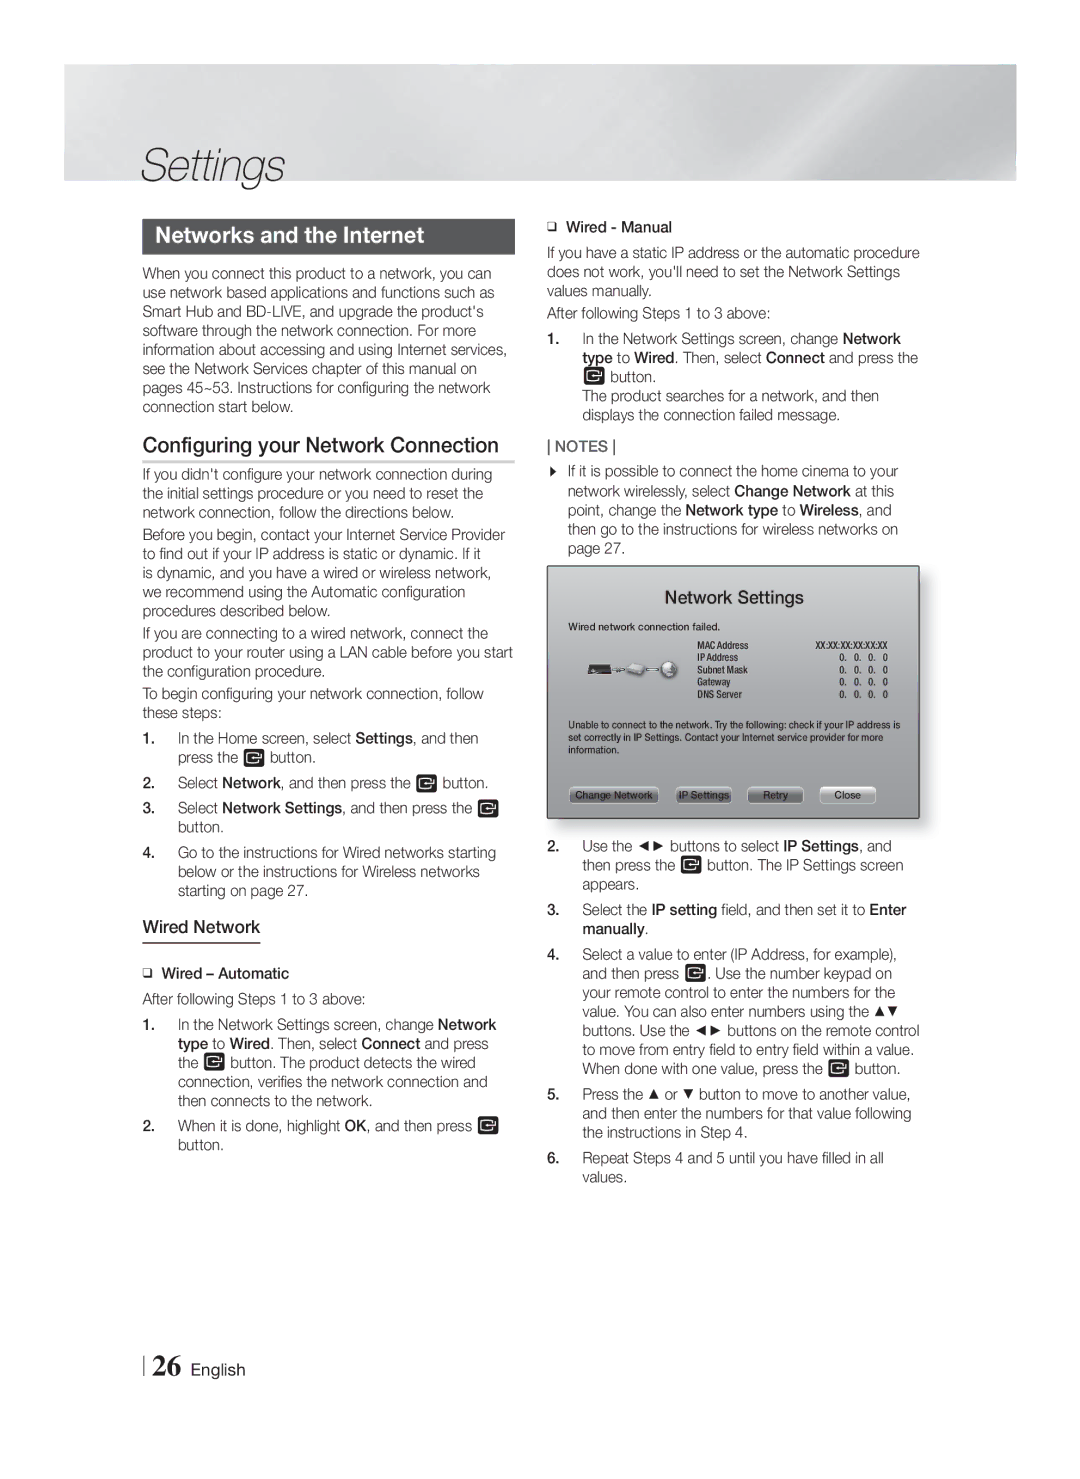
Network Settings
Configuring your Network Connection
Wired Network
Networks and the Internet
Wireless Network
Wpspbc
Wi-Fi Direct
Through the Product Using a PIN
Through the Wi-Fi Device
Through the Product Using PBC
Upgrading Software
Update by USB
Update now
Auto update
Click Support on the top right
Media Play
All Content Screen
Using the All Content Screen
Playing Commercial Discs
To Download the AllShare Software
Playing a Disc with User Recorded Content
Using the AllShare Network Function
Buttons on the Remote Control used for Video Playback
Controlling Video Playback
Using the Tools Menu
Movie The best setting for
Select to set the picture mode
Standard Choose this setting
Video signal. If this occurs, adjust
Controlling Music Playback
Using the View & Options Menus
Buttons on the Remote Control used for Music Playback
Music Screen Controls
Shuffling Tracks on an Audio CD
Information Select to see content Options Encoding
Repeating Tracks on an Audio CD
Creating a Playlist from a CD
Ripping
Using Bluetooth
What is Bluetooth?
Do not disconnect the device while ripping is in progress
Playing Photo Contents
Using Buttons on the Remote Control
Listening to Radio
About RDS Broadcasting
Setting Mono/Stereo
Presetting Stations
PTY Program Type indication PTY-SEARCH function
Using the Special Effects Remote Control Buttons
To search for a program using the PTY codes
DSP
OFF
Sound Setting
HDMI-CEC
Network Services
Network Services
Before Using Movies & TV Shows Or Apps
Logging In to Your Samsung Account
Apps Screen at a Glance
Using Movies & TV Shows
Using Apps
Starting an Application
Using the More Apps Screen
Downloading Applications
Sorting the Apps
Using the Options Menu Functions
Delete
Move to Folder
Rename Folder
Apps Moved pop up appears. Press the E button
Screen Mirroring
Update Apps
Using the Web Browser
Link Browsing and Pointer Browsing
Moves to the previous Moves to the next web
Using the Keyboard Pop-up
Control Panel at a Glance
Using the Setting Menu
Options on the Keyboard Pop-Up
Linking your Internet Service Accounts to the Product
Additional Information
Settings 3D Settings
Appendix
Hdmi OUT
Appendix
DTS-HD
Digital Output Selection
PCM
DVD DTS
Resolution according to the contents type
Is the disc severely damaged?
Troubleshooting
Step motion playback
Dolby Digital 7.1 CH
Product is not
Screen High-bandwidth Digital Content Protection Appendix
Changed
Good reception
Unstable
BD-LIVE service
When using the BD-LIVE
Check the connection
Specifications
1CH Blu-ray Ev Eğlence Sistemi
Lütfen ürününüzü
Türkçe
Güvenlik Bilgileri
Uyarı
Lisans
Disklerin Saklanması ve Yönetilmesi
Kullanımla İlgili Dikkat Edilecek Hususlar
Divx Vİdeo Hakkinda
3D oynatma modundaki video çözünürlüğü orijinal
3D İşlevinin Kullanılması
3D Görüntülerİne Daİr Önemlİ Sağlik VE Güvenlİk Bİlgİlerİ
İçindekiler
Telif Hakkı
Ürününüzün oynatabileceği Disk Tipleri ve içeriği
Başlarken
Disk ve Biçim Uyumluluğu
Ürününüzün Oynatamayacağı Disk Tipleri
İngiltere, Fransa, Almanya, vb
Bölge Kodu
Ürünün Oynatabileceği Disklerin Logoları
Ülkelerdeki PAL yayın sistemi
Desteklenen Biçimler
USB bağlantısına ilişkin notlar
Müzik Dosyası Desteği
Görüntü Dosyası Desteği
Aksesuarlar
10 Türkçe
Uzaktan Kumanda Sensörü Ekran USB SES Kontrolü
Ön Panel
Arka Panel
Hoparlör Kablosu İçin
Toroidal Ferit Çekirdeği
Güç Kablosu için
Ana Ünite
FM istasyonlarını almak için RDS fonksiyonunu kullanın
Uzaktan Kumanda
Uzaktan Kumandanın Tanıtılması
TV Kontrol Kodları
Uzaktan Kumandaya pillerin takılması
Uzaktan Kumandanın Ayarlanması
14 Türkçe
Hoparlör Bileşenleri
Bağlantılar
Hoparlörleri Bağlama
16 Türkçe
Hoparlörleri Tallboy Standına Kurma
Hoparlörleri Bağlama
Stand Hoparlör Veya
Hoparlör Sağ
Hoparlör Sağ
Harici Cihazlara Bağlama
TV/Harici Cihazlara Bağlama
Bir TV’ye Bağlanma
Yöntem 2 AUX Gİrİşİ Harici bir Analog Bileşeni Bağlama
Kablosuz IP paylaştırıcı Geniş bant Hizmeti
Bir Ağ Yönlendiricisine Bağlanmak Kablosuz Ağ
Kablolu Ağ
WEP AÇIK/PAYLAŞILAN, WPA-PSK TKIP/AES, WPA2-PSK TKIP/AES
Ana Ekran
Ayarlar
Başlangıç Ayarları Prosedürü
Ayarlar Ekranına Erişme
Ayrıntılı İşlev Bilgisi
Ayarlar Menüsü için Kullanılan Uzaktan Kumanda Düğmeleri
Ayarlar Menüsü İşlevleri
22 Türkçe
Ayarlamanızı sağlar. Gecikmeyi
Kullanarak bir Wi-Fi Direct cihazına
Sesin videoyla senkronize olmasını
Ila 300 milisaniye arasında
Hdmi Kablosunu kullanarak
24 Türkçe
Ölçüm
Oto Ses Kalibrasyonu
Oto Ses Kalibrasyonu
Kablolu Ağ
Ağlar ve İnternet
Ağ Bağlantınızın Yapılandırılması
Ağ Ayarları
Kablosuz Ağ
28 Türkçe
PBC Kullanarak Ürün Üzerinden
Wi-Fi Cihazı Üzerinden
Yazılımın Yükseltilmesi
Bir PIN Kullanarak Ürün Üzerinden
USB ile Güncelleme
Şimdi güncelle
Otomatik Güncelleme
30 Türkçe
Tüm İçerik Ekranının Kullanılması
Ortam Oynatma
Tüm İçerik Ekranı
Ticari Disklerin Oynatılması
32 Türkçe
AllShare Ağ İşlevinin Kullanılması
AllShare Yazılımını İndirmek İçin
Video Oynatmanın Kontrolü
Video Oynatmak için kullanılan Uzaktan Kumanda Düğmeleri
Araçlar Menüsünün Kullanılması
34 Türkçe
Kapalı Normal oynatmaya
Bir başlığı, bölümü veya belli bir
Konumu tekrarlamak için seçin
Dönmek için seçin
Müzik Çalmak için kullanılan Uzaktan Kumanda Düğmeleri
Görünüm ve Seçenekler Menülerinin Kullanılması
Müzik Çalmanın Kontrol Edilmesi
36 Türkçe
Müzik Ekranı Kontrolleri
Bir CDden Oynatma Listesi Oluşturma
Bir Ses CD’sindeki Parçalarının Tekrarlanması
Bir Ses CD’sindeki Parçaların Karışık Çalınması
38 Türkçe
Ripleme
Bluetooth Kullanımı
Bluetooth nedir?
40 Türkçe
Bluetooth cihazının Ev Sinemasıyla bağlantısını kesmek için
Fotoğraf İçeriklerinin Oynatılması
Radyo Dinleme
Uzaktan Kumanda Düğmelerinin Kullanılması
RDS Yayını Hakkında
Mono/Stereo Ayarı
İstasyonların Önceden Ayarlanması
PTY kodlarını kullanarak bir program aramak için
Uzaktan Kumandanın Özel Efektler Düğmelerinin Kullanılması
PTY Program Türü göstergesi ve PTY-ARAMA işlevi
44 Türkçe
HDMI-CEC Açik
Ağ Hizmetleri
06 Ağ Hizmetleri
Bir Bakışta Uygulamalar Ekranı
Filmler ve TV Şovlarını Kullanma
Uygulamaların Kullanılması
46 Türkçe
Tüm İndirilenler Ekranının Kullanılması
Uygulamaların İndirilmesi
Bir Uygulamanın Başlatılması
Uygulamaların Sıralanması
Uygulamalarım Öğesinden Uygulama Silinmesi
My Apps’ı Düznle
Uygulamalarım Öğesine Uygulama Eklenmesi
Uygulamalarım Öğesinde Bir Uygulamanın Taşınması
Sil
Klasöre Taşı
Klsr Yne Adlndr
Edüğmesine basın. Klavye görüntülenir
Web Tarayıcısının Kullanılması
Bluetooth işlevini kapatmanızı önemle tavsiye ederiz
Uyglma Günclle
Bağlantı Tarama ve İşaretçi Tarama
Önceki sayfaya gider Sonraki web sayfasına gider
Bir Bakışta Kontrol Paneli
Klavye Açılır Menüsünün Kullanılması
52 Türkçe
Ayarlar Menüsünün Kullanılması
Klavye Açılır Menüsü Seçenekleri
İnternet Hizmet Hesaplarınızın Ürünle Birleştirilmesi
54 Türkçe
İlave Bilgiler
Notlar
Bağlantılar
07 Ek
Veri Akışı
Dijital Çıkış Seçimi
56 Türkçe
Kodlanmış
İçerik tipine göre çözünürlük
Özelleştirilmiş mi?
Sorun Giderme
58 Türkçe
Disk ağır hasarlı mı?
Döner
Değiştirilemiyor
Ray Diskin kılıfına bakın ve ardından uygun işlevi seçin
Sonra GÜÇ düğmesine basın
60 Türkçe
Sinyal/gürültü oranı 55 dB Kullanılabilir hassaslık 12 dB
Spesifikasyonlar
Ağırlık 30 kg
Empedans
AH68-02630P-06
Contact Samsung World Wide
Samsung World Wide ile iletişim