HW-K360
For further information, refer to the Web Manual
Safety Information
Safety Warnings
Precautions
Unpacking
Connecting Electrical Power
Main Unit Subwoofer Remote Control / Battery
Optical Cable
Lit
Connecting the Subwoofer to the Main Unit
Is not lit
· 4 · English
Connecting to Your TV
Method 1. Connecting with a Cable
Device Name Samsung Sound
Turn on your Samsung TV and the Soundbar
· 6 · English
Connecting to AN External Device
Optical Cable
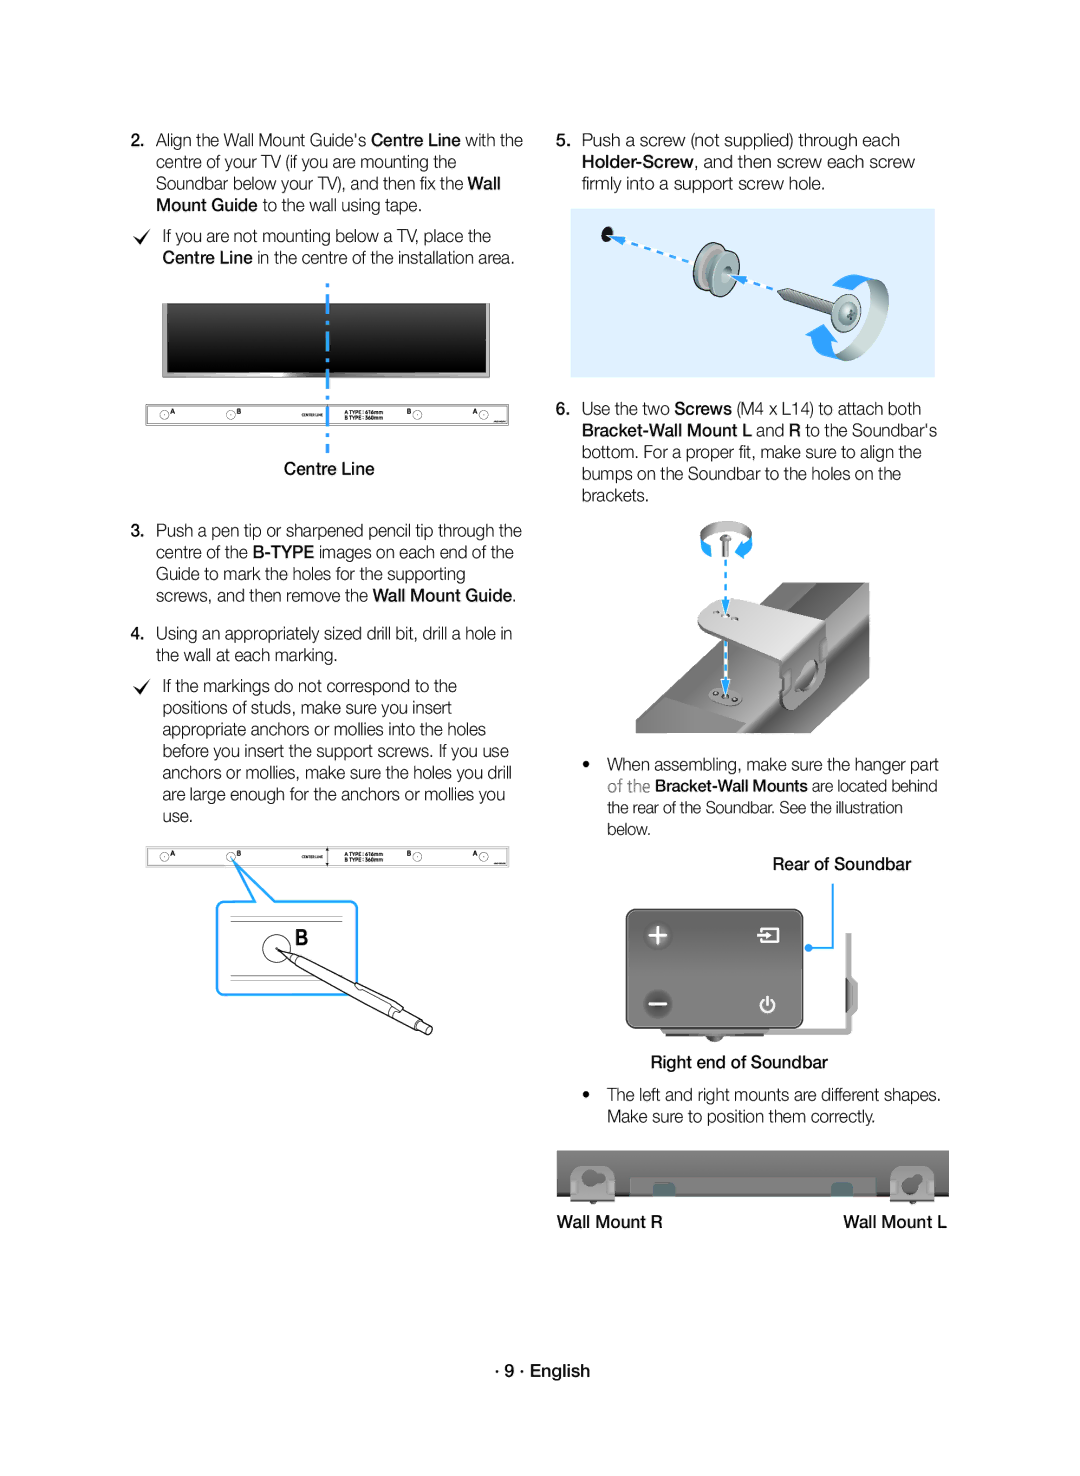
Installing the Wall Mount
Installation Precautions
Rear of Soundbar Right end of Soundbar
Centre Line
Wall Mount R Wall Mount L · 9 · English
Detaching the Soundbar from the Wall
Effect
Remote Control
Sound
Source
You can select from TREBLE, Bass
Controlling the Soundbar using Your TV Remote Control
Installing the Battery in the Remote Control
Control
Troubleshooting
License
Specifications
Important Note about Service
Open Source Licence Notice
Page
Correct disposal of batteries in this product
Manuel dutilisation
Consignes DE Sécurité
Avertissements Relatifs a LA Sécurité
Consignes
· 2 · Français
Unité principale
Déballage
Connexion À Lalimentation Électrique
Câble optique
Unité principale Caisson de basse
Connexion DU Caisson DE Basse À Lunité Principale
· 4 · Français
Méthode 1. Connexion avec un câble
Connexion À Votre Téléviseur
Dessous de lunité principale
Sélectionnez Yes Oui avec la télécommande du téléviseur
Connexion À UN Dispositif Externe
Câble optique
Fixation de support mural 2 pièces
Consignes dinstallation
Fixation murale gauche
Vis 2 pièces
Page
Démontage DU Soundbar DU MUR
De la musique à partir dun périphérique USB
Télécommande
Effets Sonores Night Mode Mode Nuit
Pour sadapter à lécoute
Installation de la pile dans la télécommande
· 12 · Français
Dépannage
Licence
Puissance Unité principale
5V / 0,5A
Poids Unité principale
De sortie KHz
Page
Elimination des batteries de ce produit
Manuale utente
Per ulteriori informazioni, vedere il manuale Web
Informazioni Sulla Sicurezza
Attenzione
Precauzioni
· 2 · Italiano
Unità principale Subwoofer Telecomando / batteria
Contenuto Della Confezione
Collegamento Dellalimentazione Elettrica
Cavo ottico
Collegamento DEL Subwoofer Allunità Principale
· 4 · Italiano
Metodo 1. Collegamento con un cavo
Collegamento AL Televisore
Cc Per ulteriori informazioni, vedere il manuale Web
Selezionare Sì con il telecomando TV
Collegamento a UN Dispositivo Esterno
Cavo ottico
Vite 2 EA
Precauzioni per linstallazione
Staffa per montaggio a parete 2 EA
Cm o più · 8 · Italiano
Staffa destra per
Montaggio a Parete · 9 · Italiano
Distacco Della Soundbar Dalla Parete
· 10 · Italiano
Audio
Telecomando
Effetto
Sorgente
Comando della soundbar tramite il telecomando della TV
Installazione della batteria nel telecomando
Accensione Bluetooth
Comando
Licenza
Generali
Avviso DI Licenza Open Source
Specifiche
Amplificatore
Page
Corretto smaltimento delle batterie del prodotto
Applicabile nei Paesi con sistemi di raccolta differenziata
Manual do Utilizador
Para obter mais informações, consulte o manual da Web
Informações DE Segurança
Cuidado
AVISO, NÃO Ingerir a PILHA, Perigo DE Queimaduras Químicas
Cuidados a TER
· 2 · Português
Unidade principal Subwoofer Controlo remoto/ Pilhas
Desembalar
Ligação À Corrente Eléctrica
Cabo óptico
Ligação automática não está concluída
Ligar O Subwoofer À Unidade Principal
Ligação automática está concluída
Apagado Tomada
Método 1. Ligar com um Cabo
Ligar AO Televisor
Cc Para obter mais informações, consulte o manual da Web
Seleccione Yes com o controlo remoto do televisor
Cabo óptico
Ligar a UM Dispositivo Externo
Cabo ótico
· 7 · Português
Suporte de fixação na parede 2 EA
Instalar a Fixação DE Parede
Cuidados a Ter na Instalação
Parafuso 2 EA
Fixação na
Parede D Parede E · 9 · Português
Retirar O Soundbar DA Parede
· 10 · Português
Controlo Remoto
· 11 · Português
Controlar o Soundbar com o Controlo Remoto do Televisor
Colocar as Pilhas no Controlo Remoto
Controlo remoto não funciona As pilhas estão gastas?
Volume está no mínimo?
Não é emitido som Função Silêncio está ligada?
Seu televisor é compatível com TV SoundConnect?
Especificações
Aviso DE Licença DE Open Source
Nota Importante Sobre O Serviço
Geral
Page
Eliminação correcta das baterias existentes neste produto
Manual del usuario
Para más información, consulte el Manual de web
Información DE Seguridad
Precaución
Precauciones
· 2 · Español
Unidad principal
Desembalaje
Conexión DE Alimentación Eléctrica
Cable óptico Subwoofer Mando a distancia / Pila
Modo en espera y el LED azul no se iluminará
Conexión DEL Subwoofer a LA Unidad Principal
Azul no El enchufe de alimentación en la toma de corriente
· 4 · Español
Cc Para más información, consulte el Manual de Web
Conexión a UN Televisor
Método 1. Conexión con un cable
Cable óptico
Seleccione Yes Sí con el mando a Distancia del TV
Conexión a UN Dispositivo Externo
Cable óptico
Escuadra de montaje en pared
Precauciones en la instalación
Montura de pared
Tornillo
Page
Separación DE LA Soundbar DE LA DE Pared
Mando a Distancia
· 11 · Español
Control de la Soundbar con el mando a distancia del TV
Power
OFF-POWER Link
Instalación de la pila en el mando a distancia
Licencia
Especificaciones
Aviso DE Licencia DE Código Abierto
Nota Importante Sobre EL Servicio
Peso Unidad principal
Page
Producto
AH68-02608J-01