Waste Electrical & Electronic Equipment
AFTER SALES SERVICE
This device is a Class B digital apparatus
Correct Disposal of This Product
A still image may cause permanent damage to the TV screen
Precautions When Displaying a Still Image
Page
Contents
USING THE VARIOUS FUNCTIONS
Symbols
Contents
SETTING THE TIME
Viewing the Control Panel
POWER
SPEAKERS HEADPHONE REMOTE CONTROL SENSOR
POWER INDICATOR
English-5
Viewing the Connection Panel
Power Input
Option
Connecting a Computer
Connecting a Set-Top Box, VCR or DVD
Viewing the Connection Panel
English-7
Connecting External A/V Devices
Kensington Slot
Viewing the Connection Panel
Viewing Pictures From External Sources
Find that the remote control is no longer operating correctly
Inserting the Batteries in the Remote Control
Purchase your set
The performance of the remote control may be affected by bright light
Viewing the Remote Control All Functions Except Teletext
Viewing the Remote Control Teletext Functions
Placing in Standby Mode
Switching On and Off
The mains lead is attached to the rear of your set
Set up your set using the on-screen menu system
Becoming Familiar with the Remote Control
The remote control is used mainly to
Change channels and adjust the volume
Netherlands - Switzerland - Sweden - United
The following settings are available
Plug & Play
Belgium - Germany - Spain - France - Italy
Plug & Play
If you want to reset this feature
English-15
English-16
Selecting TV Mode or an Input Source
English-17
Editing an Input Source Name
English-18
Choosing Your Language
English-19
Storing Channels Automatically
BG - DK - I - L
When storing channels manually, you can choose
Storing Channels Manually
AUTO - PAL - SECAM - NTSC4.43
English-21
Storing Channels Manually
English-22
Editing the Channels
You can exchange the numbers of two channels, in order to
Sorting the Stored Channels
Then
Giving Channels Names
Dynamic - Standard - Movie - Custom
Changing the Picture Standard
Select the option Contrast , Brightness, Sharpness , Colour
Adjusting the Custom Picture
or Tint-NTSC only to be adjusted by pressing the or button
button to reach the required setting
Cool 2 - Cool 1 - Normal - Warm 1 - Warm
Adjusting the Screen Background Colour
Standard - Speech
Changing the Sound Standard
Reduces the differences in volume level between broadcasters
Selecting Auto Volume Control
English-30
Setting the Clock
Off, 30, 60, 90, 120, 150, 180 minutes
Switching Off Automatically
Press the
Switching the Television On and Off Automatically
You can set the On/Off timers so that the set will
Volume level
Displaying Information
Setting the Blue Screen Mode
The information displayed varies according to the selected source
This information is divided into numbered pages see diagram
Teletext Feature
Information provided includes
You can display Teletext information at any time on your set
Displaying the Teletext Information
Press the TV
Press the
Using the various display options
Selecting a Page by Number
To display
Storing Teletext Pages
Using FLOF to Select a Page
refer to page 47
Setting Up Your PC Software Based on Windows XP
English-39
Coarse and Fine Tuning of the Image
English-40
Changing the Image Position
You can replace all image settings with the factory default values
Initializing the Image Settings
Result The message “Image Reset has completed.” is displayed
English-42
Adjusting the PC Screen Automatically
English-43
Picture Mode
Entertain - Internet - Text - Custom
Adjusting the Custom Picture
Adjusting the Screen Background Colour
Cool - Normal - Warm - Custom
English-44
English-45
Customizing the Colour
Check that the mains lead has been connected to a wall socket
Troubleshooting Before Contacting Service Personnel
Clean the upper edge of the remote control transmission window
Adjust the Coarse or Fine function. refer to page
Troubleshooting Before Contacting Service Personnel
Power Saver
LE20S51BU
Technical and Environmental Specifications
LE15S51B
LE20S51B
Vertical
Display Modes
Resolution
Horizontal
Retractable Stand
Using Your TV in Another Country
Using the Anti-Theft Kensington Lock
Mounting pad
Installing VESA compliant mounting devices
English-52
Components
Installing the Wall Mount Kit
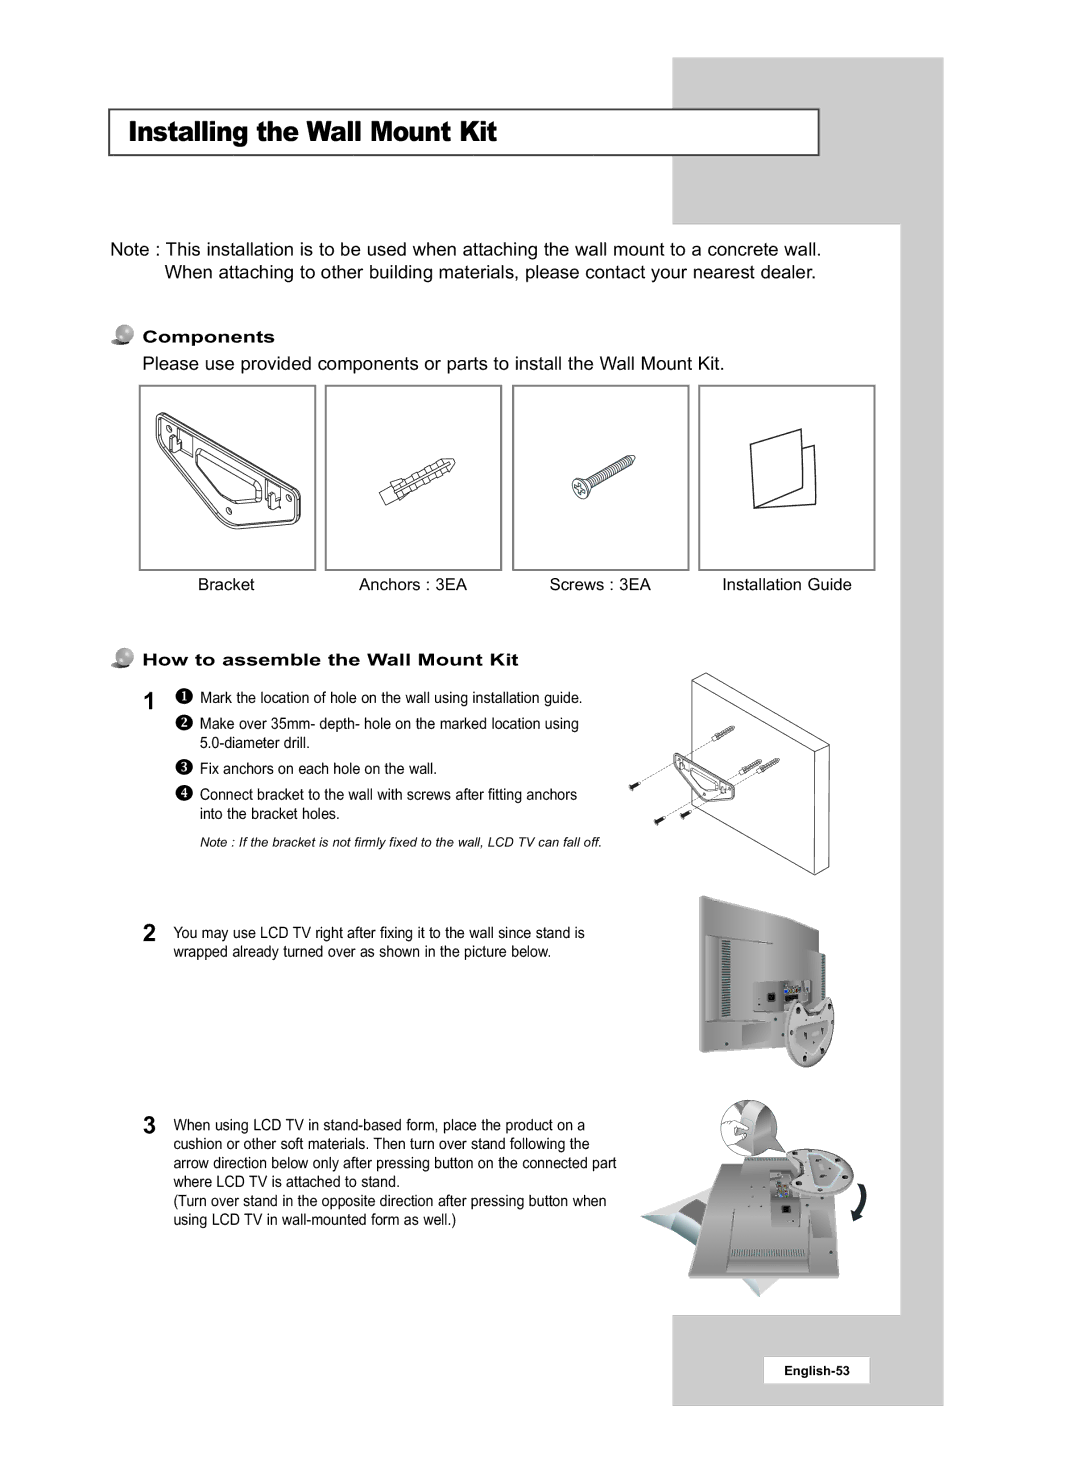
Please use provided components or parts to install the Wall Mount Kit
How to assemble the Wall Mount Kit
2 Angle abjustment section
How to adjust an angle
Installing the Wall Mount Kit
1 Angle adjustment section of
Correct Disposal of This Product
AFTER SALES SERVICE
Waste Electrical & Electronic Equipment