Contact Samsung wereldwijd
Contact Samsung WORLD-WIDE
Comment contacter Samsung dans le monde
Kontakt zu Samsung
Precautions When Displaying a Still Image
Contents
ΠWarranty card ΠSafety Guide ΠRegistration Cards
Installing the Stand
Installing the Wall Mount Kit
Cover-Bottom Stand Screw Cleaning Cloth
Viewing the Control Panel
Speakers Power
Power Indicator
Remote Control Sensor
Rear Panel Jacks
Viewing the Connection Panel
Service connection for qualified service engineer
Connecting an Aerial or Cable Television Network
Replace the cover
Viewing the Remote Control
Installing Batteries in the Remote Control
If the remote control doesn’t work, check the following
Mains lead is attached to the rear of your set
Switching On and Off
Placing Your Television in Standby Mode
Plug & Play
If you want to reset this feature
Storing Channels Manually
Storing Channels Automatically
Setting the Channel Manager
Button repeatedly. Press the Enter button
Activating the Child Lock
Sorting the Stored Channels
Repeat steps 7 for each channel to be locked or unlocked
Pressing Or button. Press the Enter button
Fine Tuning Channel Reception
Assigning Channels Names
Press the or
Button to decrease or increase the value of a
Adjusting the Custom Picture
Changing the Picture Standard
Particular item. Press the Enter button
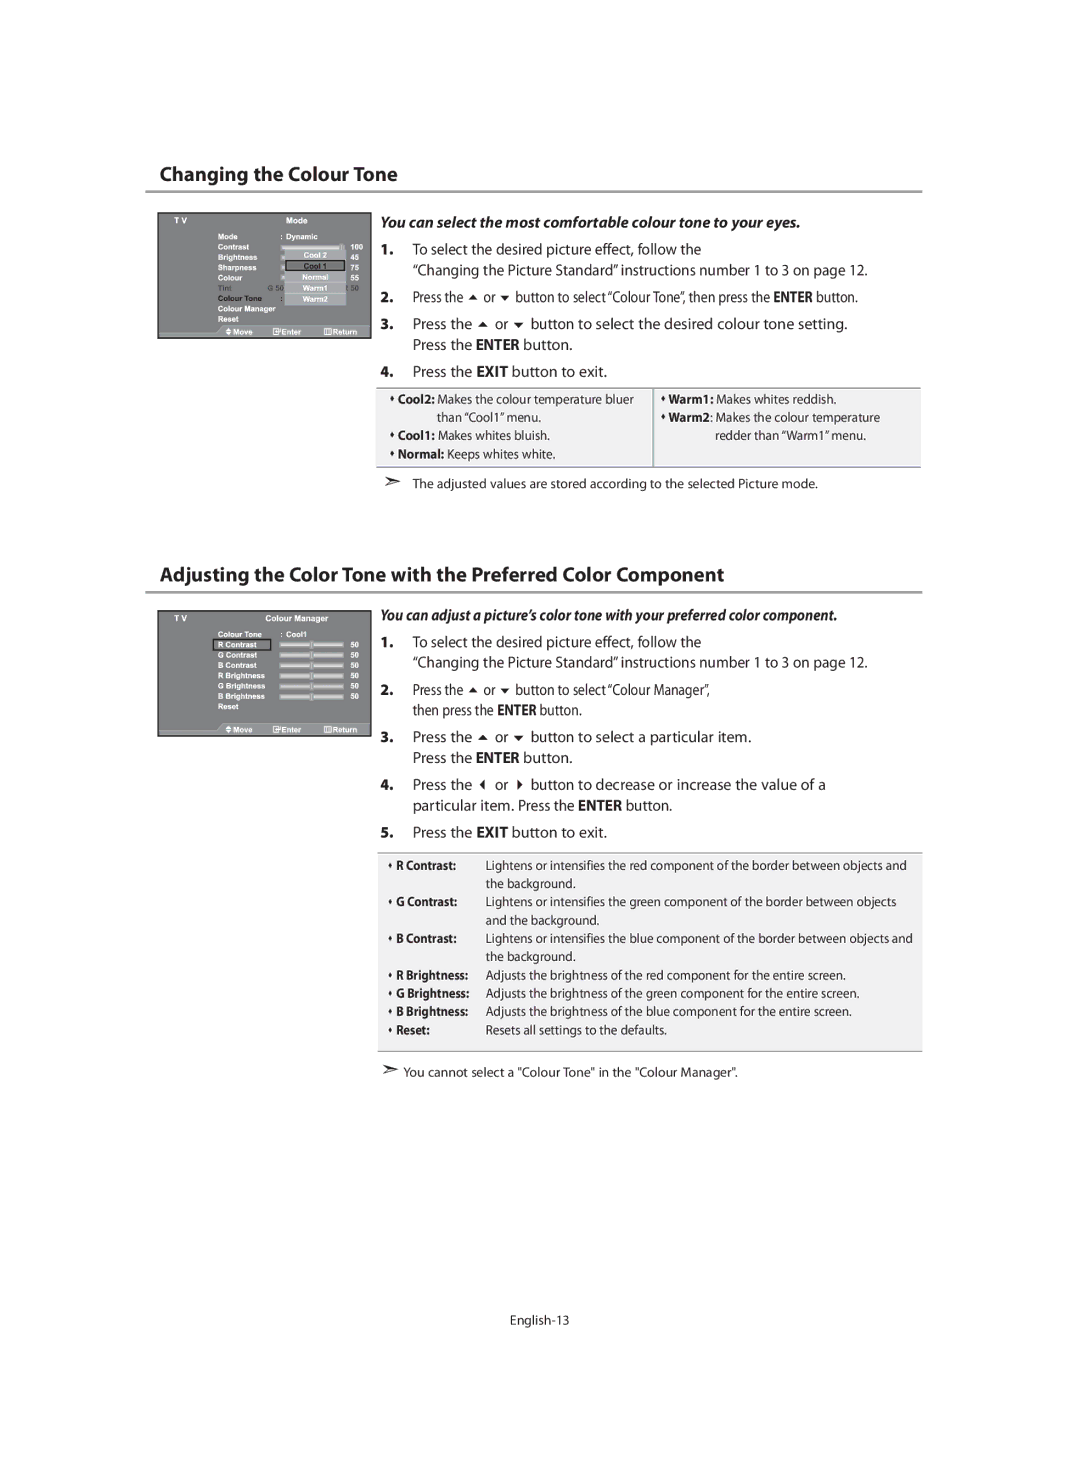
To select the desired picture effect, follow
Adjusting the Color Tone with the Preferred Color Component
Button to select the desired colour tone setting
Changing the Colour Tone
Changing the Auto Wide
Resetting the Picture Settings to the Factory Defaults
You can return to the factory defaults picture settings
Changing the Picture Size
Changing the Colour Space
Freezing the Current Picture
Digital Noise Reduction
DNIe Demo Digital Natural Image engine
Viewing the Picture In Picture PIP
Select Sound, then press the Enter button
Adjusting the Sound Settings
Setting the TruSurround XT SRS Tsxt
Changing the Sound Standard
Adjusting the Volume Automatically
Selecting the Internal Mute
Listening to the Sound of the Sub Picture
Setting and Displaying the Current Time
Resetting the Sound Settings to the Factory Defaults
Connecting Headphones
Selecting the Sound Mode
When finished, press the Enter button to return Press
Setting the Sleep Timer
Switching the Television On and Off Automatically
Select Setup, then press the Enter button Press
Press Button to select Game Mode, then press Enter button
Using Game Mode
Choosing Your Language
Press the Menu button to display the on-screen menu
Blue Screen
Setting the Blue Screen Mode / Selecting the Melody
Using the Energy Saving Feature
Setting the Blue Eye
Press the Enter button, to select Input
Selecting the Source
Editing the Input Source Names
Press the Enter button again, to select Source List
Using the Wiselink Function
Photo Printer
Button Operations
Press the Info button to configure the options
Using the Wiselink Menu
Using the Photo Jpeg List
Complete Steps 1 to 4 of Using the Wiselink Menu Press
Using the Options Menu
Speed
Using the Menu during a Slide Show
Viewing Photo File Information
Selecting a Photo and Slide Show
Background Music Setting
Rotating
Rotating function information Current OSD
Button Function
Displays a 2x, 3x or 4x zoomed-in image in full screen mode
Zooming-in
Zoom function information Current OSD Function
You can delete selected image files
Copying Image Files
Deleting Image Files
You can copy image files to a different memory card
Using the MP3 List
Printing a Photo
You can print image files directly with your printer
You can copy music files to a different memory card
Copying Music Files
Deleting Music Files
Music function information Current OSD Function
Setup displays the user settings of the Wiselink menu
Using the Setup Menu
Press the TTX/MIX button again
Part Contents
Teletext Decoder
Displaying the Teletext Information
Using Fastext to Select a Teletext
Using the various display options
Selecting a Specific Teletext
Setting Up Your Remote Control
Setting Up the Remote to Operate Your STB
Setting Up the Remote to Operate Your DVD
Brand Code
Remote Control Codes
Product Code
035 074 075 131
034 124 134 136 137
076
118
Setting up Your PC Software Based on Windows XP
Display Modes
640 x 31.469 59.940 25.175 720 x 70.087 28.322
Setting the PC
Coarse and Fine Tuning of the Image Image Lock
Press the Enter button to select Image Lock
Using the Anti-Theft Kensington Lock
Troubleshooting Before Contacting Service Personnel
Connect the Kensington lock cable
Technical and Environmental Specifications
Stand Swivel Left / Right
20˚ ~ 20˚
Symboles
Carte de garantie
Installation du support
Installation du kit de montage mural
Liste de pièces
Alimentation
Présentation du panneau de commande
Capteur de la télécommande
Enceintes
Entrée de l’alimentation
Présentation du panneau de branchement
Prises du panneau arrière
Prises du panneau latéral
Maintenance
Replacez le couvercle
Présentation de la télécommande
Installation des piles dans la télécommande
Si la télécommande ne fonctionne pas, vérifiez ce qui suit
Mode de mise en veille de votre télévision
Mise en marche et arrêt
Les réglages suivants sont disponibles
Sélectionnez le pays approprié à l’aide de la touche ou
Mémorisation automatique des chaînes
Mémorisation manuelle des chaînes
Pour réinitialiser cette fonction…
Réglage de Gestionnaire de Chaînes
Répétée sur la touche Appuyez sur le bouton Enter
Activation du verrouillage parental
Organisation des canaux mémorisés
Appuyez sur le bouton Pour sélectionner Marche
La touche Enter Appuyez sur le bouton
Attribution de noms aux canaux
Réception nette des chaînes grâce au réglage fin
La touche Enter
Modification de l’image standard
Réglage de l’image personnalisée
Élément particulier. Appuyez sur le bouton Enter
Changement de la nuance de couleur
Dans la section Modification de l’image standard à la
Appuyez sur le bouton Pour sélectionner Gestion. Couleurs
Rétablir les paramètres de réglage de l’image d’usine
Changement de la taille de l’image
Modification de Auto Wide Largeur Auto
Modification de l’espace couleur
Sélection du format de l’image
Réduction du bruit numérique
DNle Démo Digital Natural Image engine
Appuyez sur le bouton Pour sélectionner Source, puis sur
Affichage de l’Image dans l’image PIP
Appuyez sur le bouton ENTER. Appuyez sur le bouton ou pour
Sélectionner Marche, puis sur la touche Enter
Multicanaux
Changement de la norme Son
Réglage des paramètres du son
Paramétrage de la technologie TruSurround XT SRS Tsxt
Réglage automatique du volume
Sélection du mode Silence Int
Ecoute du son accompagnant l’image secondaire
Réglage et affichage de l’heure
Sélection du mode sonore Sound
Rétablir les paramètres de son par défaut
Connexion du casque
Terminé, appuyez sur le bouton Enter
Réglage de la minuterie de mise en veille
Marche et arrêt automatique du téléviseur
Désirée apparaisse. Arrêt, 30, 60, 90, 120, 150
Choix de la langue
Utilisation du Mode Jeu
Ecran Bleu
Réglage du mode d’écran bleu / Sélection de mélodie
Réglage du mode Blue Eye Yeux bleus
Utilisation de la fonction d’économie d’énergie
Sélection de la source
Modification du nom d’une source d’entrée
Français-23
Utilisation de la fonction Wiselink
Imprimante photo
Bouton Description
Français-25
Appuyez sur le bouton Info pour configurer les options
Utilisation du menu Wiselink
Utilisation de la liste Photo Jpeg
Utilisation du menu Options
Vitesse
Affichage des informations d’un fichier photo
Sélection d’une photo et d’un diaporama
Utilisation du menu durant un diaporama
Paramètres du fond musical
Rotation
Bouton Fonction
Zoom avant
Appuyez sur le bouton Info pour afficher l’option souhaitée
Informations sur la fonction de zoom OSD courant Fonction
Français-30
Copie de fichiers images
Suppression de fichiers images
Vous pouvez supprimer les fichiers images sélectionnés
Impression d’une photo
Utilisation de la liste MP3
Français-31
Copier tous les fichiers
Copie de fichiers audio
Suppression de fichiers audio
Informations sur la fonction Musique OSD courant Fonction
Utilisation du menu de configuration Setup
Appuyez sur le bouton TV pour quitter l’affichage de texte
DéCodeur télétexte
Affichage des informations Télétexte
Appuyez de nouveau sur la touche TTX/MIX
’écran normal
Sélection d’une page télétexte spécifique
TTX/MIX
Le texte caché réponses de jeux par exemple
Programmation de la télécommande
Page
Français-38
Codes de la télécommande
Magnétoscope
Marque Code
Câblosélecteur
Produit Code
Français-39
Samsung déCodeur
DéCodeur
031 068 Français-40
Cliquez sur Control Panel dans le menu Démarrer de Windows
Mode Résolution Fréquence Polarité
Paramétrage du logiciel PC Basé sur Windows XP
Modes d’affichage
Puis sur la touche Enter
Sélection du PC
Regl. Prec, puis sur le bouton Enter
Verrouillage Image
Utilisation du verrouillage Kensington antivol
Câble
Assurez-vous que les sources vidéo ou le PC sont allumés
Socle orientable Gauche/Droite
Spécifications techniques et environnementales
Symbole
ΠBedienungsanleitung ΠGarantiekarte Sicherheitshinweise
Lieferumfang
Montage des Ständers
Wandhalterung anbringen
Fernbedienungssensor
Bedienfeld
Lautsprecher Netztaste
Stromversorgungsanzeige
Anschlussfeld
Buchsen an der Rückseite
Netzkabelbuchse
An der Antenne oder am Kabelfernsehnetz anschließen
Serviceanschluss für qualifizierte Serviceingenieure
Schieben Sie die Abdeckung wieder auf die Fernbedienung
Fernbedienung
Batterien in die Fernbedienung einlegen
Legen Sie zwei AAA-Batterien ein
Drücken Sie auf der Fernbedienung die Taste Power
Ein-und Ausschalten
Schalten des Fernsehgeräts in den Standby-Modus
Kanäle manuell speichern
Kanäle automatisch speichern
So setzen Sie diese Funktion zurück
Programmverwaltung
Oder zu dem Programmplatz
Aktivieren der Kindersicherung
Gespeicherte Kanäle sortieren
Oder Um Ein auszuwählen
Drücken Sie dann die Taste Enter
Kanalnamen zuweisen
Kanäle mit Feinabstimmung einstellen
Dann die Taste Enter
Um eine bestimmte Option auszuwählen
Bildstandard ändern
Benutzereinstellung Bild anpassen
Zu erhöhen oder zu verringern. Drücken Sie die Taste Enter
Und drücken Sie dann die Taste Enter button
Farbwert ändern
Einstellen des Farbtons mit der bevorzugten Farbkomponente
Auszuwählen. Drücken Sie die Taste Enter
Ändern der automatischen Breite
Bildgröße wählen
Optimierung der Bildwiedergabe durch DNIe überzeugen
Aktuelles Bild einfrieren
Rauschminderung
Farbraum einstellen
Bild-in-Bild-Funktion verwenden PIP
Drücken Sie die Taste Enter erneut, um Modus auszuwählen
Tonwiedergabestandard ändern
Toneinstellungen anpassen
Einstellen von TruSurround XT SRS Tsxt
Lautstärke automatisch einstellen
Auswählen der internen Stummschaltung
Ton des Nebenbildes wiedergeben
Uhrzeit einstellen und anzeigen
Drücken Sie die Taste oder , um Reset auszuwählen
Anschließen eines Kopfhörers
Tonmodus wählen
Sie dann die Taste
Stellen der Einschlafschaltuhr
Fernseher automatisch ein- und ausschalten
Die Taste Enter Drücken Sie die Taste Oder
Die Taste Enter
Sprache der Bedienerführung wählen
Spielemodus verwenden
Drücken. Drücken Sie die Taste Enter
Anzeigen eines blauen Bildschirms / Melodie wählen
Verwenden der Energiesparfunktion
Einstellen des Blauen Auges
Drücken Sie die Taste ENTER, um Eingang auszuwählen
Signalquelle auswählen
Signalquellennamen bearbeiten
Drücken Sie die Taste ENTER, um Quellen auszuwählen
Taste Vorgang
Verwenden der WISELINK-Funktion
Photodrucker
Verwenden der Fernbedienungstasten im Menü Wiselink
Und drücken Sie dann Enter
Verwenden des WISELINK-Menüs
Verwenden der Photoliste Jpeg
Oder Um Photo auszuwählen
Verwenden des Optionsmenüs
Geschwind
Anzeigen von Photodatei-Informationen
Auswählen eines Photos und einer Präsentation
Verwenden des Menüs während einer Präsentation
Und drücken Sie dann die ENTER-Taste. Drücken Sie Enter
Drehen
HintergrMusik Einstellg
Drücken Sie die Taste INFO, um die Option anzuzeigen
Vergrößern
Informationen zur Zoom-Funktion Aktuelles Bildschirmmenü
Taste Funktion
Deutsch-30
Kopieren von Bilddateien
Löschen von Bilddateien
Sie können markierte Bilddateien löschen
Deutsch-31
Drucken von Photos
Verwenden der MP3-Liste
Sie können Bilddateien direkt mit Ihrem Drucker drucken
Sie können markierte Musikdateien löschen
Kopieren von Musikdateien
Löschen von Musikdateien
Informationen zur Musik-Funktion Aktuelles Bildschirmmenü
Verwenden des Setup-Menüs
Drücken Sie die Taste TV , um die Textanzeige zu beenden
Videotextdecoder
Anzeigen von Videotextinformationen
Drücken Sie erneut die Taste TTX/MIX
Auswählen einer bestimmten Videotextseite
Auswählen einer Videotextseite mit Fastext
Anzeigeoptionen verwenden
Einstellen der Fernbedienung
Modi wechseln und das gewünschte Gerät ansteuern
Einstellen der Fernbedienung zur Steuerung der Cable- Box
Einstellen der Fernbedienung zur Steuerung des STB
Einstellen der Fernbedienung zur Steuerung des DVD-Players
Deutsch-38
Fernbedienungscodes
Videorekorder
Hersteller Code
Cable- Box
Produkt Code
Deutsch-39
031 068 Deutsch-40
Samsung STB
Vertikalfrequenz Pixeltakt Synchronisations
Installation der PC-Software Unter Windows XP
Anzeigemodi PC
Modus Auflösung
Oder Um die Bildqualität anzupassen
PC auswählen
Drücken Sie die Taste Oder
Drücken Sie die Taste ENTER, um Bildjustierung auszuwählen
Kensington-Schloss als Diebstahlsicherung
Fehlerbehebung Vor der Kontaktaufnahme mit dem Kundendienst
Auf der Vorderseite des Geräts gedrückt haben
Drehbarer Fuß Links / Rechts
Technische Daten und Umgebungsbedingungen
Symbolen
Garantiekaart
De standaard installeren
De muurbevestigingsbeugel installeren
Lijst met onderdelen
Sensor voor de afstandsbediening
Overzicht van het bedieningspaneel
Luidsprekers Stroom
Controlelampje stroom
Overzicht van het aansluitpaneel
Aansluitingen op chterpaneel
Aansluitingen op zijpaneel
Aansluiten op antenne of kabeltelevisienetwerk
Serviceverbinding voor gekwalificeerde monteur
Teletekstfuncties
Overzicht van de afstandsbediening
Batterijen in de afstandsbediening plaatsen
Plaats het klepje weer terug
En uitschakelen
Televisie in standby-modus zetten
Het netsnoer is bevestigd aan de achterzijde van de tv
Kanalen automatisch opslaan
Kanalen handmatig opslaan
Als u deze functie wilt herstellen
De Kanaalbeheer instellen
Opgeslagen kanalen sorteren
Het kinderslot activeren
Druk op Om de fijnafstelling aan te passen
Kanaalnamen vastleggen
Kanalen nauwkeurig instellen
Afstellen
Druk op Enter Druk op de toets
De beeldstandaard aanpassen
Aangepast beeld instellen
Druk op Enter Druk op de toets Exit om af te sluiten
Druk op de Toets om Kleurbeheer te selecteren en druk
De kleurtint wijzigen
Op Enter
Op pagina 12 van De beeldstandaard aanpassen
Toets om Beeld te selecteren en druk vervolgens op Enter
Het beeldformaat selecteren
De Auto-breed wijzigen
Toets om Beeld te selecteren en druk vervolgens op Enter
De kleurruimte wijzigen
Het beeld stilzetten
Digitale geluidsonderdrukking
DNIe-demo Digital Natural Image engine
Entertoets Enter
Beeld-in-Beeld PIP
Apparaat bekijken terwijl u het hoofdbeeld bekijkt
Toets en vervolgens op Enter
De geluidsstandaard wijzigen
De geluidsinstellingen aanpassen
De TruSurround XT SRS Tsxt instellen
Het volume automatisch aanpassen
De Interne mute selecteren
Het geluid van het subbeeld weergeven
Als u Drukt u op
Koptelefoon aansluiten
Geluidsmodus selecteren
De huidige tijd instellen en weergeven
Druk op de
Druk op de Toets om Timer aan te selecteren en druk
Standby-klok instellen
De televisie automatisch aan uitschakelen
Kunt een keus maken uit een van 21 talen
Taal kiezen
De Spelmodus gebruiken
Druk op de toets Menu voor weergave van het menu
Druk op Om Blauw scherm of Melodie te selecteren
Blauwe schermmodus instellen / Melodie selecteren
De functie spaarstand gebruiken
De Blue Eye Blue Eye instellen
De bron selecteren
De namen van de ingangsbron bewerken
Aanpassen. Druk op Enter
Ondersteunde geheugenkaarten
De functie Wiselink gebruiken
Fotoprinter
Toets Werkzaamheden
Druk op de toetsen , , en om een bestand te selecteren en
Druk op de knop Info om de opties te configureren
Het menu Wiselink gebruiken
De lijst Foto Jpeg gebruiken
Het menu Opties gebruiken
Snelheid
Informatie voor fotobestanden weergeven
Een foto of diavoorstelling selecteren
Het menu gebruiken tijdens een diavoorstelling
Draaien
Inst. achtergrondmuziek
Informatie bij de draaifunctie Huidige OSD Functie
Toets Functie
Inzoomen
X2, X3, X4
Informatie bij de zoomfunctie Huidige OSD Functie
Kunt de geselecteerde afbeeldingsbestanden verwijderen
Afbeeldingsbestanden kopiëren
Afbeeldingsbestanden verwijderen
Druk op de knop Info om de optie weer te geven
Mapsymbool Muzieknootsymbool
Een foto afdrukken
De Lijst van MP3-bestanden gebruiken
Kunt afbeeldingsbestanden direct afdrukken met uw printer
Kunt muziekbestanden naar een andere geheugenkaart kopiëren
Muziekbestanden kopiëren
Muziekbestanden verwijderen
Informatie muziekfunctie Huidige OSD Functie
Presentatie herhalen
Het menu Instellingen gebruiken
Snelheid presentatie
Effect presentatie
Druk op de toets TV om de teletekstmodus te verlaten
Teletekstdecoder
Teletekstinformatie weergeven
Druk nogmaals op de toets TTX/MIX
Het normale beeld
Specifieke teletekstpagina selecteren
Fastext gebruiken om een teletekstpagina te selecteren
Verborgen tekst zoals antwoorden op quizvragen
Uw afstandsbediening instellen
De afstandsbediening instellen voor uw videorecorder
De afstandsbediening instellen voor uw kabelbox
De afstandsbediening instellen voor uw STB
De afstandsbediening instellen voor uw DVD
Nederlands-38
Afstandsbedieningscodes
Videorecorder
Merk Code
Nederlands-39
Kabelbox
Samsung Set- Top Box
Set- Top Box
031 068 Nederlands-40
Uw software installeren gebaseerd op Windows XP
Weergavemodus PC
Modus Resolutie Horizontale Verticale Pixel Sync Polarity
De PC selecteren
Druk op Om de beeldkwaliteit aan te passen
Beeld vergrendelen
Kabel Afb
De anti-diefstal vergrendeling gebruiken
Draaibaar voetstuk links/rechts
Technische specificaties en milieu
Símbolos
Œ Manual de Œ Tarjeta de garantía
Lista de componentes
Instalación del soporte
Instalación del equipo de montaje en la pared
Sensor del mando a distancia
Visualización del panel de control
Altavoces Encendido
Indicador de encendido
Tomas del panel posterior
Visualización del panel de conexión
Service servicio
Vuelva a colocar la tapa
Cancelar teletexto Mostrar teletexto
Visualización del mando a distancia
Instalación de las pilas en el mando a distancia
Pulse el botón Enter para confirmar la elección
Pulse el botón Power del mando a distancia
Encendido y apagado
Cómo poner el televisor en modo de espera
Memorización automática de canales
Memorización manual de canales
Si quiere volver a ajustar esta característica
Configuración del Gestor de Canales
Orden de los canales memorizados
Activación del bloqueo para niños
Para Entonces
Asignación de nombres de canales
Sintonía fina de la recepción de canales
Nuevo pulsando los botones o . Pulse el botón Enter
Para seleccionar el efecto de imagen deseado
Cambio del formato de la imagen
Ajuste de imagen personal
Concreto. Pulse el botón Enter
Pulse el botón Enter Pulse los botones
Cambio del tono del color
3 de Cambio del formato de la imagen de la página
Deseado. Pulse el botón Enter
Para seleccionar Imagen y pulse el botón Enter
Selección del tamaño de la imagen
Cambio de Auto Wide Ancho autom
Pulse el botón Menu para ver el menú. Pulse los botones o
Cambio de Gama de colores
Congelación de la imagen actual
Reducción de ruido digital
DNIe Demo motor digital de imágenes naturales
Botones o Pulse el botón Enter
Visualización de imagen en imagen PIP
Para seleccionar PIP y pulse el botón Enter
Pulse el botón Enter de nuevo
Seleccionar Sonido y pulse el botón Enter
Configuración de TruSurround XT SRS Tsxt
Cambio del estándar de sonido
Ajuste de los parámetros de sonido
El botón Enter Pulse el botón o
Ajuste automático del volumen
Selección del silencio interno
Cómo escuchar el sonido de la imagen secundaria
Selección del modo de sonido
Configuración y visualización de hora actual
Seleccionar Configuración y pulse el botón Enter
Conexión de los auriculares
Para seleccionar Temp. de encen. y pulse el
Ajuste del temporizador de desconexión
Encendido y apagado automático del televisor
Para
Seleccione un idioma pulsando varias veces los botones o
Selección del idioma
Uso del Modo Juego
Pulse el botón Menu para ver el menú en pantalla
Pantalla azul
Ajuste del modo Pantalla Azul / Selección de Melodía
Uso de la función de ahorro de energía
Ajuste del modo Blue Eye Ojo azul
Selección de la fuente
Edición de los nombres de fuentes de entrada
Pulse los botones Para seleccionar el dispositivo deseado
Botón Función
Uso de la función Wiselink
Impresora fotográfica
Uso del botón del mando a distancia en el menú Wiselink
Icono de carpeta Icono de foto
Pulse el botón Info para configurar las opciones
Uso del menú Wiselink
Uso de la lista Photo Foto en Jpeg
Uso del menú Options Opciones
Velocidad
Visualización de la información del archivo de foto
Selección de una foto y un visionado automático
Uso del menú durante el visionado automático
Giro
Config. música fondo
Ampliación
Español-30
Copia de archivos de imagen
Eliminación de archivos de imagen
Puede borrar los archivos de imagen seleccionados
Después pulse el botón Enter
Impresión de una foto
Uso de la lista de MP3
Pulse los botones , , y para seleccionar un archivo
Español-32
Copia de archivos de música
Eliminación de archivos de música
Puede borrar los archivos de música seleccionados
Uso del menú de configuración
Para salir de la visualización de texto, pulse el botón TV
Decodificador de teletexto
Visualización de informaciones del teletexto
Pulse de nuevo el botón TTX/MIX
Selección de una página de teletexto específica
Uso de Fastext para seleccionar una página del teletexto
Uso de varias opciones de pantalla
Configuración del mando a distancia
Configuración del mando a distancia para controlar el vídeo
Si aparece más de un código, inténtelo con el primero
Configuración del mando a distancia para controlar el STB
Configuración del mando a distancia para controlar el DVD
Español-38
Códigos del mando a distancia
Vídeo
Marca Código
Producto Código
Decodificador de cable
Marca
Producto
Samsung receptor TV digital
Receptor TV digital
031 068 Español-40
Polaridad
Configuración del software del PC basado en Windows XP
Modo de visualización PC
Modo Resolución Frecuencia
Español-42
Selección del PC
De la imagen Bloqueo de Imagen
Para seleccionar Grueso o Fino y pulse el
Cable
Utilización del bloqueo Kensington antirrobo
Giro del soporte izquierda/derecha
Especificaciones técnicas y medioambientales
Repor os valores de fábrica
Configurar o software do PC
Resolução de problemas
Regular a tonalidade da cor com o componente
Œ Cartão de garantia
Lista de acessórios
Instalar a Base
Instalar o kit de montagem na parede
Sensor do telecomando
Funções do painel de controlo
Colunas Corrente
Indicador de potência
Apresentar o painel de ligação
Serviço
Funções de Teletexto
Funções do telecomando
Colocar as pilhas no telecomando
Volte a colocar a tampa
Colocar o televisor no modo de espera
Ligar/desligar o aparelho
Carregue no botão Enter para confirmar a escolha
Memorizar canais automaticamente
Memorizar canais manualmente
Seleccione o País apropriado carregando no botão ou
Definir Gestor Canais
Carregue no botão Para seleccionar Lig Prima o botão Enter
Activar Bloqueio crianças
Ordenar os canais memorizados
No botão Enter Carregue no botão
Para Faça o seguinte
Atribuir nomes a canais
Sintonia fina da recepção de canais
Prima o botão Enter Prima o botão Exit para sair
Item em particular. Prima o botão Enter
Escolher o tipo de imagem
Seleccionar a imagem padrão
Prima o botão Enter Carregue no botão
Escolher o tipo de imagem na página
Seleccionar a tonalidade
Pode seleccionar o tom de cor mais confortável para si
Cor desejado. Prima o botão Enter
Pode voltar aos valores de fábrica das definições de imagem
Repor os valores de fábrica das definições de imagem
Seleccionar o tamanho da imagem
Alterar Auto Wide
Alterar a colorimetria
Parar a imagem
Redução de ruído DNR
Demonstração DNIe Digital Natural Image Engine
Prima o botão Para seleccionar Alternar
Apresentar a imagem na imagem PIP
Volte a carregar no botão Enter
Botão ou Depois carregue no botão Enter
Seleccionar Som e depois carregue no botão Enter
Escolher o som Padrão
Regulação das programações de som
Definir TruSurround XT SRS Tsxt
Ouvir o som da imagem secundária
Ajustar Automaticamente o Volume
Carregue no botão Para seleccionar Volume auto. e depois
Seleccionar a opção Internal Mute Sil. externo
Acertar e ver a hora actual
Repor os valores de fábrica das definições de som
Ligar os auscultadores
Seleccionar o modo Sound Som
Deslig., 30, 60, 90, 120, 150, 180. Prima o botão Enter
Seleccionar Configurar e depois carregue no botão Enter
Programar o temporizador
Ligar e desligar o televisor automaticamente
Carregue no botão Menu para ver o menu no ecrã
Carregue no botão Para seleccionar Configurar e depois
Seleccionar o idioma
Opção Modo de Jogos
Ecrã azul
Programar o modo de Ecrã azul / Seleccionar a Melodia
Utilizar a função Poupar energia
Definir a opção Blue Eye Olho azul
Prima o botão Enter Carregue no ‘botão
Seleccionar fontes externas
Editar os nomes das fontes de entrada
Carregue no botão Enter , para seleccionar Entrada
Botão Operações
Utilizar a função Wiselink
Impressora de fotografias
Utilizar o botão do telecomando no menu Wiselink
Ícone de pasta Ícone de fotografia
Carregue no botão Info para configurar as opções
Utilizar o menu Wiselink
Utilizar a lista Fotografia Jpeg
Cópia, Copiar todos os ficheiros
Utilizar o menu Opções
Apresentação diapositivos
Rodar
Velocidade
Ver informação de ficheiros de fotografias
Em seguida, carregue no botão Enter
Utilizar o menu durante uma apresentação de diapositivos
Rodar
Def. Música de fundo
Informações da função Rodar OSD actual Função
Ampliar
Informações da função Zoom OSD actual Função
Botão Função
Copiar ficheiros de imagem
Eliminar ficheiros de imagem
Pode eliminar ficheiros de imagem seleccionados
Utilizar a lista MP3
Imprimir uma fotografia
Pode eliminar ficheiros de música seleccionados
Copiar ficheiros de música
Eliminar ficheiros de música
Informação da função Música OSD actual Função
Utilizar o menu Configurar
Carregue no botão TV para sair da página de teletexto
Descodificador de teletexto
Exibição das informações de teletexto
Volte a carregar no botão TTX/MIX
Seleccionar uma página de teletexto específica
Utilizar Fastext para seleccionar uma página de teletexto
Utilizar as várias opções de visualização
Configurar o telecomando para utilizar o videogravador
Configurar o telecomando
Configurar o telecomando para funcionar com o STB
Configurar o telecomando para funcionar com o DVD
Codici del telecomando
Videogravador
Português-38
Português-39
Caixa de TV por cabo
Produto
Produto Código
Samsung Set-Top Box
Set-Top Box
031 068 Português-40
Polaridade de
Configurar o software do PC Baseado no Windows XP
Modo de visualização
Modo Resolução Frequência
Alinhada no centro do ecrã
Seleccionar o PC
Cabo
Utilizar o sistema de bloqueio Kensington anti-roubo
Inclinação da base Esquerda/Direita
Características técnicas e ambientais
Simboli
ΠScheda di garanzia
Installazione del supporto
Installazione del Kit di montaggio a parete
Elenco dei componenti
Sensore telecomando
Indicatore alimentazione
Vista del pannello di controllo
Altoparlanti Alimentazione
Jack pannello posteriore
Vista del pannello dei collegamenti
Assistenza
Illustrazione del telecomando
Inserimento delle batterie nel telecomando
Rimettere il coperchio
Impostare il televisore in modalità standby
Accensione e spegnimento
Memorizzazione automatica dei canali
Memorizzazione manuale dei canali
Per reimpostare questa funzione…
Premere il tasto Exit per uscire
Impostazione del Gestore Canale
Premere il tasto o per selezionare l’opzione Memorizza
Premere il tasto Enter per selezionare l’opzione OK
Premere il tasto
Attivazione di Blocco canali
Ordinamento dei canali memorizzati
Premere il tasto Per selezionare On
Assegnazione dei nomi ai canali
Ottimizzazione della sintonia dei canali
Per Quindi
Premere il tasto Per selezionare la voce desiderata
Modifica dello standard dell’immagine
Regolazione dell’immagine personalizzata
Dello standard dell’immagine dal punto 1 al punto
Italiano-13
Modifica della tonalità di colore
Premere il tasto Enter
Selezione delle dimensioni dell’immagine
Cambiare il formato Auto Wide
Selezionare l’opzione da regolare premendo il tasto o
Premere il pulsante Per selezionare Digital NR
Fermo immagine corrente
Uso della funzione Digital NR
Cambiare il Colour Space
Visualizzazione dell’immagine nell’immagine PIP
Premere il pulsante o per selezionare Sorgente
Quindi premere Enter
Per selezionare Suono e premere Enter
Modifica dello standard audio
Regolazione delle impostazioni dell’audio
Impostazione di TruSurround XT SRS Tsxt
Regolazione automatica del volume
Selezione di Internal Mute Mute interno
Ascolto dell’audio dell’immagine secondaria
Italiano-19
Configurazione e visualizzazione dell’ora attuale
Collegamento delle cuffie di ascolto
Per Premere il
Off, 30, 60, 90, 120, 150, 180. Premere il tasto Enter
Impostazione del timer
Spegnimento e accensione automatica della televisione
Premere il pulsante Per selezionare Ora e premere Enter
Per selezionare Impostazione e premere Enter
Scelta della lingua
Uso di Modalità gioco
Premere il tasto Menu per visualizzare il menu a video
Italiano-22
Utilizzo della funzione Risparmio energia
Per selezionare Pagina blu o Melodia
Per selezionare Risp. energia e premere Enter
Italiano-23
Selezione della sorgente
Modifica dei nomi delle sorgenti di ingresso
Per selezionare Modifica Nome e premere Enter
Uso de la función Wiselink
Italiano-25
Uso del menu Wiselink
Italiano-26
Uso del menu Options Opzioni
Italiano-27
Selezione di una foto e di una proiezione di diapositive
Italiano-28
Imp. musica sfondo
Italiano-29
Ingrandimento
Italiano-30
Copia di file di immagine
Italiano-31
Stampa di una fotografia
Italiano-32
Informazioni sulla funzione Musica OSD corrente Funzione
Italiano-33
Uso del menu di impostazione
Premere il tasto TV per uscire dalla schermata Testo
Teletext DeCodicer
Visualizzazione delle informazioni del Televideo
Premere nuovamente il pulsante TTX/MIX
Selezione di una pagina Teletext specifica
Configurazione del telecomando per controllare la Cable Box
Configurazione del telecomando
Se è elencato più di un codice, provare con il primo
Italiano-38
Marca Codice
031 068 Italiano-39
Prodotto Codice
Cable Box
Prodotto
Italiano-40
Polarità
Configurazione del software per PC basato su Windows XP
Modalità di visualizzazione
Modalità Risoluzione Frequenza
Blocco immagine da 1 a
Selezione del PC
Regolazione della qualità dell’immagine Blocco immagine
Per selezionare PC e premere Enter
Opzionale
Risoluzione dei problemi Prima di contattare l’assistenza
Uso del blocco antifurto Kensington
Cavo
Supporto ruotabile Sinistra / Destra
Specifiche tecniche e ambientali
Italiano-45
Diagrammi a blocchi
Questa pagina è stata lasciata Intenzionalmente vuota
Korrekte Entsorgung dieses Produkts Elektromüll