CCD LCD
AD68-00934F
Contents
Setting the Miniket Photo
Getting Started
Photo Mode
Movie Mode
Music Mode
PictBridge mode
Voice Mode
PC Cam mode
Storage Mode
Specifications
Troubleshooting
Using the Menu
Miscellaneous Information
Please note the following precautions for use
Precautions when using the Miniket Photo
Please note the following precautions for use
Keep out of reach of children
This manual or other documentation provided with your
Their respective holders
Record
When you are not operating it
Battery discharge
Damage it
Direct sunlight can damage the LCD monitor Miniket Photo
Precautions Regarding Service
Precautions Regarding Replacement Parts
Features
Getting to know your Miniket Photo
Optional Accessory
Accessories Supplied with the Miniket Photo
Basic Accessories
Service center Samsung Electronics
Display Button LCD USB port LCD Monitor DC in jack
Name of Each Part
Rear & Left View
Joystick Up, Down, Left
Power Button Card Slot Built-in Battery Slot Microphone
Mode Dial Flash
Record / Stop Open Switch Button
Front & Bottom View
Photo Capture Mode
Photo View Mode
Photo is restarted after turning it off
Movie Record Mode
Movie Play Mode
Name of Each Part LCD Display
OSD On Screen Display in Music Mode
Music Mode
Settings Mode
Voice Record Mode
Voice Play Mode
To insert the Battery Pack
How to Use the Battery Pack
Battery Pack Installation / Ejection
To eject the Battery Pack
Maintaining the Battery Pack
Using Time / Image Capacity According To Modes
Approx
Charging time according to charging methods
Battery Level Display
Battery Using AC Adapter Using USB Charging
Turn off the Miniket Photo by pressing the Power button
Charging the Battery Pack
Connecting the AC Power Adapter
Power
Recording / Charging Indicator
Power Indicator
Getting Started
PictBridge Mode
Using the Mode Dial
Movie Mode You can record / play back video
Storage Mode
Screen
Using the Display Button
Using the Menu Button
LCD monitor
Using the Shortcut Buttons
Press the shortcut button to access the function directly
Confirm your selection by pressing the joystick OK
Using the Joystick
You can adjust the volume by moving
Structure of Folders and Files
999
Recording Time and Capacity
Photo Capacity Image Quality
Using a mini SD card Optional Accessory
Name of Each Part mini SD card
Inserting / Ejecting a mini SD card Optional Accessory
Make sure to format a mini SD card using the Miniket Photo
Message Memory Card inserted
Press the Power button to turn on
Selecting the Memory Type
Screen
Adapter to the Miniket Photo. Refer to
Select the desired mode by turning the Mode Dial
Before You Start Operating the Miniket Photo
Recording movie / voice or hear music
Setting Miniket Photo
English Setting the Miniket Photo Setting Memory
Turn the Mode Dial to the Settings mode
Mini SD cards, so that the first file number
Setting the File No. Function
Default value
Memory Card Format the external memory
Previous information can not be restored after formatting
Formatting the Memory
Any mini SD card on the Miniket Photo
Left / right
Viewing Memory Space
Photo
Capacity may differ from the printed memory capacity
Adjusting the LCD Brightness
English Setting the Miniket Photo
Adjusting the LCD Monitor
Monitor is hard to see LCD
Right, and then set values by moving Joystick up / down
Setting Date/Time
Setting Date/Time
English Setting the Miniket Photo Setting Date/Time
Setting Date Format
Setting Date/Time Display
You can set to display date and time on the LCD monitor
Ntsc Sets to Ntsc standard
Setting the Miniket Photo Setting the System
Setting the NTSC/PAL
May not be perfect
Off Turn the beep sound off On Turn the beep sound on
Setting the Beep Sound
Every time a button is pressed
Select Beep Sound by moving the joystick
You can set the shutter sound to on / off
English Setting the Miniket Photo Setting the System
Setting the Shutter Sound
Joystick up / down and then press the joystick OK
English
Selecting Language
You can select the desired language of the Miniket Photo
Polski / Pûòòíëè / / Magyar / ‰∑¬ Ì͇ªÌҸ͇ / Svenska
Setting the Mode Display
Off Turns the Mode Display off
Select the desired option by moving the joystick
Setting the Auto Shut Off
Off Cancel the Auto Shut Off function
Up / down and then press the joystick OK
Resetting the Miniket Photo
Yes Starts the reset function No Cancel the reset function
Photo Mode
Turn the Mode Dial to
Photo Mode Capturing
Capturing Images
Zoom Out
Turn the Mode Dial to Photo mode
Zooming In and Out
Press the Shortcut 1 button to switch to Photo View mode
Photo Mode Viewing
Anywhere such as in a car, indoors, or outdoors
Viewing Photo Files on the LCD Monitor
Press the Shortcut 1 button to switch to
Screen switches to multi View
Enlarging a Photo File Zoom Move the W/T zoom switch to
Enlarge the selected photo
Cropping an Enlarged Photo File
Miniket Photo Press the Shortcut 2 button
English Photo Mode Setting the Capturing Options
Setting the Flash Turn the Mode Dial to Photo mode
Through
Refer to
Press the Menu button to exit the menu
Using the Scene Modes
Press the Menu button
Move the joystick left / right to select Photo Size
Setting the Photo Size
Menu screen appears
Press the Menu button to exit the menu
Super Fine / Fine / Normal
Setting the Photo Quality
Move the joystick left / right to select Photo Quality
Down, and then press the joystick OK
Appears on the screen
Setting the Metering Method
Metering
Regarding metering with Scene modes, refer to
Move the joystick left / right to select Self Timer
Setting the Self Timer
With delayed shooting
Press the Menu button
Just one press of the shutter
Setting the Multi Shot
Shot enabled
Press the Menu button Menu screen appears
Selected Digital Effect and icon appear on the screen
Setting Digital Effects
Effect
Move the joystick left / right to select Digital
Adjusting the Exposure Exposure Compensation
Regarding EV setting in Scene modes, refer to
Appears on the screen
Setting the ISO Speed Sensitivity
Minikets imaging sensor
If Auto is selected, no icon will be displayed
Setting
Setting the White Balance
Menu button to cancel and exit to Menu screen. Photos
Center. Press the joystick OK to set, or press
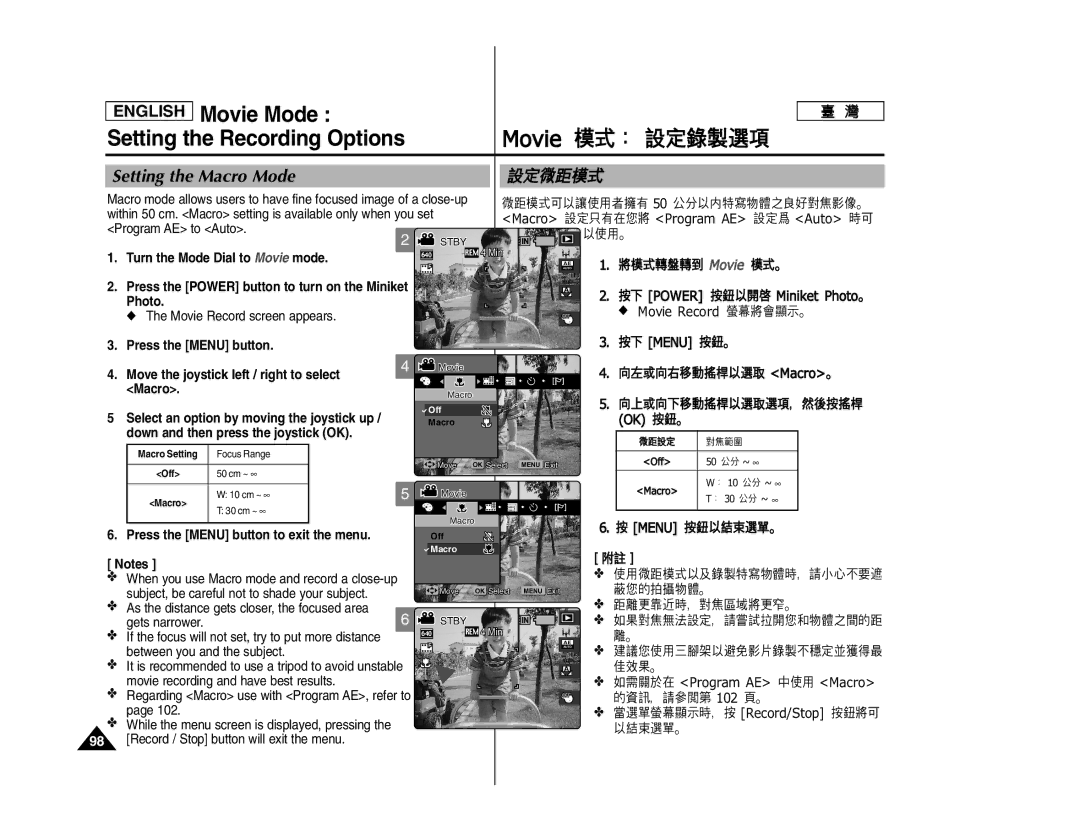
Setting the Macro Mode
Setting the Flash
Regarding Flash setting in Scene modes, refer to
Supported Functions According to the Capturing Modes
Soft
Setting the Sharpness
Sharpness
Setting the Focus Method
Regarding Focus Method setting in Scene modes, 6 refer to
Press the joystick OK
Setting the Anti-Shake Function Image Stabilisation
Move the joystick left / right to select Anti-Shake
Anti-Shake
Down, and then press the joystick OK
Setting the Digital Zoom
Zoom
3x will be supported for zooming
Setting the Imprint Option
Press the Shortcut 1 button in Photo Capture mode
English Photo Mode Setting the Viewing Options
Viewing a Slideshow Turn the Mode Dial to Photo mode
Mode
Selected file is protected from erasure
Protecting Photo files Turn the Mode Dial to Photo mode
Cancel Cancels delete
Delete Deletes the selected photo
Move the zoom switch to W Wide
Press the Shortcut 3 button again
All All photo files will be deleted. a
Move the W/T zoom switch to W Wide
Cancel Cancels deletion
Selected files
Message Delete? appears. Select Yes
Deleting Photo Files
You can delete saved photo files
Protecting Photo Files
If Select is selected, Multi-view screen appears
Move the joystick left / right to select Rotate
Rotating a Photo File
You can rotate a saved photo
Press the Menu button. Menu screen appears
Move the joystick left / right to select Resize
Resizing Photos
File to resize
Down and then press the joystick OK
Setting the Slideshow
Photo Mode
Mini SD card
Copying Photo Files
If the internal memory was used, it copies to a
Movie Mode
Press the Record / Stop button
Movie Mode Recording a Movie
Recording a Movie
To stop recording, press the Record / Stop button again
Move the W/T zoom switch to T
Before You Start
Playing a Movie on the LCD Monitor
Movie Mode Playing a Movie
To adjust volume, move the joystick up / down
English Movie Mode Setting the Recording Options
Switching to Movie Play Mode
Through the a - flash modes
Effects
Photo
Setting the Program AE
Setting to suit different conditions
Regarding White Balance use with Program AE, refer to
Any recording
Move the joystick left / right to select White Balance
Setting the Digital Effects
Move the joystick left / right to select Macro
Regarding Macro use with Program AE, refer to
Quality
Setting the Movie Quality
You can set the quality for movie files
Available options are Super Fine / Fine / Normal
Setting the Movie Size
100
Move the joystick left / right to select Self
Timer
101
102
Setting the Wind Cut
Turn the Mode Dial to Movie mode
Move the joystick left / right to select Wind Cut
English Movie Mode Setting the Viewing Options
103
Between Unlocked
Cancel Cancels the deletion
Protecting a Movie File
Down button, and then press the joystick OK.5
105
Protecting Movie files in Multi-View
Selected movies are protected from an accidental erasure
Down and press the joystick OK
Confirm Cancel Cancels deletion
Deleting Movie files in Multi-View
Selected movie files are deleted
All All files will be deleted
Deleting Movie Files
You can delete saved movie files
107
Protecting Movie Files
Selected files Press the Shortcut 3 button
109
Setting the All Play
All Play starts
Copying Movie Files
112
111
Set the desired memory type on the PC
Music Mode Playing Music Files
Copying Music Files from a PC
113
How to Connect Earphones
Playing Music Files
Photo Press the Shortcut 2 button
English Music Mode Setting the Music Play Options
Setting the Repeat Option Turn the Mode Dial to Music mode
114
Press and hold the Shortcut 3 button
English Music Mode
Setting to Hold
115
Order once
Setting the Repeated Play
Start again from the beginning
116
117
Setting the Equaliser
Move the joystick left / right to select Equalizer
118
Deleting Music Files
Selected music files are deleted
OK to confirm
Protecting Music Files
Protection or format the memory
119
120
121 122 123 125 126 127 128
Recording Voice Files
Voice Mode Recording Voice Files
Turn the Mode Dial to Voice mode Press the Power button
Press the Record / Stop button to start recording
Down
Voice Mode Playing Voice Files
Playing Voice Files
122
123
Voice Mode Setting the Voice Play Options Voice
OK or move the joystick right
Delete Deletes the selected file Cancel Cancels the deletion
124
Shuffle All files will play in random order once
125
Move the joystick left / right to select Delete
Deleting Voice Files
126
Select an option by moving the joystick up
Protecting Voice Files
Move the joystick left / right to select Protect
127
Press the Shortcut 1 button Voice Play screen appears
Copying Voice Files
Vice-versa
An icon indicating selected file is to be copied appears
Using the PC Cam Function
129
Using the PC Cam Function
English PC Cam Mode
Using the PC Cam Function
When finished, disconnect the cable
PictBridge mode
131
Printing with PictBridge
When finished, disconnect the USB Cable
Press the Menu button to access the function
Press the Shortcut 1 button to begin printing
Storage Mode
133
Windows XP
Storage Mode Using as a Mass Storage Device
Using as a Mass Storage Device
Internal Memory Miniket Misc
Information
135
136
English Miscellaneous Information Connecting to a PC
Recommended System Requirements
137
English Miscellaneous Information Installing Software
Installing DV Media Pro
For photo editing, use Photo Express
Installing DV Media Pro 1.0 / Video Studio
Installing Video Studio
138
Connecting to a PC Using USB Cable
139
Press the Shortcut 1 button to switch to Movie Play mode
Connecting to a TV Monitor
Movie Record mode is displayed on the TV screen
Select a movie file to play
Connecting to a VCR
141
Printing Dpof files in the mini SD card
Miscellaneous Information Printing Photos
Printing with Dpof
142
After using the Miniket Photo
143
To Clean the Exterior of the Miniket Photo
English Miscellaneous Information Cleaning and Maintenance
Cleaning the Body
144
Regarding the Battery
145
Its video output PAL-Compatible Countries / Regions
Using Abroad
Power Sources
NTSC-Compatible Countries / Regions
Self-Diagnosis Display
Troubleshooting Self-Diagnosis Display
Checklist
148
VCR
Using the Menu
149
Music
150
Model Name SC-MS10S/BL/R / MS11S/BL/R / MS15S/BL/R System
Specifications
151
Camera
152
Connectors
AC Power Adapter
General
Index
153
154
Customer Care Center Web Site
Contact Samsung World Wide
Samsung
Miniket Photo is Manufactured by