Memory Camcorder
Key features of your memory camcorder
Englishii
Englishiii
Englishiv
Safety warnings
Important safety instructions
Ventilation
Englishv
Power Sources
Englishvi
Power Lines
Englishvii
Stock No
FCC Warning
This device may not cause harmful interference,
Englishviii
Recorded contents cannot be compensated for
Precautions
Before Using this Camcorder
Precautions on use
Important Note
Be careful of unusual ambient temperature
Do not subject the memory camcorder to impact
No sand or dust
No water or oil
Do not expose the memory camcorder to soot or steam
Do not use the memory camcorder near corrosive gas
Do not use the memory camcorder near ultrasonic humidifier
Macintosh is trademark of Apple Inc
Contents
Recording Playback Recording Options
English04
Settings Options
English05
Connecting to a PC
Specifications
Troubleshooting
English06
English07
Introduction to basic features
Recording movie or photo images pages 46
Connecting to a PC
English08
Exact shape of each item may vary by model Battery pack
Whats Included with Your Memory Camcorder
Software CD
English09
Front & Left View
English10
English11
Mode indicator
Rear & Bottom View
Using the Accessories
Preparation
Attaching a Grip Belt
English12
Angle Adjustment
English13
Connecting a Power Source
Inserting the battery pack
Ejecting the battery pack
English14
Charging the Battery Pack
English15
English16
Auto Power Off Function
Auto Power Off to Off.
Battery Level Display
Battery
Seconds
English17
Battery type
Continuous Recording without zoom
Charging time
TV Super Fine TV Fine
English19
About battery packs
On handling a battery pack
English20
Maintaining the battery pack
About the battery life
Using a household power source
English21
Setting the operating modes
Movie Record is set by default with the power on
Basic Operation of Your Memory Camcorder
Turning memory camcorder on or off
English23
LCD Screen Indicators
Movie Record mode
Movie Record mode Shortcut menu OK Guide
Movie Record mode Shortcut menu Manual
Photo Record mode
English25
English26
Photo Record mode Shortcut menu OK Guide
Photo Record mode Shortcut menu Manual
Movie Play mode Thumbnail View
Movie Play mode Single View
Folder-File Number Movie Play Tab Protect Copy Selected
English27
English28
Movie Play mode Shortcut menu OK Guide
Movie Play mode Single Volume
English29
Photo Play mode Thumbnail View
Photo Play mode Single View
Turning the Screen Indicators ON/OFF
Switching the information display mode
Checking the remained battery and memory capacity
English30
English31
Using the LCD Enhancer Function
Release ŠLCD enhancer 1level ŠLCD enhancer 2level Š Release
Using the Control Buttons
Adjusting the LCD Screen
Using the Menu Button
Using the Control button
Shortcut Menu OK Guide
English34
Shortcut function using the Control buttons
Mode Movie Play
Play
English
English36
Initial Setting Time ZONE, Date and Time & OSD Language
Turning the power on and setting the date and time
Simple setting of the clock by time difference
On charging the built-in rechargeable battery
Turning the date and time display on/off
English37
English38
Set the Settings mode
Selecting the OSD language
Using a memory card not supplied
About the storage media
Selecting the Storage Media
Selecting the storage media
Inserting / Ejecting the Memory Card
Inserting a memory card
Ejecting a memory card
English40
Selecting a Suitable Memory Card
Sdhc Secure Digital High Capacity Memory Card
MMCplus Multi Media Card plus
Common cautions for memory card
Handling a memory card
English42
English43
Recordable Time and Capacity
English44
TV Super Fine, TV Fine, TV Normal, Web&Mobile
English45
You can record movie images in Movie Record mode only.
Recording
Recording Movie Images
Press the Recording start/stop button
Recording with Ease for Beginners Easy Q Mode
To cancel Easy Q mode
Functions are set to Auto. Exposure, Focus, Shutter, etc
English47
English48
Taking Photo Images
RN/SN only or memory card
Zooming in and OUT
English49
English50
Changing the Playback Mode
Playback
Playing Movie Images
English51
Adjusting the volume
English52
Various Playback Operations
Still playback pause
Search playback
Skip playback
Viewing Photo Images
English54
English55
Changing the Menu Settings
Recording options
English56
English57
Menu Items
Recording menu items
English58
Using the Recording Menu Items
ISCENE
Contents On-screen
Setting the white balance manually Select Custom WB
White Balance
Manual Focus
Contents
Exposure
None
Manual exposure is recommended in situations listed below
Setting the shutter speed manually
Recommended shutter speed when recording
Focusing diffi cult or unreliable Face detection
Focus
To concentrate on the creative side of your recording
English62
English63
Focusing manually during recording
Manual focus is recommended in the following situations
Anti-Shake Hdis
English64
Digital Effect
Resolution
Wide
Disables the function
Wind Cut
Quick View
On-screen Display
English68
Back Light
Backlight compensation is executed
Time Lapse REC recording images at Time Lapses
English69
Example of Time Lapse Recording
English71
Nite
Fader
Disables the function None Cross
Guideline
Zoom Type
Only optical zoom is available up to None
Playback options
Playback menu items
Setting the Play Option
Plays back from the selected movie to the last movie
Selected movie will be played
All movies will be played repeatedly
Deleting Images
Press the Menu button
Press the Control button / to select Delete
English75
Protecting Images
English77
Copies the selected movie or photo images
All Files
File Information
Slide Show
English79
English80
Settings options
Changing the Menu Settings in Settings
Settings menu items
Memory
Home Date/Time Set
JAN/01/2009
Using the Settings Menu Items
Settings Contents
Storage
Storage Info
Format
File No
Setting the clock to the local time Visit
To your hometown date/time setting
Time Zone
Between the two locations
Cities used to set the time zone
English85
Date/Time Set
Date Type
Time Type
Date/Time Display
LCD Brightness
LCD Color
Beep Sound
Shutter Sound
Auto Power Off
Default Set
TV Display
Memory camcorder does not turn off automatically
Version
Menu Design
Transparency
Language
Connecting to a PC
Transferring a Recorded File Through a USB Connection
USB Connection Speed depending on the System
Cyberlink MediaShow4 System Requirements
English91
English92
Installing the Cyberlink MEDIASHOW4
Before you begin
Setup Complete appears
English93
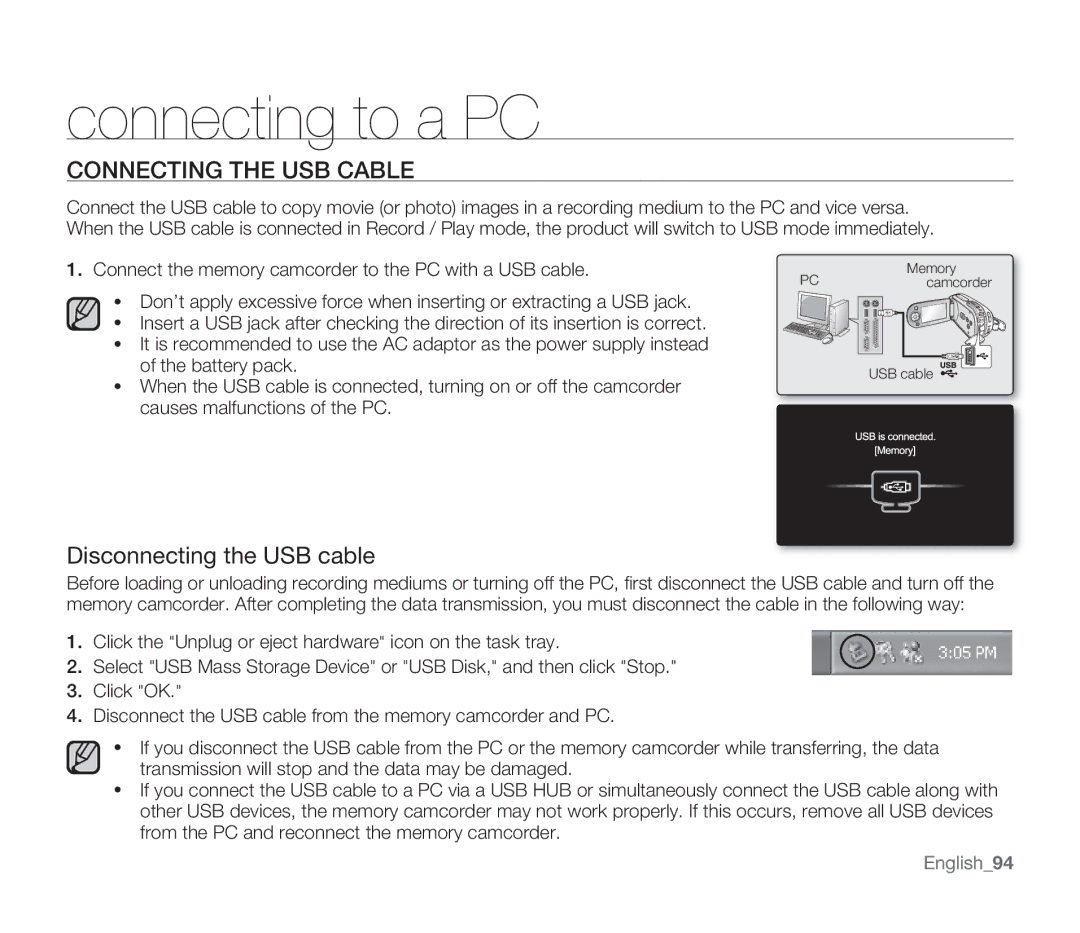
Connecting the USB Cable
Disconnecting the USB cable
Connect the memory camcorder to the PC with a USB cable
English94
Viewing the Contents of Storage Media
Movie Images H.264 ①
Photo Images ②
Movie Images
Photo Images
English97
Transferring Files from the Memory Camcorder to Your PC
Playing Back Files on the PC
Uploading Movie Images in the Memory Camcorder to YouTube
English98
Connecting to other devices
Connecting to a TV
Audio cables to the TV
English99
Image display depending on LCD and TV screen ratio
Refer to page 66 for 169 Wide setting
Viewing on TV Screen
English101
Recording Dubbing Images on a VCR or DVD/HDD Recorder
Memory camcorder
Maintenance & additional information
Maintenance
Cleaning the memory camcorder
To clean the LCD monitor
To clean the lens
Additional Information
Storage media
LCD screen
Battery packs
To prevent damage and prolong service life
Temperature range specifications
To avoid hazards
Using Your Memory Camcorder Abroad
Power sources
On TV color systems
NTSC-compatible countries/regions
Troubleshooting
Troubleshooting
Power source
Auto Power Off to Off
Recording
English107
Playback
Back-up important fi les to PC or another
Reading data from storage media
Storage device
Power
Symptom Explanation/Solution
Is Auto Power Off set to 5 Min?
English109
Displays
English110
English111
Pressing the Recording start
Recorded movie starts/stops. This is not an error
Set Beep Sound to On
Starts/stops
English113
English114
Adjusting the image during recording
Set Focus to Auto.
English115
Playback on your memory camcorder
Playback on other devices TV, etc
Connecting to a computer
English116
Connecting/Dubbing with other devices TV, DVD recorder, etc
Symptom Explanation/Solution You cannot dub correctly
Using the AV cable From your camcorder.
Overall operations
Menu
English118
Video signal
Specifi cations
Web & Mobile about 2.0Mbps
English119
Warranty
Samsung Limited Warranty
Samsung RoHS compliant