SNC-M300
Safety precautions
Page
Important safety instructions
Contents
Setting Up
Using the Camera
Appendix
Features
Precautions Installation and Use
Preparation
Compatible PoE Switches
Recommended PC Specifications
Compatible IP Routers
Checking the components in the package
Front
Names of Each Part
Rear
Description
Installing the Camera
Installation and connection
Disconnect the power cord before installation or relocation
When using the CS lens
Adjusting the back focus
INSTAllATION ANd Connection
Case of the lens with no zooming function
Inserting/Removing an Sdhc Memory Card
Contacts Lock Switch
What is a memory card?
Memory Card Information not included
Selecting a memory card that’s suitable for you
Connecting
Connecting Ethernet Cable
Connect the Ethernet cable to the network port as shown
Connecting Power
To connect input and output ports
Alarm In/Out Connection Diagram
Microphone
Connecting to Audio Input/Output
MicrophonePre-Amp
Speaker Pre-Amp
Audio I/O Block Diagram
Network connection & setup
Network Connection & Setup
Setting the IP address
Connecting a local PC in the IP router to the camera
Connecting to the camera from an IP router external PC
Connecting to the camera from a local PC in the LAN
Connecting the camera directly to local area networking
IP Installer screen layout
IP Installer
SEARChING for ThE CAmERA
MANUAl NETWORk Setting
Setting static ip
Camera list
Click the Manual Set button
Enter your password
PORTfields, set up port numbers
Camera is set to the manually entered IP and is restarted
Number of Http
If more than one camera are connected to an IP Router
Set the IP and port settings for camera differently
AUTOmATIC NETWORk Setting
Automatic network setting is finished
Click the OK button
DyNAmIC IP Setting
Setting dynamic ip
Examples of using dynamic IP
Dynamic IP Check
Manual Port Forwarding
Port FORWARdING Port mAPPING Setting
부부using the camera
Connecting to ThE CAmERA
Connecting to the camera
Checking the ddNS address
Connecting to the camera using the IP Installer program
For Windows XP Service Pack
INSTAllING Activex
Click the Install ActiveX Control
If the following screen appears, click the Install button
Click the Log In button
Logging to the camera
Using ThE Viewer Screen
Main Screen layout
Name Button Function and description
Screen Size & Partition Buttons
Camera function buttons Audio buttons View Screen
To Print a Video
To Capture a Video
Click OK
At a desired scene, click the Print button
Insufficient Disk Space Setting
At desired scene, click Record button Set up the AVI save
Amount designated under this setting
To Record a Video
Using ThE SEARCh Viewer Screen
Capture button Print button Record button
Timeline Display Playback function buttons View Screen
Calendar Selection
At a desired scene Click the Capture button
At desired scene, click the Record button Click OK
To Search the Video data
Select the timeframe you wish to search, using the timeline
To Control Playback
From the calendar, select the date you wish to search
Setting ThE CAmERA
Setting up
Setupbasic
Setup Screen Layout
BASIC Configuration
To setup Video/Audio
Click Basic Video & Audio
Click Basic IP
To Setup IP settings
Click Basic User
To Setup Users
For the ID and password, up to
Enter user ID and password
Click the Apply button
User from the Operator and User in the Level field
Window, modify User ID
Password, Confirm Password
Or Level of the user account Click the Apply button
Click the Delete button in the User window
Click Basic Language
To set the display language
SySTEm Configuration
To set date/time
Click System DATE/TIME
Setting time is applied
To view the log information
Click System LOG
To update the software
Software Update window appears
Click System
To reset the system
Click System Reset
Reset window appears Restart The Reset window appears
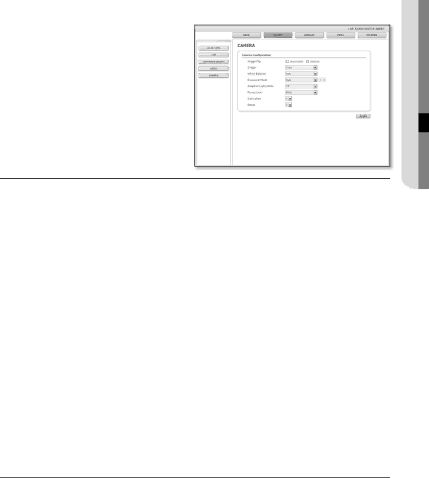
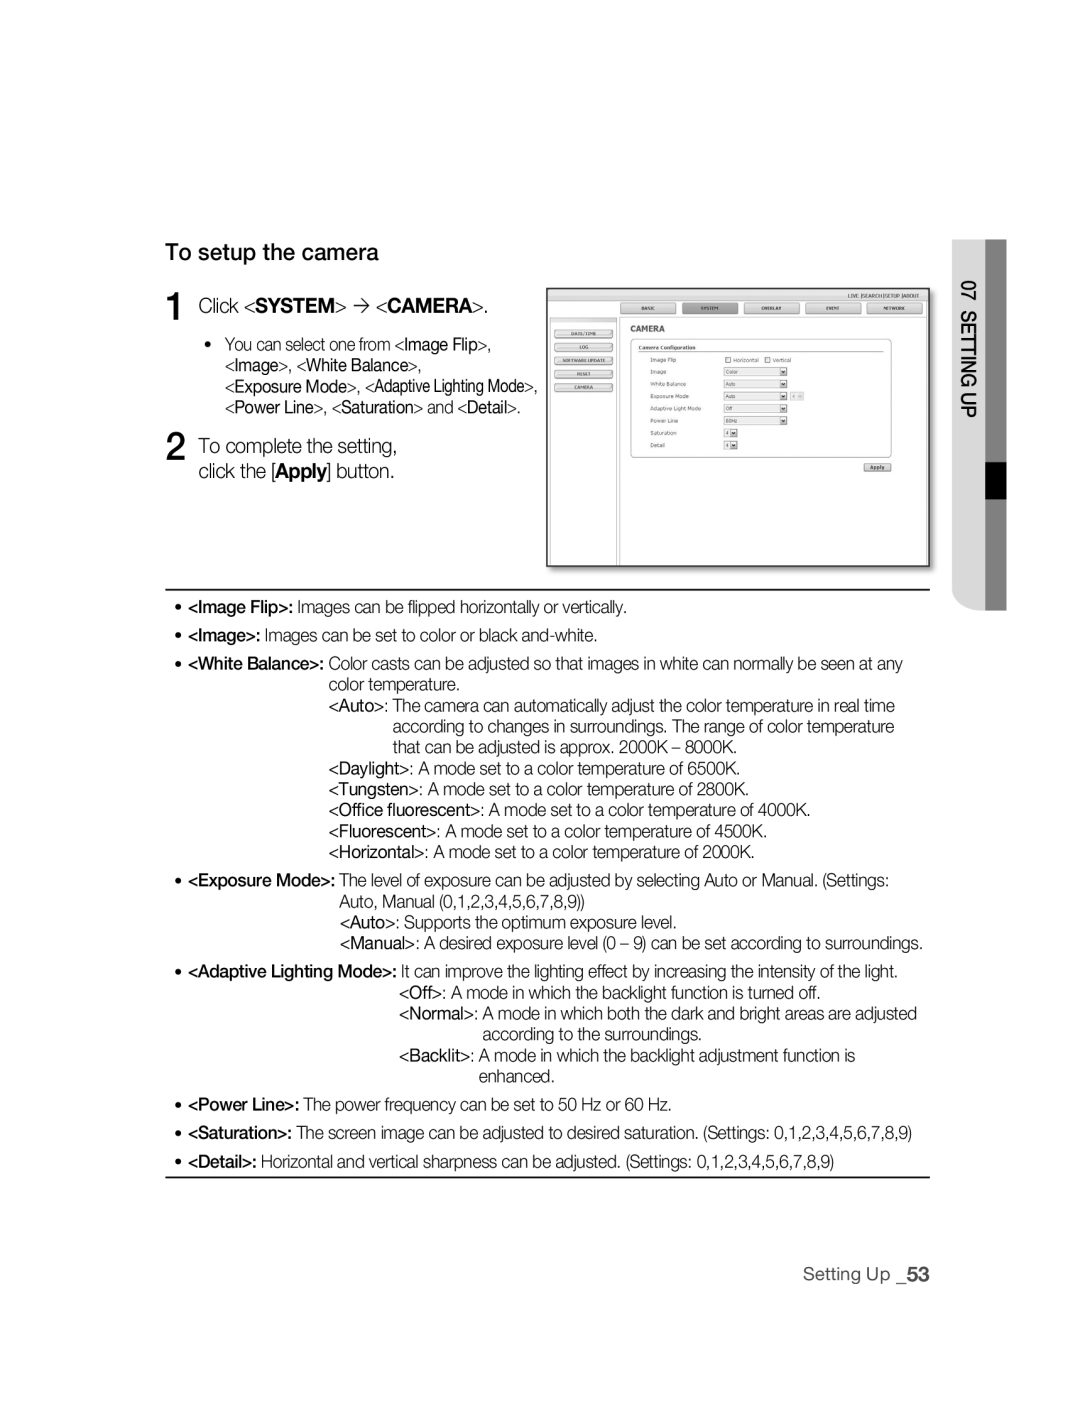
Click System Camera
To setup the camera
To Set text
LAyOUT Configuration
You can display text on the screen
Click Overlay
Click Event Transfer Setup
To set the image transmission function
Click the Test button
Click Event Record Setup
To setup the record
Click Event Alarm Image
To set an alarm image
To set an alarm input
Click Event Alarm Input 1 or Alarm Input
Transfer Setup settings
Click Event Motion
To set the motion detection function
Motion window, click the Motion Area button
To complete the setting, click the Apply button
Selected area is colored in yellow
Square box returns to its original color
Click Event Schedule
To set scheduled transmission
To set video streaming
NETWORk Configuration
If 00166c, and p if
To set ddNS
부록appendix
Troubleshooting
Feature under Motion
Enabled Motion Detection
Camera Is it possible to configure
But didn’t trigger an alarm
Details
Specifications
Frame Rate
Video Quality
Motion Detection
Alarm Event
Alarm IN/OUT
Time Setup
IP installer
Lgpl S/W
GPL/LGPL Software License
Appendix
Appendix
Appendix
Appendix
Appendix
Appendix
Appendix
Appendix
Appendix
Appendix
Appendix
Appendix
Correct Disposal of This Product
Удивительные возможности
Руководство по эксплуатации
Техника безопасности
Может привести к поражению электрическим током
Использованию или обслуживанию
Внимание
Важные правила техники безопасности
Подготовка 03 Функции
Содержание
Сборка и подключение
Сетевое подключение и настройка сети
Приложение
Настройка
Установка динамического IP-адреса
Использование камеры
Подготовка
Функции
Предосторожности при установке и использовании
Совместимые IP-роутеры
Рекомендуемая конфигурация ПК
Совместимые PoE свичи
Проверка наличия компонентов в комплекте
Лицевая часть
Названия Деталей
Регулятор заднего
Фокуса
Звуковой выход Звуковой вход Слот для карточки памяти
Задняя часть
Ethernet разъем Разъем питания
Разъем для Ethernet кабеля Сюда подключается шнур питания
Описание
Установка камеры
Сборка и подключение
Установка объектива
Случае использования CS объектива
При использовании объектива без функции увеличения
Настройка заднего фокуса
При использовании объектива с функцией увеличения
02 сБоркА И ПодклЮчЕНИЕ
Вставка/извлечение карточки памяти Sdhc
Вставка карточки памяти Sdhc
Извлечение карточки памяти Sdhc
Что такое карточка памяти?
Информация о карточке памяти не включено
Выбор наиболее подходящей карточки памяти
Использование карточки памяти
Подсоединение Ethernet кабеля
Подсоединение
Подключение питания
Подсоедините сетевой шнур к блок питания
Вставьте вилку в розетку
Схема соединения входящих/исходящих сигналов тревоги
Чтобы соединить входные и выходные порты
Соедините порт Audio OUT камеры и порт Line in динамика
Подсоединение звукового ввода/вывода
Микрофон
Микрофон Предварительный усилитель
Аудиокодек
Схема ввода/вывода аудио
Звуковой выход
Сопротивление выходного канала Line out
Подключение и настройка сети описаны ниже
Сетевое подключение и настройка сети
Подключение камеры к IP-роутеру через локальную сеть
ШАг 2 Настройка IP-адреса
ШАг 3 Подсоединение локального Пк через IP-роутер к камере
ШАг 4 Подключение камеры через IP-роутер к внешнему Пк
Подключение к камере через локальный ПК в локальной сети
Подключение камеры напрямую к локальной сети
Окна программы IP Installer
10 Кнопка Exit Выход из программы IP Installer
ОБНАружЕНИЕ кАМЕры
РучНАя НАстроЙкА сЕтИ
Установка статического IP-адреса
Выберите нужную камеру из списка Нажмите кнопку Manual Set
Если используется IP-роутер
Полях PoRT задайте номера Портов
Введите свой пароль
Нажмите кнопку oK
Если к IP-роутеру подключена более чем одна камера
Камеры
АВтоМАтИчЕскАя НАстроЙкА сЕтИ
Кнопки Auto Set и Manual Set
Активируются
УстАНоВкА дИНАМИчЕского IP-АдрЕсА
Установка динамического IP-адреса
Примеры использования динамического IP-адреса
Проверка динамического IP-адреса
НАстроЙкА ПЕрЕАдрЕсАцИИ ПортоВ соПостАВлЕНИЕ ПортоВ
Ручная переадресация портов
Внутреннюю камеру с IP-роутером
Использование камеры
ПодклЮчЕНИЕ к кАМЕрЕ
Подключение к камере
Проверка Ddns адреса
Подключение к камере при помощи программы IP Installer
Случае использования Windows XP Service Pack
Нажмите Install ActiveX Control
УстАНоВкА Activex
Нажмите кнопку Log
Вход в систему камеры
Интерфейс главного экрана
ИсПользоВАНИЕ ЭкрАНА ПросМотрА
При подключении к камере, появляется следующий экран
Название Кнопка Функция и описание
13 Экран Просмотра
Окно статуса соединения
Ниже показано какой размер экрана можно установить
Печать видеокадров
Захват видеокадров
REC зАПИсь
Запись видео
Чтобы остановить запись, снова нажмите кнопку Показатель
06 ИсПользоВАНИЕ кАМЕры
ИсПользоВАНИЕ ЭкрАНА Search Viewer ПоИск И ПросМотр
Capture
Кнопка
Календаря
Timeline
38 Использование камеры
Показатель
На нужной сцене, нажмите кнопку
Управление воспроизведением
Поиск видеоданных
Появится видеоданные, связанные с этой датой
Отображает двухчасовый промежуток
НАстроЙкА кАМЕры
Настройка
Setup
Интерфейса окна Setup Настройки
Настройка Видео/Аудио
ОсНоВНыЕ НАстроЙкИ
Чтобы завершить настройку видео, нажмите кнопку Apply
Появится окно Video & Audio
Щелкните Basic IP
Настройка IP-параметров
Щелкните Basic User
Задание настроек пользователей
Введите ID пользователя и его пароль
Нажмите кнопку Apply
Регистрация пользователя завершена
User ID, Password, Confirm Password или Level
Окне внесите изменения в
Уровни доступа пользователя
Щелкните Basic Language
Выбор языка
Установка даты и времени
СИстЕМНыЕ НАстроЙкИ
Выберите адрес NTP-сервера
Просмотр журнала
Щелкните System LoG
Из списка Address, или щелкните Syncronize with PC Viewer
Появится окно Software Update Обновление ПО
SoFTWARE Update
Обновление программного обеспечения
Щелкните System
Сброс системы
Щелкните Basic Camera
Настройка камеры
Настройка текста
НАстроЙкА ИНтЕрФЕЙсА
На экране может отображаться дополнительный текст
Щелкните oVERLAY oVERLAY Text
НАстроЙкА соБытИЙ
ЩелкнитеEVENT Transfer Setup
Настройка функции передачи изображения
Появится окно настройки передачи
Настройка записи
Щелкните Event RECoRD Setup
Настройка изображения по тревоге
Щелкните Event
SD Card Record
Настройка сигналов тревоги
Щелкните Event Alarm Input 1. или Alarm Input
Щелкните Event MoTIoN
Настройка функции регистрации движения
Задание зоны, в которой будет вестись обнаружение движения
Нажмите кнопку Apply для завершения
Появится окно Motion Area Зона обнаружения движения
Организация пересылки по расписанию
Чтобы завершить настройку, нажмите кнопку Apply
Появится окно Schedule Расписание
НАстроЙкА сЕтИ
Настройка потокового видео
UDPUnicast Данные отсылаются только одному получателю
Задание Ddns
Поиск и устранение неполадок
Приложение
Функция обнаружения
Нет картинки
Было
Записываются данные
Позиция Описание
Технические характеристики
Normal
Сек
Кадров
Very Low Оч.низкое
Сигналы тревоги ВХОД/ВЫХОД
Количество
Пересылка
По тревоге
GPL/LGPL Software License
70 Приложение
08 Приложение
72 Приложение
08 Приложение
74 Приложение
08 Приложение
76 Приложение
08 Приложение
78 Приложение
08 Приложение
80 Приложение
08 Приложение
Правильная утилизация данного устройства
Wyobraź sobie możliwości
Instrukcja użytkowania
Uwaga
Środki ostrożności
Uwaga
Ważne zalecenia dotyczące bezpieczeństwa
Spis treści
Konfigurowanie
Załącznik
Używanie kamery
Wstęp
Funkcje
Środki Ostrożności Instalacja I Użytkowanie
Zgodne Routery IP
Zalecane Specyfikacje Komputera PC
Zgodne Przełączniki POE
Sprawdzenie Zawartości Opakowania
Przód
Nazwy Każdej Części
Port we/wy Przycisk resetowania
Tył
Wyjście audio Wejście audio Gniazdo karty pamięci Sdhc
LED
Dioda Stan Opis
Instalacja Kamery
Instalacja i podłączenie
Montaż obiektywu
Przypadku stosowania obiektywu CS
Regulacja tylnej odległości ogniskowej
Przypadku obiektywu bez funkcji zoom
Przypadku obiektywu z funkcją zoom
Wkładanie i wyjmowanie karty pamięci Sdhc
Wkładanie karty pamięci Sdhc
Wyjmowanie karty pamięci Sdhc
Co to jest karta pamięci?
Informacje o karcie pamięci niedołączonej do zestawu
Wybór odpowiedniej karty pamięci
Użytkowanie karty pamięci
Podłączanie Kabla sieci Ethernet
Podłączanie
Podłączanie Zasilania
Aout 1, Aout 2 Są to porty wyjścia alarmu
Schemat połączeniowy wejścia i wyjścia alarmu
Aby połączyć porty wejściowe i wyjściowe
Jest to port umasienia
Połącz port Audio OUT kamery z portem Line in głośnika
Podłączanie przewodów do wejścia i wyjścia audio
Mikrofon
Mikrofon Przedwzmacniacz
Kodek audio
Schemat blokowy wejść i wyjść audio
Dźwięk w trybie pełnego dupleksu Wejście audio
Wyjście audio
Podłączenie do sieci i konfiguracja
18 Podłączenie do sieci i Konfiguracja
Krok 2 Ustawianie adresu IP
Komputerze PC i wyszukaj kamerę
IP w celu łączenia z kamerą znajdującą się za routerem IP
Podłączanie Kamery Bezpośrednio do Sieci Lokalnej
Wyszukiwanie Kamery
Układ ekranu programu IP Installer
Ręczne Konfigurowanie Sieci
Ustawianie statycznego adresu ip
Wybierz odpowiednią kamerę z listy Kamer.1
Kliknij przycisk Manual Set
Ustawianie Statycznego Adresu IP
Skonfiguruj różne wartości adresów IP i portów kamer
Razie podłączenia więcej niż jednej kamery do routera
Kamer
Automatyczne Konfigurowanie Sieci
Panelu tylnym
Jest aktywny Kliknij przycisk Auto Set
Konfigurowanie Dynamicznego Adresu IP
Ustawianie dynamicznego adresu ip
Przykłady używania dynamicznego adresu IP
Sprawdzanie dynamicznego adresu IP
Konfigurowanie Przekierowywania Portów Mapowania Portów
Przycisk Save Settings
Po zakończeniu konfiguracji kliknij
Zmiany zostały zapisane
Używanie kamery
Podłączanie do Kamery
Podłączanie do kamery
Sprawdzanie adresu Ddns
Instalowanie Activex
Przypadku systemu Windows XP z dodatkiem Service Pack
Kliknij przycisk Log
Logowanie do kamery
Używanie Ekranu Podglądu
Podstawowy układ ekranu
Nazwa Przycisk Funkcja i opis
Połączenia
Okno stanu
Przycisk
Drukowania
Aby wydrukować treść wideo
Aby przechwycić treść wideo
Odpowiednim momencie filmowania kliknij przycisk Capture
Odpowiednim momencie filmowania kliknij przycisk Print
Kliknij przycisk Save
Aby nagrać treść wideo
Nazwa Przycisk
Używanie Ekranu Podglądu Wyszukiwania
Przycisk Record Obszar kalendarza Linia czasu
38 Używanie kamery
Kliknij ponownie przycisk Save
Aby zatrzymać nagrywanie
Kontrolowanie odtwarzania
Aby wyszukać dane wideo
Kalendarza wybierz datę, którą chcesz znaleźć
Zostaną wyświetlone dane wideo skojarzone z daną datą
Konfigurowanie Kamery
Konfigurowanie
Setupbasic
Układ ekranu Setup
Podstawowa Konfiguracja
Aby skonfigurować opcje wideo i audio
Zostanie wyświetlone okno Video & Audio
Aby skonfigurować ustawienia IP
Kliknij przycisk Basic ´ IP
Apply
Kliknij opcję Basic ´ User
Aby skonfigurować użytkowników
Aby zakończyć konfigurowanie, kliknij przycisk Apply
Zostanie wyświetlone okno User
Rejestracja użytkownika została zakończona
Kliknij przycisk Apply
Confirm Password lub Level konta4
Użytkownika Kliknij przycisk Apply
Informacja o poziomie użytkownika
Kliknij opcję Basic ´ Language
Aby ustawić język wyświetlania
Konfiguracja Systemu
Aby ustawić datę i godzinę
Zostanie wyświetlone okno DATE/TIME
Kliknij opcję System ´ LOG
Aby wyświetlić informacje dziennika
Konfigurowanie
Aby zresetować system
Kliknij opcję System ´ Camera
Aby skonfigurować kamerę
Aby skonfigurować wyświetlanie tekstu
Konfiguracja Układu
Na ekranie można wyświetlić tekst
Kliknij opcję Overlay ´ Overlay Text
Zostanie wyświetlone okno Trnasfer Setup
Kliknij opcję Event ´ Transfer Setup
Konfiguracja Zdarzeń
Aby skonfigurować funkcję transmisji obrazu
Zostanie wyświetlone okno Record Setup
Kliknij opcję Event ´ Record Setup
Aby skonfigurować nagrywanie
Aby zakończyć konfigurowanie, kliknij przycisk
Kliknij opcję Event ´
Aby skonfigurować obraz alarmowy
Aby zakończyć konfigurowanie
Ustawienia zostają zapisane
Aby skonfigurować wejście alarmu
Kliknij opcję Event ´ Alarm Input 1 lub Alarm Input
Zostanie wyświetlone okno Alarm Input
Aby skonfigurować funkcję wykrywania ruchu
Kliknij opcję Event ´ Motion
Zostanie wyświetlone okno Motion
Aby anulować wybór, kliknij ponownie prostokątne pole
Aby skonfigurować obszar wykrywania ruchu
Aby zakończyć konfigurowanie, kliknij przycisk Apply button
Wybrany obszar zostanie wyświetlony w kolorze żółtym
Aby skonfigurować transmisję zaplanowaną
Opcja Disable wyłącza tę funkcję
Konfiguracja Sieci
Zostanie wyświetlone okno Streaming Setup
Aby skonfigurować przesyłanie strumieniowe wideo
UDPUnicast i UDPMulticast
Kliknij opcję Network ´ Ddns
Aby skonfigurować ustawienia Ddns
Załącznik
Rozwiązywanie Problemów
Brak obrazu
Wywołał on alarmu
Po włączeniu funkcji
Wykrywania ruchu po
Pozycja Szczegóły
Specyfikacje
Szybko
Pozycja Szczegóły
Jako wideo
Wykrywanie ruchu
Program IP Installer
Alarmu
Podłączeni
Użytkownicy
GPL/LGPL Software License
70 Załącznik
ŁĄ 08 ZA Cznik
72 Załącznik
ŁĄ 08 ZA Cznik
74 Załącznik
ŁĄ 08 ZA Cznik
76 Załącznik
ŁĄ 08 ZA Cznik
78 Załącznik
ŁĄ 08 ZA Cznik
80 Załącznik
ŁĄ 08 ZA Cznik
Zużyty sprzęt elektryczny i elektroniczny
Prawidłowe usuwanie produktu
Memo
AB68-00721E00