SRD-470/470D
Channel DVR
Channel DVR
Important Safety Instructions
Before Start
Normal capacity 170mAh
Continuous standard load 0.2mA
Contents
Search & Play
Backup Viewer
WEB Viewer
Appendix
Features
Standards Approvals
Package Contents
Part Names and Functions Rear
Part Names and Functions Front
SRD-470
SRD-470D
Mode
Audio
REC
Remote Control
Using the Numeric buttons
Changing the Remote Control ID
Checking the Installation Environment
Installation
Manufacturer
HDD Addition
Installation
Hard disk bracket Master hard disk
SATA2 SATA1
Connecting the USB
Connecting the VIDEO, AUDIO, and Monitor
Connecting POS Device
Connecting with Other Device
Connecting the RS485 Device
Connecting the Alarm INPUT/OUTPUT
Connecting the alarm input signal
Connecting the alarm output signal
Connecting the Network
Connecting to Internet through Ethernet 10/100/1000BaseT
Connecting to the Internet using the router
Connecting to Internet through Adsl
Starting the system
Getting Started
Shutting Down the System
Live screen appears with a beep
Click Login Login dialog appears
Login
Locking All Buttons
figure
Live Screen Configuration
Icons on the Live Screen
Live
Split Mode Menu
Error Information
Split Mode Menu
Live Screen Menu
Zoom
Single Mode Menu
View the Launcher Menu
PTZ Alarm Freeze
System Date/Time/Language Time.
PTZ
Switching the screen mode
Live Mode
Switching the screen automatically
PIP
Switching to Single Mode
Channel Setting
Spot OUT
Selecting a Spot Out mode
Zoom
Multichannel Live Menu
Audio ON/OFF
Audio ON/OFF in Single mode
Freeze
Event Monitoring
Seconds
System Setup
Setting the Date/Time/Language
Date/Time/Language
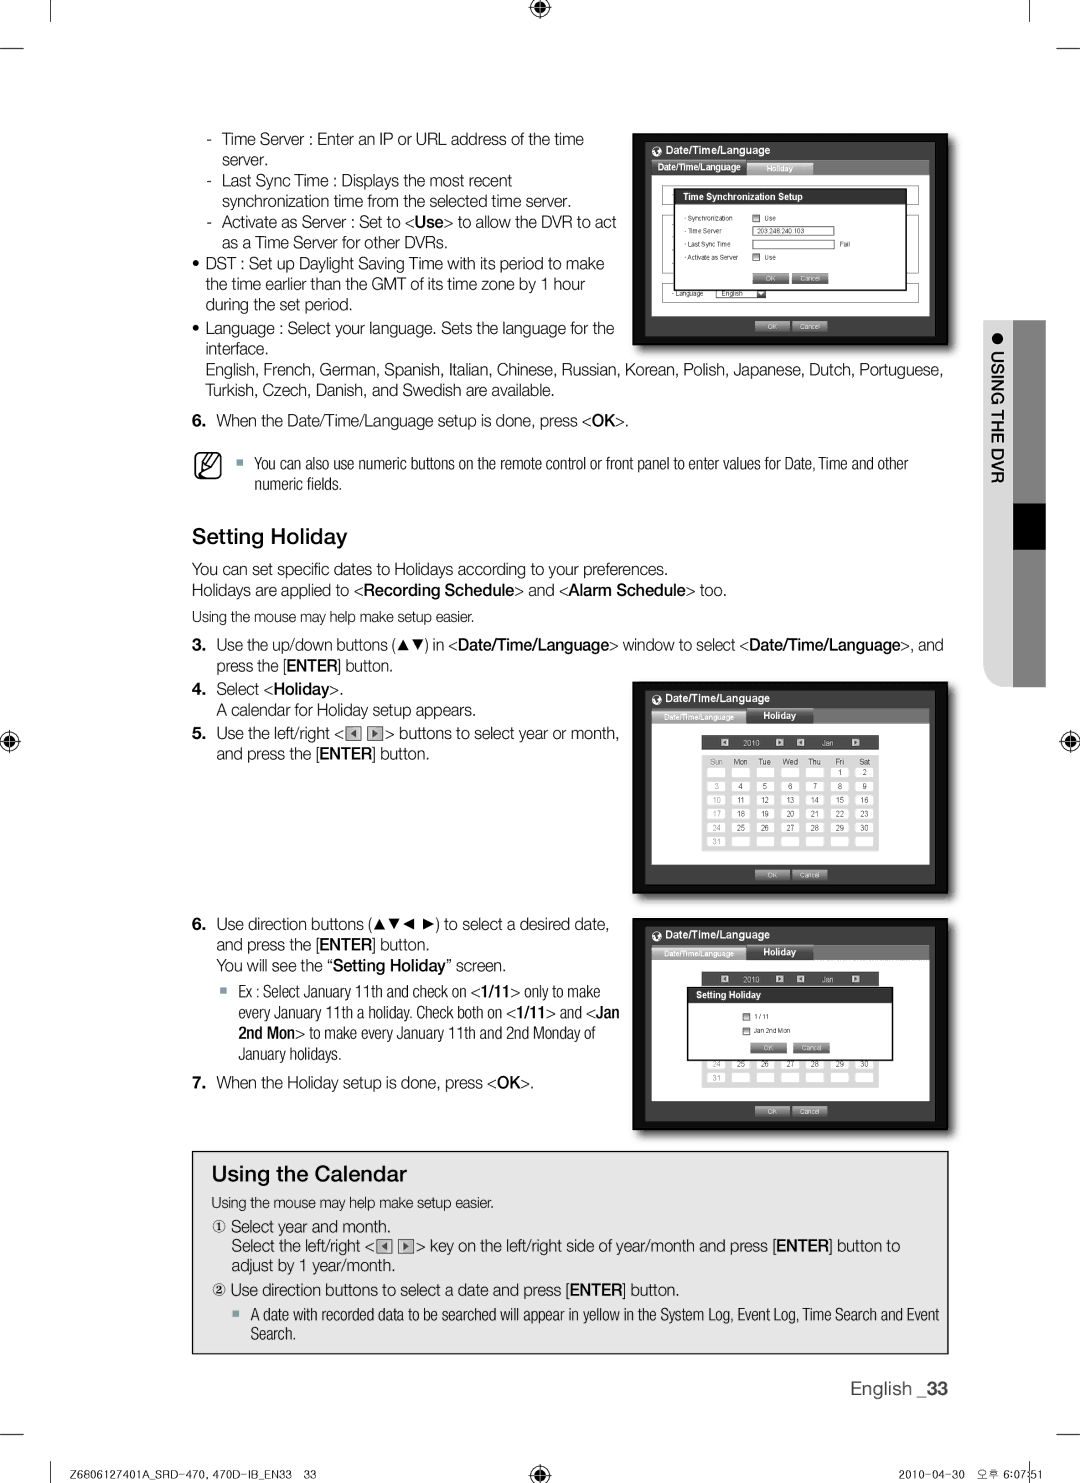
Setting Holiday
Using the Calendar
Using the DVR
Using Virtual Keyboard
Setting the Administrator
You can set and change Administrator’s ID and password
Permission Management
To set the group authority
Setting the Group
Login
To change the user password
To restrict the user permissions
User
Setting Permissions
Setting the User
When the user setup is done, press OK
Use direction buttons
System Management
Checking the System Information
System Management
System Upgrade
Using
BroadcastS/W Upgrade
Updating the Software
Settings
Log Information
System Log
Backup Log
Backup Log
Event Log
Select Event Log Use direction buttons
Setting the Camera
Setting the Device
Camera
Press Enter button
Setting the PTZ
When the camera setup is done, press OK
Usingthe DVR
Confirming Devices
Storage Device
Formatting
HDD Alarm
You can format a storage device
Select Format
POS Devices
Remote Devices
Item, and press Enter button
Remote Device
Add Preset
POS Device Setup
Setting Display position
Setting the Monitor
Monitor
Move to Monitor, and press Enter button
Setting the Screen Mode
Setting the Spot Out
Select Mode Use direction buttons
When the screen mode setup is done, press OK
Recording Schedule
Setting the Recording
Record
Recording Schedule
Setting Standard Recording Properties
REC Quality / Resolution
Event Record Duration
Recording Color Tags
Resolution
Setting Event Recording Properties
Record Option
Cifs
Window of sensor detection setup appears
Setting the Event
Sensor Detection
Detection, and press Enter button
Motion Detection
Setting the Motion Detection Area
Video Loss Detection
Alarm Schedule
Setting the Backup
Backup
You can backup the desired data to a connected device
Backup window appears
Connection Mode
Network Configuration
Setting the Connection
You can set the network connection route and protocol
Setting the Protocol
Connecting and Setting the Network
When no router is used
Dynamic IP Dhcp mode
Internal Port Range Set the same to the External Port Range
When a router is used
Network setting window, press the up/down
Ddns Setting
Live Transfer
Use the direction buttons
Mailing Service
Smtp Setting
Event Setting
Group Setting
Recipient Setting
GroupAdd recipient
Controlling a PTZ Device
Using the PTZ camera
PTZ Device
Getting started with PTZ
Preset Setting
Camera Setting
Exit System Info
Search
It does not appear in Backup Search
Time Search
You can search for recorded data of a desired time
Backup Search
Event Search
Search & Play
Motion Search
POS Search
Select POS Search in the Search menu
Select Motion Search in the Search menu
Playback
Play
Play
Product Features
What is Web Viewer?
Introducing WEB Viewer
System Requirements
WEB Viewer
Connecting WEB Viewer
Z6806127401ASRD-470, 470D-IBEN72 2010-04-30 오후
Using Live Viewer
Single Mode
You can change the split mode by clicking each number icon
Full Screen Mode
OSD Information Display
Setting the display of the OSD time information
Changing the Live Screen Mode
Connected DVR
Capture Saves the current screen into a BMP or Jpeg fi le
Saving the Live Screen on the PC
Changing the Live Screen Channel
Using PTZ Camera
Z6806127401ASRD-470, 470D-IBEN78 2010-04-30 오후
Using Search Viewer
Z6806127401ASRD-470, 470D-IBEN80 2010-04-30 오후
Z6806127401ASRD-470, 470D-IBEN81 2010-04-30 오후
Searching the Recorded Video in the Timeline
Searching the Recorded Video in the Calendar
You can confi gure the various settings of the DVR system
Viewer Setup
System
Controlling Playback
Permission Management
Holiday
System Management
Device
Camera
Storage Device
Remote Device
POS Device
Monitor
For more information, refer to Setting the Recording.
Record
Recording Schedule
Event
REC Quality & Resolution
Event Record Duration
Record Option
You can set the alarm output time if a video loss occurs
Alarm Schedule
Motion Detection
Video Loss Detection
Connection
Network
Ddns
Live Transfer
Smtp
Mailing Service
About
Recommended System Requirements
SEC Backup Viewer
Backup Viewer
Ntsc PAL
Product Specification
4CIFL
2CIFM
HDD
Appendix
POS
SRD-470/470D
Product Overview
Management
Default Setting
Duration
Category Details Factory Default
Smtp
Troubleshooting
By the service personnel
HDD installed. Try again with a different HDD
Quick start guide backup, search
Forgot the password Contact the DVR administrator for help
4CIF 2CIFCIF
Z6806127401ASRD-470, 470D-IBEN106 2010-04-30 오후
Correct disposal of batteries in this product
TEL +44-1932-45-5300 FAX +44-1932-45-5325
Sales Network

![]()
![]() > key on the left/right side of year/month and press [ENTER] button to adjust by 1 year/month.
> key on the left/right side of year/month and press [ENTER] button to adjust by 1 year/month.