QUICK REFERENCE
WARNING: Avoid injury. Keep loose clothing, hair, fingers, and all other parts of body away from any moving part (such as the revolving brush). Turn off the switch and unplug the cleaner before changing the cleaner height setting.
9
10
12
9 
![]()
![]()
![]()
![]() 11
11
3
5
1
2
4
9
13
10 | 11 |
|
| 9 |
|
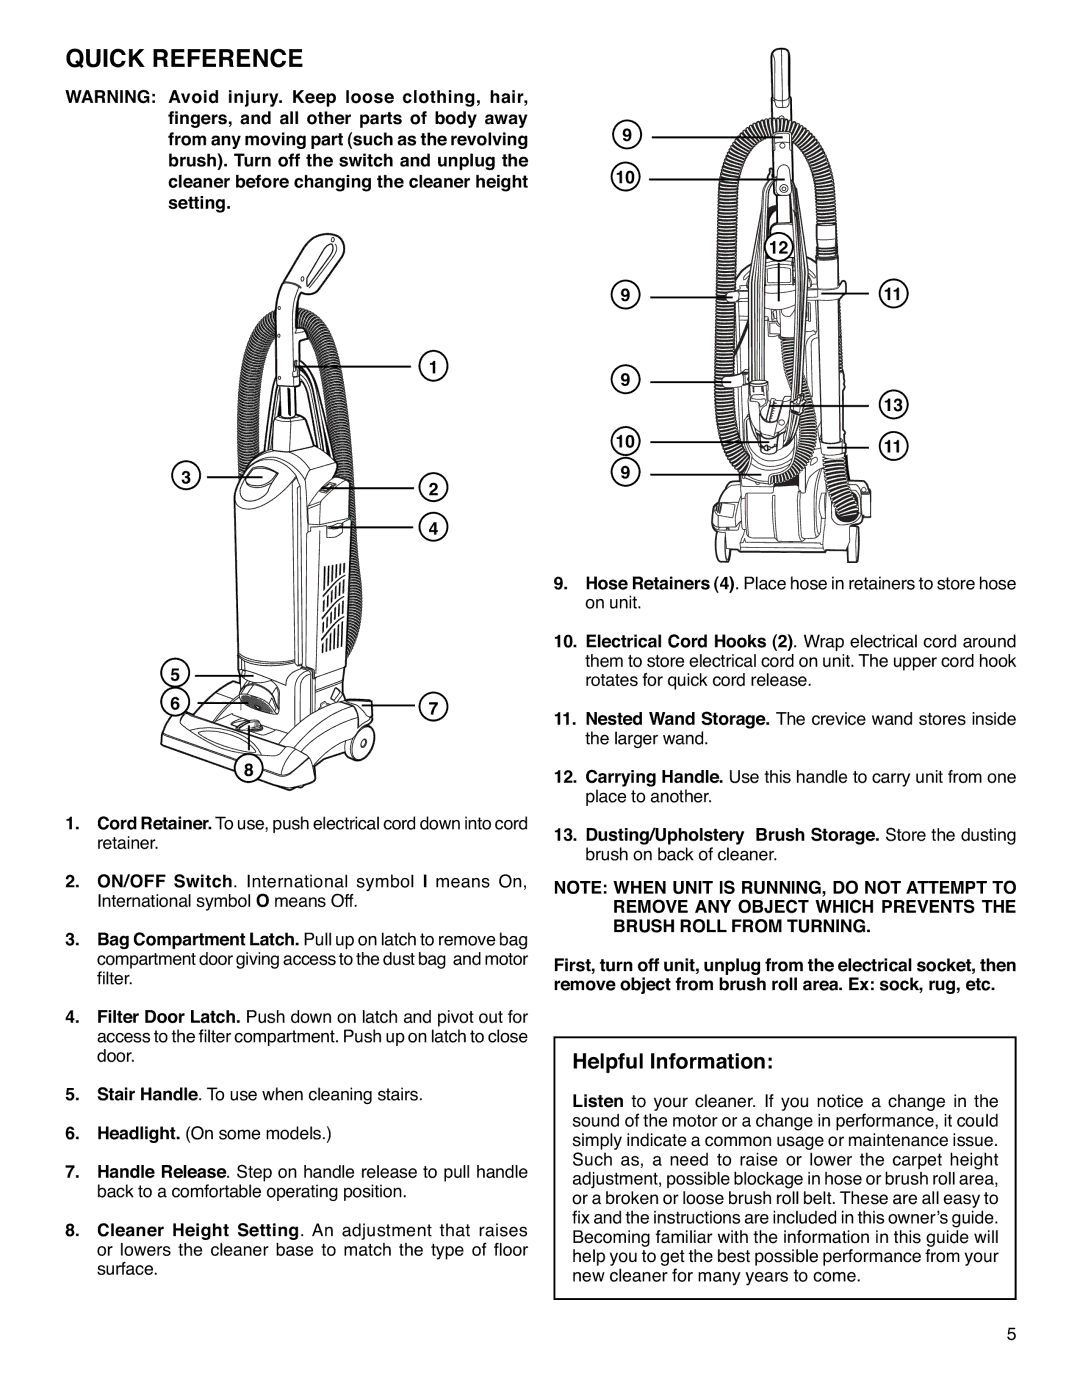
9. | Hose Retainers (4).Placehoseinretainerstostorehose | |
| onunit. |
|
10. | Electrical Cord Hooks (2).Wrapelectricalcordaround | |
| themtostoreelectricalcordonunit.Theupperco | rdhook |
| rotatesforquickcordrelease. |
|
6 | 7 |
|
8![]()
1.Cord Retainer.Touse,pushelectricalcorddownintocord retainer.
2. ON/OFF Switch. International symbol I means On, Internationalsymbol OmeansOff.
3.Bag Compartment Latch. Pulluponlatchtoremovebag compartmentdoorgivingaccesstothedustbagand motor filter.
4.Filter Door Latch.Pushdownonlatchandpivotoutfor accesstothefiltercompartment.Pushuponlatcht oclose door.
5.Stair Handle.Tousewhencleaningstairs.
6.Headlight. (Onsomemodels.)
7.Handle Release.Steponhandlereleasetopullhandle backtoacomfortableoperatingposition.
8.Cleaner Height Setting. An adjustment that raises
or lowers the cleaner base to match the type of floo | r |
surface. |
|
11. | Nested Wand Storage. Thecrevicewandstoresinside |
| thelargerwand. |
12. | Carrying Handle. Usethishandletocarryunitfromone |
| placetoanother. |
13. | Dusting/Upholstery Brush Storage.Storethedusting |
| brushonbackofcleaner. |
NOTE: WHEN UNIT IS RUNNING, DO NOT ATTEMPT TO REMOVE ANY OBJECT WHICH PREVENTS THE BRUSH ROLL FROM TURNING.
First, turn off unit, unplug from the electrical socket, then remove object from brush roll area. Ex: sock, rug, etc.
Helpful Information:
Listen to your cleaner. If you notice a change in the soundofthemotororachangeinperformance,itcould simplyindicateacommonusageormaintenanceissue. Such as, a need to raise or lower the carpet height adjustment,possibleblockageinhoseorbrushroll area, orabrokenorloosebrushrollbelt.Thesearealleasyto fixandtheinstructionsareincludedinthisowner sguide. Becomingfamiliarwiththeinformationinthisguidewill helpyoutogetthebestpossibleperformancefromyour new
5
