Orion Website
Customer Service
FCC Declaration of Conformity Compliance Statement Part
Or BACK. no USER-SERVICEABLE
Qualified Service Personnel
SHOCK, do not Remove Cover
HOW to Handle the LCD Panel
Clean water
Condensation
Important Notice
Digital Audio Jack Coaxial
Features
Contents
Disc
Left Side
Location of controls
Top
Front
Location of controls
Rear
Variable TV-screen angle
Remote control
Inserting Batteries
Remote control
Power source
To USE AC Power
Antenna Jack Combiner UHF 300 ohm VHF 75 ohm
Antenna connections
Jack 75 ohm Coaxial Cable
Matching
Cable TV Ohm Cable Jack To TV/DVD
Cable TV Ohm Cable Jack Switch To TV/DVD Splitter
Cable TV connections
Incoming 75 ohm
Press Exit to return to the normal screen
Setting the on-screen display language
Press or to select
Language
To Select Digital Channels
To turn on the unit, press Power
TV operation
To Select Analog Channels
Display
TV operation
TV/CABLE
Cable Chart
Memorizing channels
TV/CABLE selection
Automatic memory tuning
Memorizing channels
To ADD/DELETE channels
Enter
Setting the V-Chip
To register password
Using Number buttons
To set the V-Chip
Setting the V-Chip
To change the password
Press or to select NEW PASSWORD, then press or
TV menu screen will appear Press or to select Locks menu
Labeling channels
To create channel labels
To erase channel labels
Press SETUP/TV Menu
Labeling the video input source
Selecting the video input source
Setting the clock
Preparation
Setting the on timer
Cinema WIDE1 picture size for 43 format programs
Setting the picture size
Selecting the picture size
Natural picture size
Full will display the picture at the maximum size
Setting the picture size
Cinema WIDE2 picture size for letter box programs
Full picture size for 169 source programs
Picture Scroll
Setting the picture scroll
Press or to display Scroll Adjustment mode
Then press or to select
To set the Cinema Mode to Video
To set the Cinema Mode to Film
Using the aspect feature
Adjusting the back lighting feature
Picture Preference
Adjusting the picture preference
Picture control adjustment
You can select four picture modes-SPORTS, Standard
Selecting the color temperature
Resetting your picture adjustments
Contrast
Closed Caption
CC advanced
To listen to a second audio program SAP
Sound control adjustment
Selecting stereo/Second Audio Program SAP
Turning off the built-in speakers
SRS 3D
Using the Wowtm surround sound feature
Selecting the Hdmi audio input source
Selecting the digital output
Resetting your audio adjustments
Press TV SETUP/MENU, then press or to select Audio menu
Selecting the audio language
Checking the Digital-signal strength
Following pages describe the setup/operation in DVD mode
Preparation/Status display of disc
Preparation
Changes to Reading
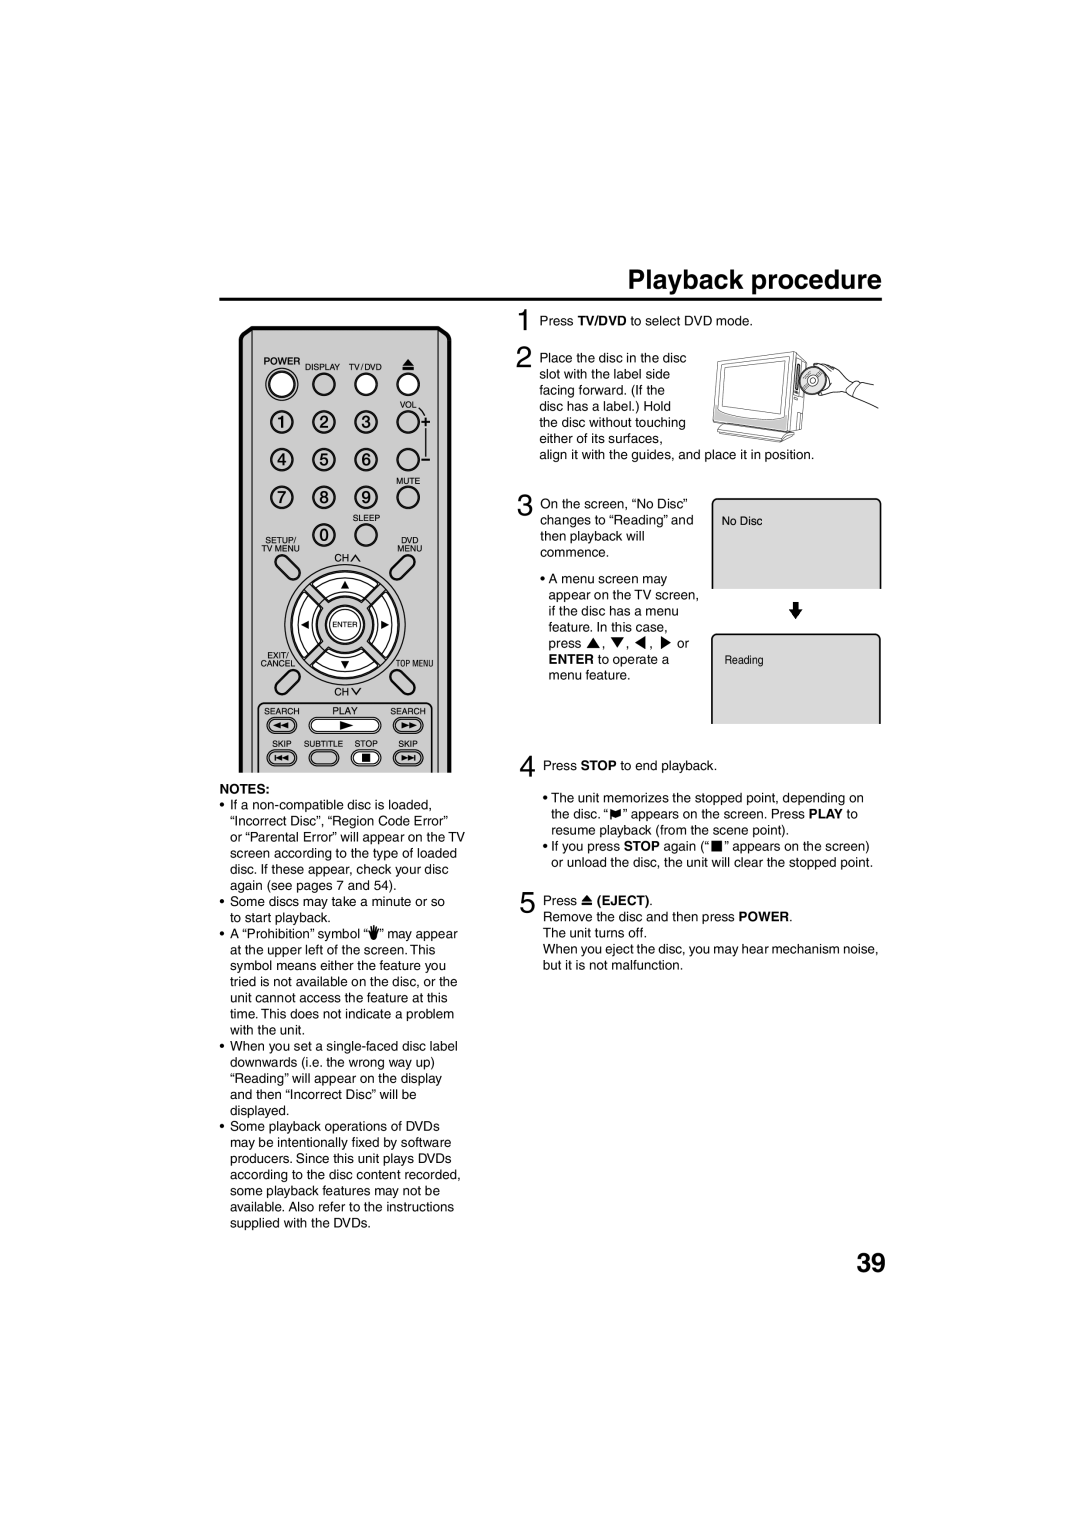
Playback procedure
Press TV/DVD to select DVD mode Place the disc in the disc
Menu feature Press Stop to end playback
Special playback
Limitations on MP3/WMA/JPEG CD playback
MP3/WMA/JPEG playback
MP3/WMA/JPEG CD information MP3 CD playback
Apple-HFS-System cannot be played
MP3/WMA/JPEG playback
Jpeg CD playback
Or Number
Seconds
Setting the Jpeg interval
Or Enter
Off
Pictures Only
Setting the select files
All
Music Only
Zooming/Locating desired scene
Zooming
Locating desired scene
Repeat Playback
Repeat playback
Title, Chapter, Track Playback
Audio-CD
Program playback/Random playback CD
Program playback
Random playback
Returning to the Scenes
To Cancel the Mark
Marking desired scenes
Marking the Scenes
Changing the subtitle language
Changing soundtrack language/Subtitles
Subtitles
Turning the subtitles on and off
DVD menu
Changing angles/Title selection/DVD menu
Changing angles
Title selection
Setting on screen display
Setting the aspect ratio of TV screen
Setting the Picture mode
Setting the Picture mode
Dynamic Range Control
DRC /Setup/Ret urnOn
Press Number buttons 0-9 to
Parental control setting
Changing the parental level
Press Number buttons
Then press Number buttons
Playback will commence if the entered password was correct
Temporary disabling of rating level by DVD disc
If you interrupt the entering, press Return
Original Audio
Setting the language
English, Francais, Espanol
Other
Language code list
To connect to a DVD player with Component Video Input
Connections to other equipment
To connect the LCD TV/DVD to a VCR
To connect the LCD TV/DVD to a VCR with an S-Video cord
Rear lower left of unit
Using an AV Amplifier with built-in digital surround
Connections to other equipment
To connect a Hdmi or a DVI device to the unit
To connect an audio system
To connect the TV/DVDorto a camcorder, or a TV Game
Left side of unit Camcorder
Ignition
Reception disturbances
TV Broadcast Reception
Problems and troubleshooting
Symptoms
Power
Review
Problems and troubleshooting
Remote Control
DVD
Television
Specifications
Accessories
General
This warranty does not cover
Warranty
Memo
J5X10101ASH06/02 N