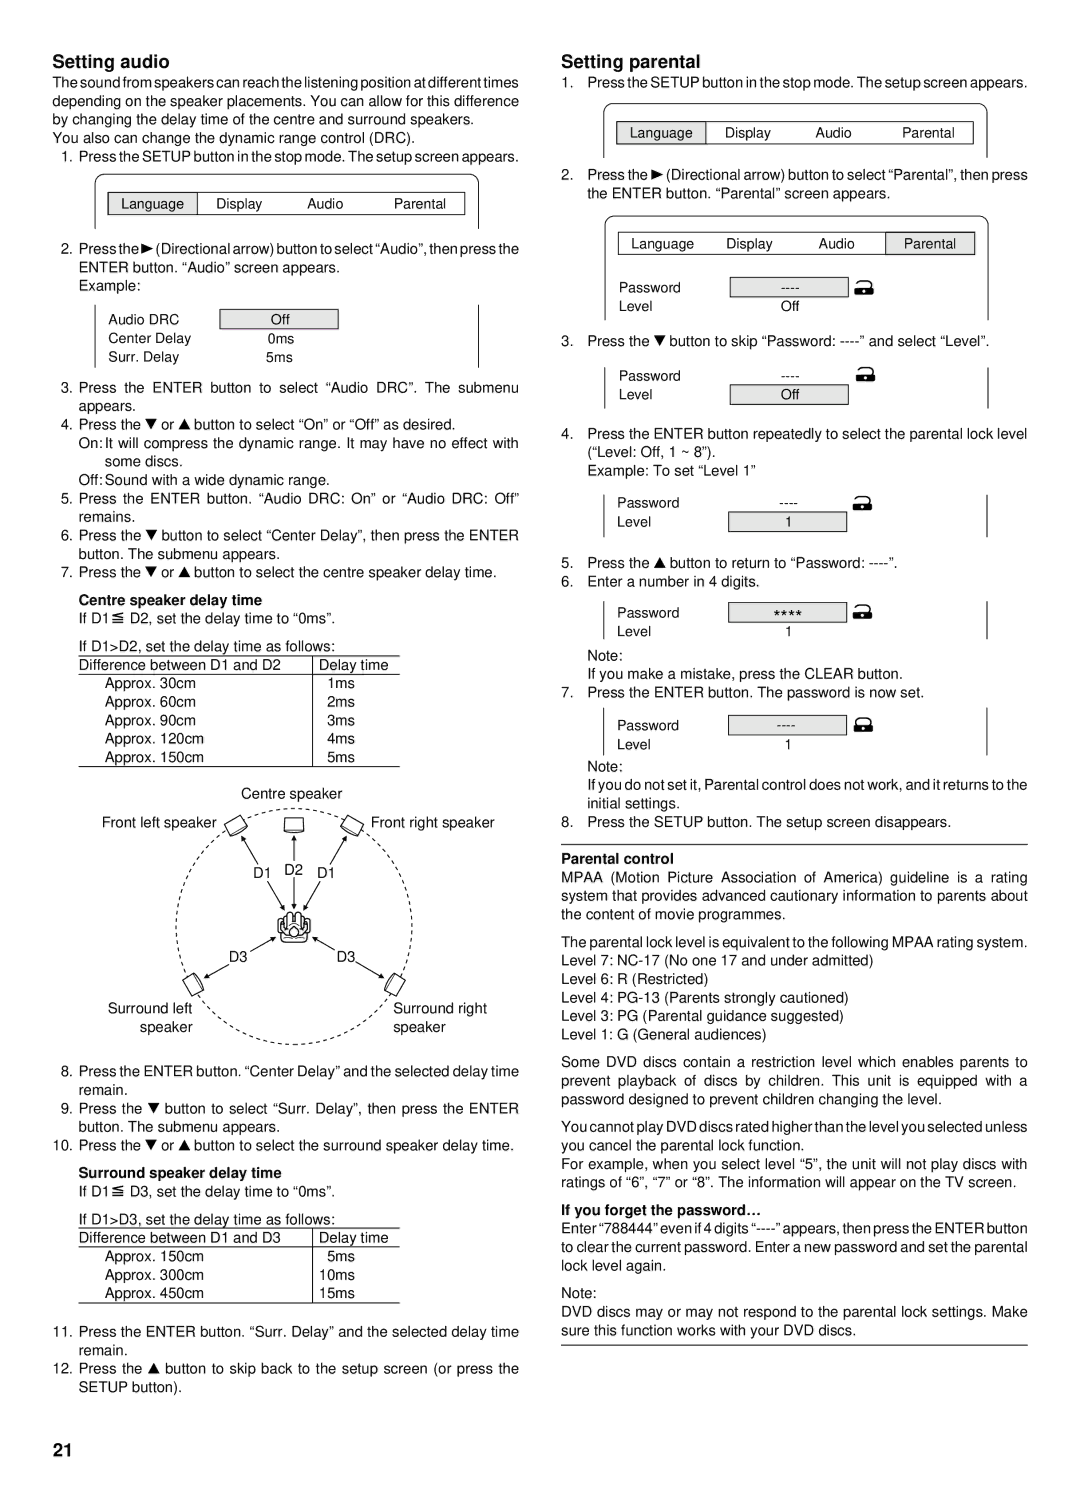
Setting audio

The sound from speakers can reach the listening position at different times depending on the speaker placements. You can allow for this difference by changing the delay time of the centre and surround speakers.

You also can change the dynamic range control (DRC).

1. Press the SETUP button in the stop mode. The setup screen appears.

Language

Display

Audio

Parental


2.Press the a(Directional arrow) button to select “Audio”, then press the ENTER button. “Audio” screen appears.

Example:

Audio DRC

Off

Center Delay

0ms

Surr. Delay

5ms

3.Press the ENTER button to select “Audio DRC”. The submenu appears.

4.Press the 5 or 4button to select “On” or “Off” as desired.

On: It will compress the dynamic range. It may have no effect with some discs.

Off: Sound with a wide dynamic range.

5.Press the ENTER button. “Audio DRC: On” or “Audio DRC: Off” remains.

6.Press the 5 button to select “Center Delay”, then press the ENTER button. The submenu appears.

7.Press the 5 or 4button to select the centre speaker delay time.

Centre speaker delay time

If D1 D2, set the delay time to “0ms”.

If D1>D2, set the delay time as follows:

Difference between D1 and D2


Delay time


Approx. 30cm


1ms


Approx. 60cm


2ms

Approx. 90cm


3ms

Approx. 120cm


4ms

Approx. 150cm


5ms


Centre speaker

Front left speaker


Front right speaker


D1

D2

D1


D3

D3

Surround left

Surround right

speaker

speaker

8.Press the ENTER button. “Center Delay” and the selected delay time remain.

9.Press the 5 button to select “Surr. Delay”, then press the ENTER button. The submenu appears.

10.Press the 5 or 4button to select the surround speaker delay time.

Surround speaker delay time

If D1 D3, set the delay time to “0ms”.

If D1>D3, set the delay time as follows:

Difference between D1 and D3

Delay time

Approx. 150cm

5ms

Approx. 300cm

10ms

Approx. 450cm

15ms

11.Press the ENTER button. “Surr. Delay” and the selected delay time remain.

12.Press the 4 button to skip back to the setup screen (or press the SETUP button).

Setting parental

1. Press the SETUP button in the stop mode. The setup screen appears.

Language

Display

Audio

Parental


2.Press the a(Directional arrow) button to select “Parental”, then press the ENTER button. “Parental” screen appears.


Language

Display

Audio


Parental


Password


----


Level


Off


3. Press the 5button to skip “Password: ----

” and select “Level”.


Password


----


Level


Off


4.Press the ENTER button repeatedly to select the parental lock level (“Level: Off, 1 ~ 8”).

Example: To set “Level 1”


Password

----


Level


1


5.

Press the 4 button to return to “Password: ----”.

6.

Enter a number in 4 digits.


Password


****


Level

1


Note:


If you make a mistake, press the CLEAR button.

7.

Press the ENTER button. The password is now set.


Password


----


Level

1


Note:


If you do not set it, Parental control does not work, and it returns to the


initial settings.


8.

Press the SETUP button. The setup screen disappears.

Parental control

MPAA (Motion Picture Association of America) guideline is a rating system that provides advanced cautionary information to parents about the content of movie programmes.

The parental lock level is equivalent to the following MPAA rating system. Level 7: NC-17 (No one 17 and under admitted)

Level 6: R (Restricted)

Level 4: PG-13 (Parents strongly cautioned)

Level 3: PG (Parental guidance suggested)

Level 1: G (General audiences)

Some DVD discs contain a restriction level which enables parents to prevent playback of discs by children. This unit is equipped with a password designed to prevent children changing the level.

You cannot play DVD discs rated higher than the level you selected unless you cancel the parental lock function.

For example, when you select level “5”, the unit will not play discs with ratings of “6”, “7” or “8”. The information will appear on the TV screen.

If you forget the password…

Enter “788444” even if 4 digits “----” appears, then press the ENTER button

to clear the current password. Enter a new password and set the parental lock level again.

Note:

DVD discs may or may not respond to the parental lock settings. Make sure this function works with your DVD discs.

21

Page 22
Image 22
Sanyo DC-TS760 instruction manual Setting audio, Setting parental

DC-TS760 specifications

The Sanyo DC-TS760 is a compact digital camera that gained popularity for its robust design and remarkable features. Launched as part of Sanyo's innovative lineup, it is well-suited for both amateur photographers and seasoned enthusiasts looking for reliability combined with advanced capabilities.

One of the standout features of the DC-TS760 is its waterproof construction. With an impressive rating of IP68, this camera can withstand being submerged in water up to 10 feet deep for extended durations, making it an ideal companion for aquatic adventures, whether snorkeling or capturing images in the rain. Its rugged build also includes shock resistance, ensuring it can endure drops from heights up to 5 feet. This durability reaches beyond water and impact, making it dustproof, which is essential for outdoor shoots in challenging environments.

The camera comes equipped with a 16.1-megapixel CCD sensor, delivering high-resolution images that capture fine details. The sensor works in tandem with a 5x optical zoom lens, allowing for versatility in framing shots, whether capturing sweeping landscapes or distant subjects. The lens also incorporates advanced anti-blur technology, significantly reducing the effects of camera shake and enabling clearer images even in challenging lighting conditions.

The Sanyo DC-TS760 supports high-definition video recording, providing users with the ability to shoot 720p videos at 30 frames per second. This capability allows for dynamic storytelling through video, making it suitable for capturing memorable moments in a fluid and captivating manner.

Another remarkable technology featured in the DC-TS760 is its intelligent auto mode. This mode recognizes various shooting scenarios and optimizes camera settings to suit the conditions. It is ideal for users who prefer a straightforward approach without diving into manual controls. Additionally, the camera includes fun features such as face detection and smile shutter, further enhancing the user experience.

The camera's LCD display is notable for its clarity and brightness, even in outdoor settings. This makes reviewing images and framing shots under direct sunlight easier than with many other compact cameras.

In summary, the Sanyo DC-TS760 blends durability with advanced photographic technology. Its waterproof and shock-resistant design, combined with a capable sensor, 5x optical zoom, HD video recording, and intelligent shooting modes, make it a standout choice for adventure seekers and casual users alike.