INITIAL SETTINGS

Once the initial settings have been completed, the unit can always be operated under the same conditions.

The settings will be retained in the memory until they are changed, even if the power is turned off.

Notes:

In this instruction manual, the language in on-screen display is English.

If you change the language, please follow the selected language in on-screen display.

You cannot switch audio sound track languages if there is only one language recorded on the disc.

When you play back a DVD video disc, the unit automatically displays the pre-selected subtitle language if it is included on the disc.

For improvement, on-screen displays subject to change without notice.

Setting Language

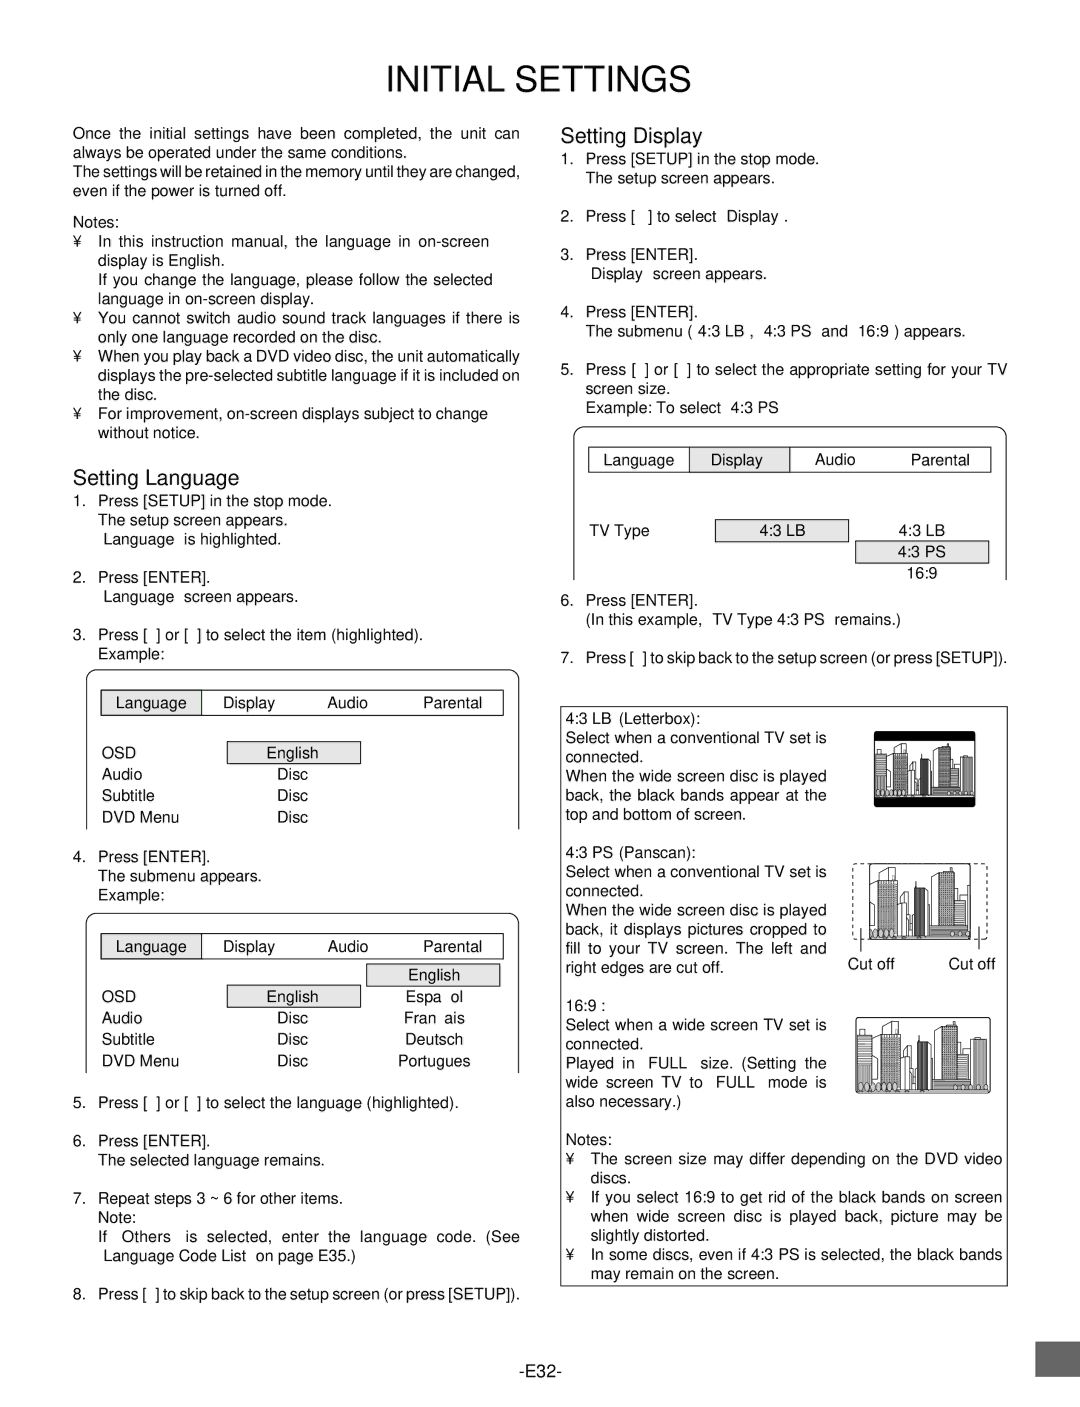
1.Press [SETUP] in the stop mode. The setup screen appears. “Language” is highlighted.

2.Press [ENTER]. “Language” screen appears.

3.Press [p] or [o] to select the item (highlighted). Example:

Language

Display

Audio

Parental


OSD


English


Audio


Disc


Subtitle


Disc


DVD Menu


Disc


4.Press [ENTER].

The submenu appears. Example:

Language

Display

Audio

Parental


English


OSD


English


Español


Audio


Disc


Français


Subtitle


Disc


Deutsch


DVD Menu


Disc


Portugues


5.Press [p] or [o] to select the language (highlighted).

6.Press [ENTER].

The selected language remains.

7.Repeat steps 3 ~ 6 for other items. Note:

If “Others” is selected, enter the language code. (See “Language Code List” on page E35.)

8.Press [o] to skip back to the setup screen (or press [SETUP]).

Setting Display

1.Press [SETUP] in the stop mode. The setup screen appears.

2.Press [a] to select “Display”.

3.Press [ENTER]. “Display” screen appears.

4.Press [ENTER].

The submenu (“4:3 LB”, “4:3 PS” and “16:9”) appears.

5.Press [p] or [o] to select the appropriate setting for your TV screen size.

Example: To select “4:3 PS”

Language

Display


Audio

Parental


4:3 LB


TV Type


4:3 LB


4:3 PS


16:9


6.Press [ENTER].

(In this example, “TV Type 4:3 PS” remains.)

7.Press [o] to skip back to the setup screen (or press [SETUP]).

4:3 LB (Letterbox):

Select when a conventional TV set is connected.

When the wide screen disc is played back, the black bands appear at the top and bottom of screen.

4:3 PS (Panscan):


Select when a conventional TV set is


connected.


When the wide screen disc is played


back, it displays pictures cropped to


fill to your TV screen. The left and

Cut off

Cut off

right edges are cut off.

16:9 :

Select when a wide screen TV set is connected.

Played in “FULL” size. (Setting the wide screen TV to “FULL” mode is also necessary.)

Notes:

The screen size may differ depending on the DVD video discs.

If you select 16:9 to get rid of the black bands on screen when wide screen disc is played back, picture may be slightly distorted.

In some discs, even if 4:3 PS is selected, the black bands may remain on the screen.

-E32-

Page 33
Image 33
Sanyo DWM-2500 instruction manual Initial Settings, Setting Language, Setting Display, Osd

DWM-2500 specifications

The Sanyo DWM-2500 is a versatile and portable dual-screen mobile TV that was crafted to cater to the growing demand for on-the-go entertainment. Known for its compact design, this model was particularly appealing to consumers seeking a portable yet functional device that could bring television viewing to a variety of settings, whether at home, during travel, or while enjoying outdoor activities.

One of the standout features of the Sanyo DWM-2500 is its dual-screen capability, which allows users to watch two channels simultaneously. This innovative design is particularly beneficial for families or groups who may have differing viewing preferences, as it enables multiple users to enjoy varied content without interruption. Each screen boasts a sharp and vibrant display, ensuring that both visual clarity and color depth enhance the viewing experience.

The DWM-2500 incorporates cutting-edge technologies that elevate its user experience. It utilizes a digital tuner that guarantees reception of over-the-air broadcasts, including free digital channels. This feature not only broadens the range of content available to users but also ensures that the signal strength and picture quality remain high, even in less-than-ideal reception areas.

Battery life is another critical consideration for mobile devices, and the Sanyo DWM-2500 does not disappoint. It comes equipped with a built-in rechargeable battery, offering several hours of continuous use, making it suitable for long trips or outdoor use without the need for constant recharging. The device also includes various power-saving modes to extend battery life even further.

In terms of connectivity, the DWM-2500 is designed to be user-friendly and versatile. It features multiple input options, including HDMI and USB ports, allowing users to connect additional devices such as gaming consoles, DVD players, or flash drives loaded with media. This connectivity ensures that the DWM-2500 can serve not only as a TV but as a multifunctional entertainment hub.

The Sanyo DWM-2500 exemplifies the blend of convenience and performance in modern portable television technology, making it an attractive option for those who prioritize flexibility and quality in their viewing experience. With its dual-screen functionality, digital tuning capabilities, long battery life, and varied connectivity options, the DWM-2500 stands out as a noteworthy device in the realm of mobile entertainment.