FULL SCREEN OPERATIONS

(Live picture on monitor 1)


1

2

0 4

4ZOOM

Z

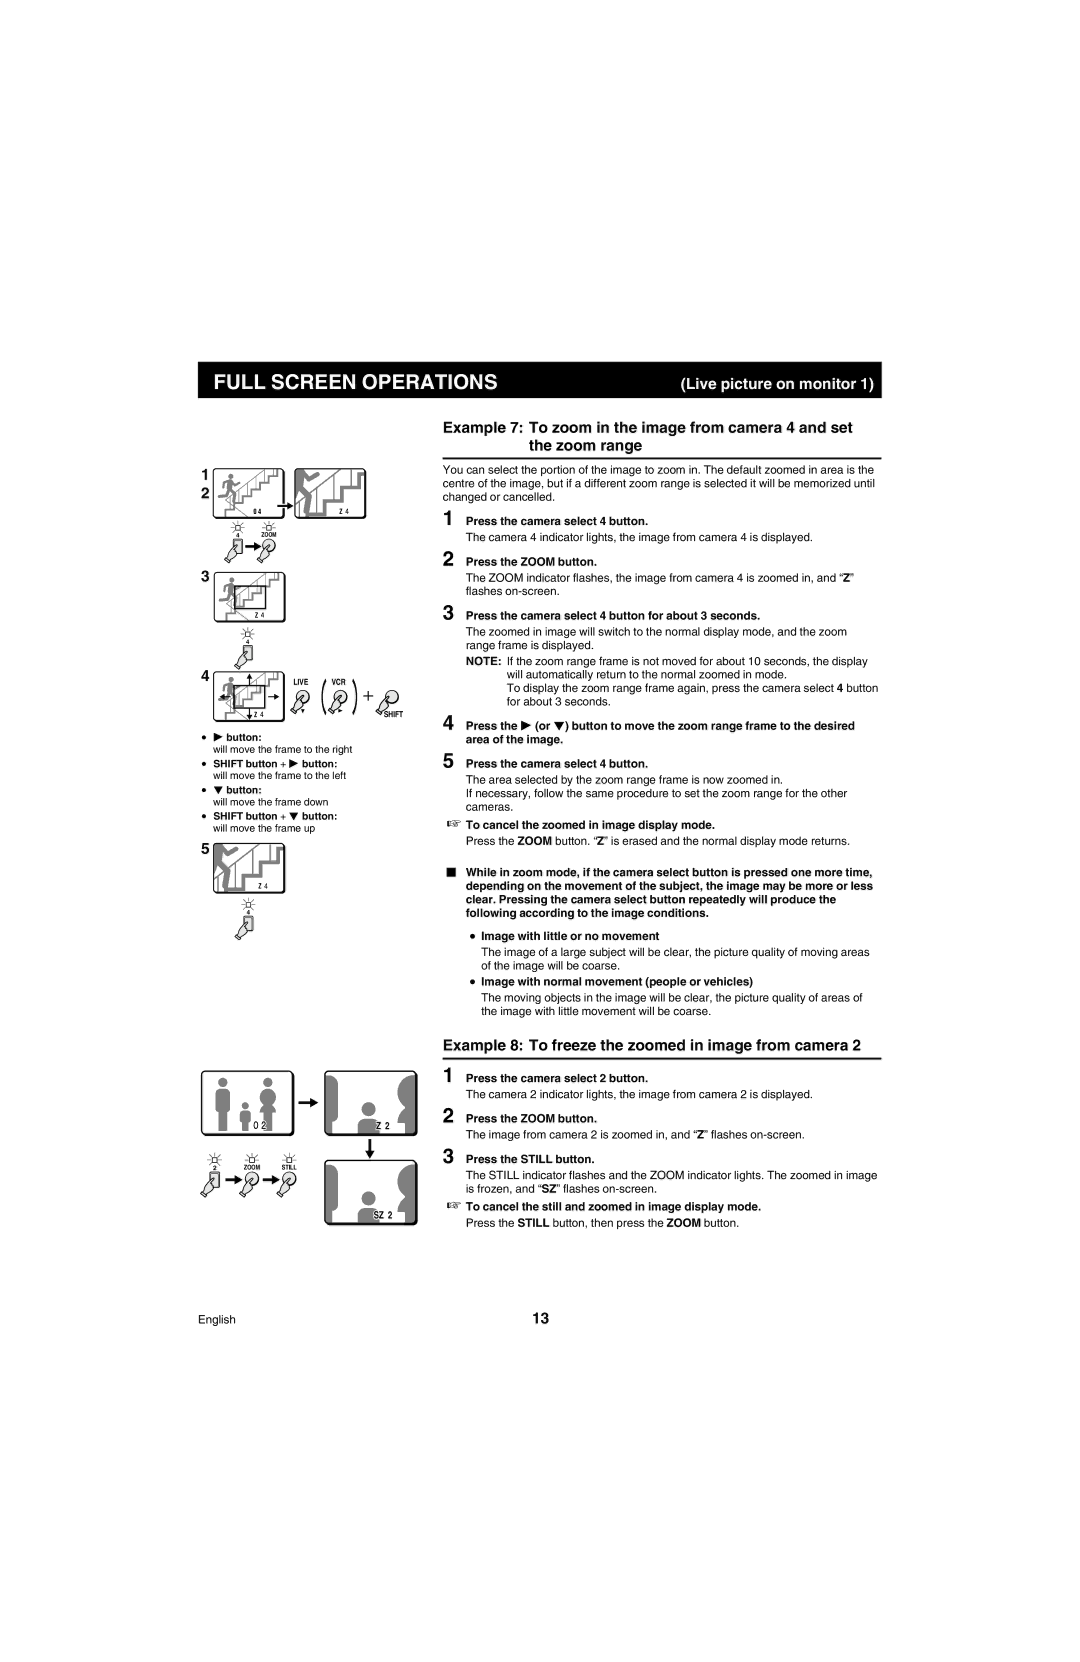
Example 7: To zoom in the image from camera 4 and set the zoom range

You can select the portion of the image to zoom in. The default zoomed in area is the centre of the image, but if a different zoom range is selected it will be memorized until changed or cancelled.

1 Press the camera select 4 button.

The camera 4 indicator lights, the image from camera 4 is displayed.

2 Press the ZOOM button.

3


Z


4

4

LIVE VCR

The ZOOM indicator flashes, the image from camera 4 is zoomed in, and “Z” flashes on-screen.

3 Press the camera select 4 button for about 3 seconds.

The zoomed in image will switch to the normal display mode, and the zoom range frame is displayed.

NOTE: If the zoom range frame is not moved for about 10 seconds, the display will automatically return to the normal zoomed in mode.

To display the zoom range frame again, press the camera select 4 button for about 3 seconds.


Z


SHIFT

4 Press the c (or l) button to move the zoom range frame to the desired


c button:


area of the image.


will move the frame to the right


5 Press the camera select 4 button.

SHIFT button + c button:


will move the frame to the left


The area selected by the zoom range frame is now zoomed in.

l button:


If necessary, follow the same procedure to set the zoom range for the other


will move the frame down


cameras.

SHIFT button + l button:


To cancel the zoomed in image display mode.


will move the frame up


5


Press the ZOOM button. “Z” is erased and the normal display mode returns.


While in zoom mode, if the camera select button is pressed one more time,


Z


depending on the movement of the subject, the image may be more or less


clear. Pressing the camera select button repeatedly will produce the


4


following according to the image conditions.


Image with little or no movement


The image of a large subject will be clear, the picture quality of moving areas


of the image will be coarse.


Image with normal movement (people or vehicles)


The moving objects in the image will be clear, the picture quality of areas of


the image with little movement will be coarse.

Example 8: To freeze the zoomed in image from camera 2

Z 2

2


ZOOM


STILL


SZ 2

1

2

3

Press the camera select 2 button.

The camera 2 indicator lights, the image from camera 2 is displayed.

Press the ZOOM button.

The image from camera 2 is zoomed in, and “Z” flashes on-screen.

Press the STILL button.

The STILL indicator flashes and the ZOOM indicator lights. The zoomed in image is frozen, and “SZ” flashes on-screen.

To cancel the still and zoomed in image display mode.

Press the STILL button, then press the ZOOM button.

English

13

Page 14
Image 14
Sanyo MPX-MD4 instruction manual Full Screen Operations, Example 8 To freeze the zoomed in image from camera

MPX-MD4 specifications

The Sanyo MPX-MD4 is a state-of-the-art mini disc player and recorder designed to deliver high-quality audio performance combined with user-friendly features. Launched in the early 2000s, this compact device marked an important evolution in portable music technology, particularly during the era when digital audio began to gain significant traction among consumers.

One of the standout features of the MPX-MD4 is its ability to record audio directly onto mini discs, allowing users to create their custom music compilations or record live performances with remarkable ease. The device supports the MDLP (Mini Disc Long Play) format, enabling users to record extended sessions without compromising sound quality. This is particularly advantageous for music enthusiasts who desire longer playback times without needing to interchange discs frequently.

Equipped with Sanyo's innovative ATRAC (Adaptive Transform Acoustic Coding) technology, the MPX-MD4 excels in compressing audio files while maintaining high fidelity. ATRAC is known for its efficiency in lossy audio compression, enabling users to store more tracks on a single disc without noticeable degradation in sound quality. This feature makes it an ideal choice for audiophiles who require convenience without sacrificing audio integrity.

The MPX-MD4 also boasts a sleek and stylish ergonomic design, making it highly portable and easy to handle. The user interface is intuitive, featuring a clear LCD display that provides essential information such as track numbers, remaining playback time, and battery status. Additionally, the device includes various playback options, including shuffle and repeat modes, allowing users to customize their listening experience.

Another notable characteristic of the Sanyo MPX-MD4 is its long-lasting battery life, which ensures extended playback and recording sessions. It is compatible with both rechargeable and disposable batteries, providing flexibility for users on the go.

Moreover, the incorporation of features such as digital sampling, adjustable recording levels, and a built-in microphone adds significant value for budding musicians and recording enthusiasts who want a versatile device for various audio needs.

In conclusion, the Sanyo MPX-MD4 stands out with its impressive recording capabilities, superior sound quality through ATRAC technology, and user-friendly design, making it a sought-after choice for those invested in the mini disc format and digital audio. Whether for casual listening or professional recording, the MPX-MD4 remains a noteworthy entry in the landscape of portable audio devices.