PICTURE IMAGE

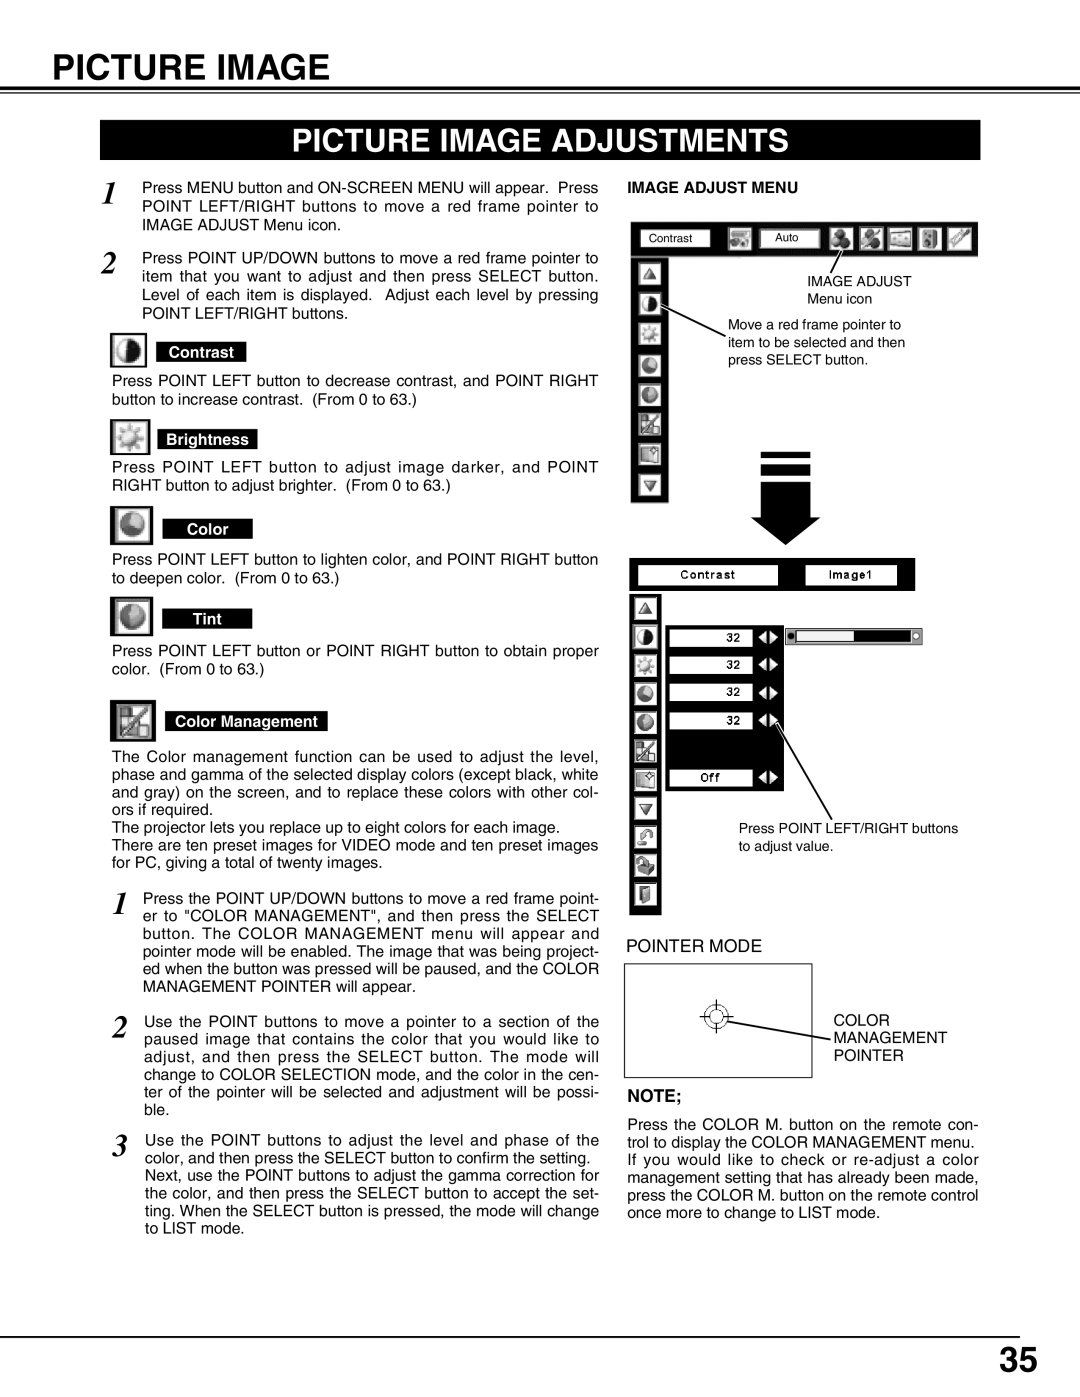
PICTURE IMAGE ADJUSTMENTS

1

Press MENU button and ON-SCREEN MENU will appear. Press


POINT LEFT/RIGHT buttons to move a red frame pointer to


IMAGE ADJUST Menu icon.

2

Press POINT UP/DOWN buttons to move a red frame pointer to


item that you want to adjust and then press SELECT button.

Level of each item is displayed. Adjust each level by pressing POINT LEFT/RIGHT buttons.

Contrast

Press POINT LEFT button to decrease contrast, and POINT RIGHT button to increase contrast. (From 0 to 63.)

Brightness

Press POINT LEFT button to adjust image darker, and POINT RIGHT button to adjust brighter. (From 0 to 63.)

Color

Press POINT LEFT button to lighten color, and POINT RIGHT button to deepen color. (From 0 to 63.)

Tint

Press POINT LEFT button or POINT RIGHT button to obtain proper color. (From 0 to 63.)

Color Management

The Color management function can be used to adjust the level, phase and gamma of the selected display colors (except black, white and gray) on the screen, and to replace these colors with other col- ors if required.

The projector lets you replace up to eight colors for each image. There are ten preset images for VIDEO mode and ten preset images for PC, giving a total of twenty images.

1 Press the POINT UP/DOWN buttons to move a red frame point- er to "COLOR MANAGEMENT", and then press the SELECT button. The COLOR MANAGEMENT menu will appear and pointer mode will be enabled. The image that was being project- ed when the button was pressed will be paused, and the COLOR MANAGEMENT POINTER will appear.

2 Use the POINT buttons to move a pointer to a section of the paused image that contains the color that you would like to adjust, and then press the SELECT button. The mode will change to COLOR SELECTION mode, and the color in the cen- ter of the pointer will be selected and adjustment will be possi- ble.

3 Use the POINT buttons to adjust the level and phase of the color, and then press the SELECT button to confirm the setting. Next, use the POINT buttons to adjust the gamma correction for the color, and then press the SELECT button to accept the set- ting. When the SELECT button is pressed, the mode will change to LIST mode.

IMAGE ADJUST MENU

ContrastAuto

IMAGE ADJUST Menu icon

Move a red frame pointer to item to be selected and then press SELECT button.

Press POINT LEFT/RIGHT buttons to adjust value.

POINTER MODE

COLOR

MANAGEMENT

POINTER

NOTE;

Press the COLOR M. button on the remote con- trol to display the COLOR MANAGEMENT menu. If you would like to check or re-adjust a color management setting that has already been made, press the COLOR M. button on the remote control once more to change to LIST mode.

35

Page 35
Image 35
Sanyo PLV-75/PLV-80, PLV75L/PLV-80L owner manual Picture Image Adjustments, Image Adjust Menu

PLV75L/PLV-80L, PLV-75/PLV-80 specifications

The Sanyo PLV75L and PLV80L projector models, known for their versatility and high-quality performance, cater to both home theater enthusiasts and professional presentations. As one of Sanyo’s notable entries into the projector market, these models emphasize clarity, brightness, and engaging visuals.

A key feature of the PLV75L and PLV80L is their impressive brightness, boasting output levels of up to 2000 ANSI lumens. This allows for exceptional visibility even in well-lit environments, making them suitable for both professional settings such as conference rooms and personal use in home theaters. The incorporation of a high-quality LCD technology ensures that colors are vibrant and lifelike, with a native resolution that enhances the clarity of HD content.

These projectors also employ a contrast ratio that provides deep blacks alongside bright whites, ensuring a dynamic viewing experience. Whether displaying a film or a presentation, the visual detail remains sharp, contributing to a more immersive experience for spectators. The color reproduction is further enhanced by Sanyo’s advanced image processing technologies, which aim to optimize picture quality.

Portability is another significant characteristic of the PLV75L and PLV80L. Their relatively lightweight design facilitates easy transportation, making them ideal for traveling professionals or educators frequently moving between venues. Additionally, users can take advantage of flexible installation options, including various lens shift capabilities and zoom functions, allowing for adaptability in different environments.

Connectivity options are extensive, with multiple inputs including HDMI, VGA, and composite options, enabling connections to a variety of media devices such as laptops, Blu-ray players, and streaming boxes. This versatility ensures that users can seamlessly integrate the projector into their existing setups.

The PLV series from Sanyo also emphasizes energy efficiency, incorporating features that reduce power consumption without sacrificing performance. This aligns with a growing demand for eco-friendly technology solutions.

Overall, the Sanyo PLV75L and PLV80L projectors combine powerful performance with user-friendly features, making them suitable for a range of applications, from business presentations to home entertainment. Their blend of portability, superior image quality, and advanced connectivity positions them as valuable tools in the realm of visual display technology.