VPC-C1EX VPC-C1
Important note
For American Users
Declaration of Conformity
Conformity to EC Directives
Setup
Outline of Operation
Symbols used in this manual
Playback
Contents
Shooting
Playback
Expert Mode
Other Devices and Connections
Camera Settings
Appendices
Using Your Camera Safely and Correctly
Be aware of your surroundings when using the camera
Do not modify or open the cabinet
Do not use while driving
Do not get the camera wet
Do not use during a storm
Do not place on an unstable surface
Do not look through the camera into the sun
Do not use where there is risk of explosion
Using Your Camera Safely and Correctly
Keep the camera out of the reach of children
Operating environment
Do not disassemble or modify
Use a 100 to 240 V AC power supply
Do not get the docking station or AC adapter/ charger wet
Do not pull on the power cord to unplug it
Keep out of the reach of children
Do not handle with wet hands
Do not damage the power cord
Operating and storage conditions
LI-ION Battery Pack DB-L20
Do not transform, take apart, or modify
Operating and storage conditions
Use the battery pack only in the specified device
With clean water
Insert the battery pack correctly, as specified
Do not peel or damage the outer case
Charge the battery pack before using it
Recycling the battery pack
Concerning the accessories
Concerning the Lithium Battery CR2025
Tery
Cleaning procedure
If the camera is extremely dirty
If condensation seems likely to form
When not using the camera for a long period
Be careful of condensation under the following conditions
For Correct USE of Your Camer
Page
Checking the Included Accessories
Handstrap Software 2 CD Li-ion battery pack
Battery pack
AC adapter/charger e Soft case 1 and power cord
Media cards that can be used with this camera
Handstrap Lens cap Soft case
SD Memory Card 128MB
Shooting video clips
Getting the Most OUT of Your Camera
Capture still shots while recording a video clip
Twin menus for easy operation
Movable monitor for any shooting angle
Getting the Most OUT of Your Camera
Docking station for easy connection
Front
Parts Names
To open the monitor unit
Rear
Bottom
Cable adapter
Docking station
Parts Names
Connect the AC adapter/charger to a power outlet
Charging the Battery Pack
Insert the battery pack into the AC adapter/charger
Installing the Battery Pack and Card
Install the battery pack
Open the battery cover on the side
Insert the battery pack
Close the battery cover
Install the card
Close the card cover
Turning the Power on and OFF
Set the main switch. To shoot pictures
Turning on the camera
To play back images
Page
Turning the Power on and OFF
To immediately activate the power save function
About the standby mode
Turning off the camera
Turn on the camera Press the Menu button
Operation Buttons
Select the icon above or below
Operation Buttons
Actuate the selected icon
Example Basic Mode Shooting Setting Screen
Switching the Menu Mode
Example Basic Mode Playback Setting Screen
Switching the Menu Mode
Example Expert Mode Shooting Setting Screen
Example Expert Mode Playback Setting Screen
Toggle the SET button to the left
Before Taking Pictures
For best results
Using the autofocus
When both near and far objects are present
Before Taking Pictures
Conditions that may cause incorrect focus
Where is the image and audio data saved?
Hints for taking pictures
Muting the operation sounds
Taking pictures in backlight conditions
Capturing Images
Recording video clips
Focus lock during video clip recording
End the recording
Capturing still images
Turn on the camera
Shoot a still image while recording a video clip
Capturing Images
About the target mark
Shoot a still image while recording a video clip
Press the video clip recording button l
Screen during audio Recording
About the Basic Mode Shooting Setting Screen
Display the Basic Mode Shooting Setting Screen
Turn on the camera Set the main switch to REC
Set the camera to the Basic mode
Basic Mode Shooting Setting Screen
About the Basic Mode Shooting Setting Screen
Photo resolution menu
Self-timer menu
Menu mode display 9Help display FRemaining battery power
Video clip menu
Changing the Shooting Settings
Video clip image quality setting
Still image resolution setting
Adjusting the brightness of the LCD monitor when shooting
Changing the Shooting Settings
Other Shooting Functions
Scene Select feature
Take the picture
Setting Screen page 52, Select the filter menu
Filter feature
Other Shooting Functions
Using the flash
Select the flash menu
Using the zoom
Self-timer photography
To pause or cancel the self-timer function
When xis selected
Viewing Images
JOG playback
Viewing Images
Convenient 9-image display playback
Press W P on the zoom switch
Select the image to play back
Magnifying zooming in the image
Audio data playback
About the Basic Mode Playback Setting Screen
Display the Basic Mode Playback Setting Screen
Basic Mode Playback Setting Screen
About the Basic Mode Playback Setting Screen
Playback mode
Other Playback Functions
Select the desired playback mode, and press the SET button
Clip
Volume control
Other Playback Functions
Monitor brightness playback
Image protect mode prevent accidental erasure
To cancel the protect mode for an image
To select a different image in steps 2
Erasing data
Erase
ONE Erase
Still image playback mode
1Video clip mode settings
Displaying image data Information Screen
Display the Expert Mode Shooting Setting Screen
About the Expert Mode Shooting Setting Screen
Set the camera to the Expert mode
Expert Mode Shooting Setting Screen
About the Expert Mode Shooting Setting Screen
Focus menu
Flicker-reduction menu
ISO sensitivity menu
White balance menu
Video Image Quality
About focus range in the Basic mode
About the scene select function and focus range settings
Focus
FLICKER-REDUCTION Function
Display the Expert Mode Shooting Setting Screen
ISO Sensitivity
Select the ISO sensitivity
Menu
White Balance Setting
To cancel the white balance setting
Exposure Correction
About the Expert Mode Playback Setting Screen
Display the Expert Mode Playback Setting Screen
Monitor brightness page 72 e Adjust the brightness
Volume control
Multi-playback
Rotate Image
Procedure to save part of a video clip as a separate clip
Editing Video Clips
Procedure to join two video clips
Editing Video Clips
Display the Expert Mode Playback Setting Screen
Deleting part of a video clip
Select the edit video icon k, and press the SET button
Delete 2ND Part
Press the SET button
Display the first video clip
Joining two video clips
Select the join icon
Confirmation screen for Saving the original video clip
Extracting a still image from a video clip
Select the save frame icon 7, and press the SET button
Print Settings Still Images only
Display the Print Settings Screen
About the Dpof format
Print Settings Still Images only
About the finished prints
Specifying date imprinting and print quantities
YES
Specifying the number of prints
Select ADD to Print Settings and press the SET button
If the print settings are correct
If the print settings were changed
Display the Print Settings Screen Select Index
Changing the print settings
Select YES, and press the SET button
Clearing all the print settings
To display the Option Setting Screen
About the Option Setting Screen
Select the option icon 3, and press the SET button
Option Setting Screen
Guidance Functions
Operational Sounds Setting
Shutter
Operational Sounds Setting
If Shutter or KEY SW is selected
USB Function Setting
USB Setting
File NO. Reset Function
File number reset function on
File number reset function OFF
File name image number
Card a
Replace card
File NO. Reset Function
Select OFF, and press the SET button
Date and Time Setting
Example To set the clock to 730 p.m. on December 23
Set the date
Date and Time Setting
Set the clock
To correct the date and time settings
Select EXIT, and press the SET button
Screen Language
Language
When set to PAL and connected to a TV
TV System Setting
Select the appropriate TV system, and press the SET button
Power Save Setting
Example When Batt
Select the desired option Press the SET button
Toggle the SET button up or down to set the standby time
Down
Resetting the Camera Settings
Formatting a Card
Reformat Screen appears
Formatting a Card
To cancel reformatting
Reformatting erases the data
Turn on the power
Set the main switch to REC,
Checking the Remaining Card Memory
Checking the Remaining Card Memory
For audio data
Display the Audio Data Information Screen
Checking the Remaining Battery Pack Charge
Checking the Remaining Battery Pack Charge
Connecting the docking station
Docking Station
Connect the AC adapter/charger
Gently connect and disconnect the cable
Connect to another device
Docking Station
To connect to a computer or printer
To connect to a TV
Data file formats
AAC
Configuration of directories for the stored data
About file names when the card is replaced
About video clip data recorded with this camera
About audio data recorded with this camera
Preparing and using the remote control unit
Prepare the remote control unit
Pull out and remove the protective battery insulating sheet
Set the camera in the docking station
How to use the remote control unit
Remote control unit button operation
CH channel
Replacing the remote control unit battery
Reinsert the battery holder in the remote control unit
Changing the remote control code
Changing the remote control code from RC Code 1 to RC Code
Set the TV input switch to Video input
Resetting the remote control code to RC Code
Select the image to play back
Remote control unit cannot be used
Battery cannot be recharged
Cable Adapter
DIGITAL/AV terminal
Connecting to a Printer
Print preparations
Using the docking station
Using the cable adapter
Connecting to a Printer
PictBridge printing mode is activated
To select one image and print it one image
To cancel printing
Specify the number of prints
To print all the images all images
Select PRINT, and press the SET button
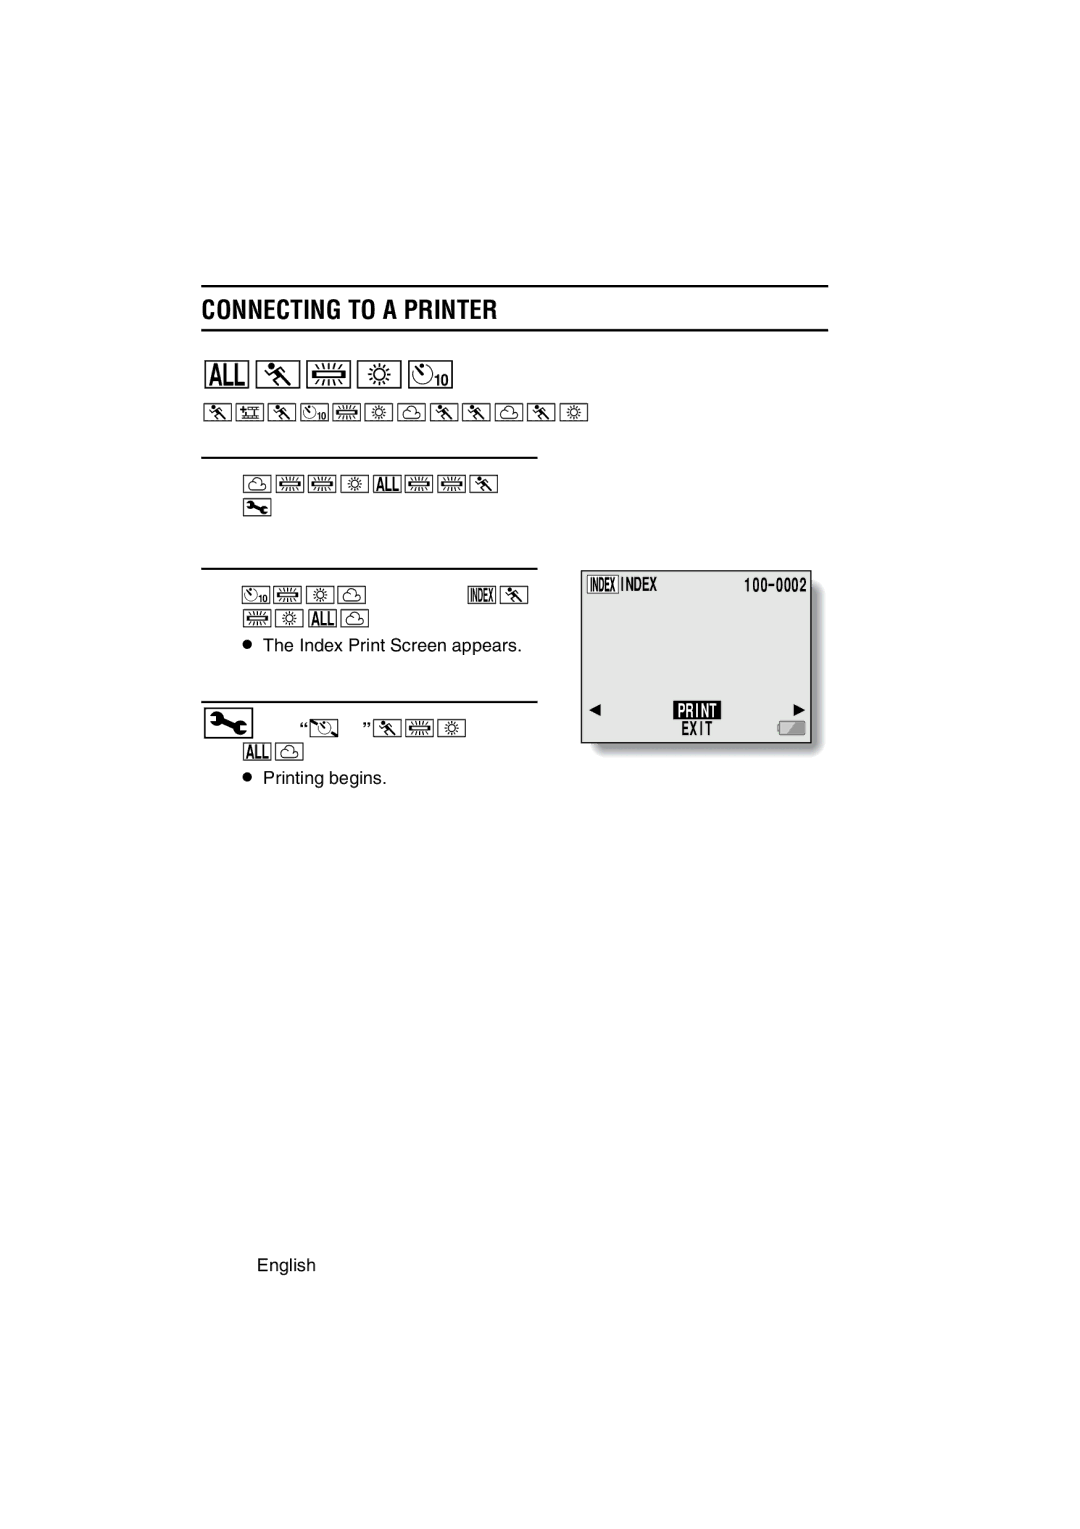
Thumbnail prints index
Icon w, and press the SET
Button
Printer Settings
Adjust the printer settings
When Printer Value is selected
Commonly Asked Questions
Power
Question Cause Action
Shooting
Commonly Asked Questions
Monitor
Images
Commonly Asked Questions
Image
Edit Video
Card Full
Misc
System
Troubleshooting
Problem Cause Action
Erase all the images Pressed From the card
Troubleshooting
View
Needs
To a TV
OFF
Docking Station
Remote
Specifications
Camera
Page
Specifications
Camera connectors
Battery pack operation
Shooting Reso
128MB 512 MB 16 MB
Remote control unit
PDS-C1
Supplied Li-ion battery pack
Supplied AC adapter/charger
Supplied SD Memory Card
Others