ASSEMBLY
HOW TO INSTALL THE SEAT
Seat
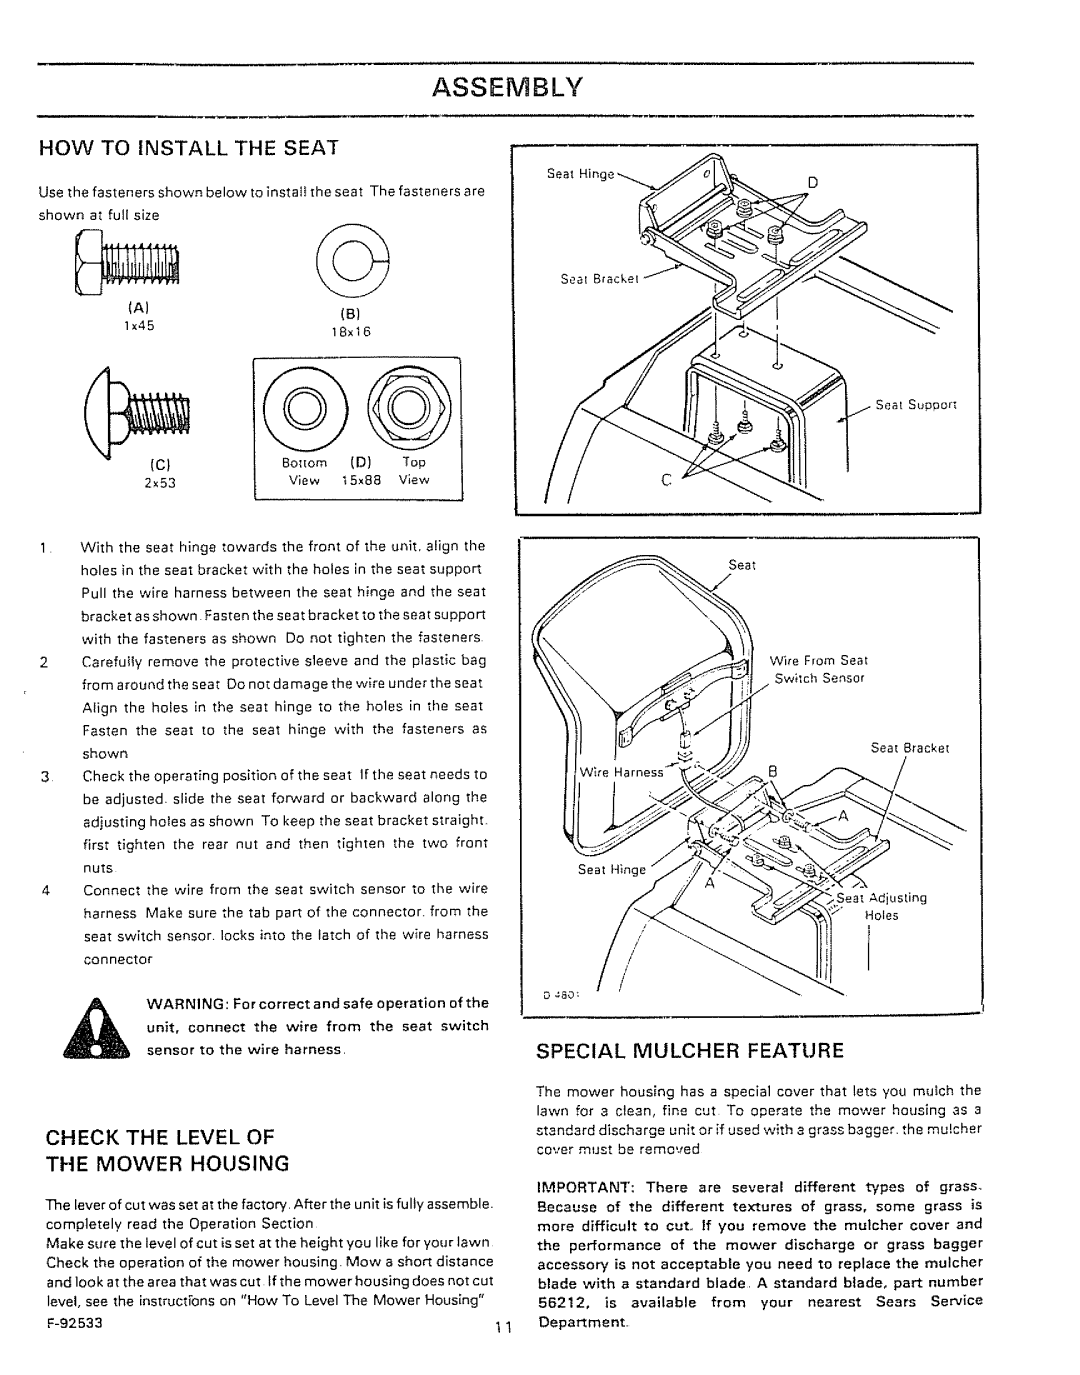
Use the fasteners shown below to instalt the seat The fasteners are shown at full size
D
Seal Bfackel
(A) | (B) |
lx45 | 18xlB |
(C} | BoIlom | (D) | Top |
2x53 | View | tSx88 | V_ew |
1With the seat hinge towards the front of the unit. align the holes in the seat bracket with the holes in the seat support Pull the wire harness between the seat hinge and the seat bracket as shown Fasten the seat bracket to the seat support with the fasteners as shown Do not tighten the fasteners
2Carefully remove the protective sleeve and the plastic bag from around the seat Do not damage the wire under the seat
Align the holes in the seat hinge to the holes in the seat Fasten the seat to the seat hinge with the fasteners as
shown
3Check the operating posltlon of the seat If the seat needs to
be adjusted slide the seat forward or backward along the adjusting holes as shown To keep the seat bracket straight. first tighten the rear nut and then tighten the two front nuts
4Connect the wire from the seat switch sensor to the wire
harness Make sure the tab part of the connector from the seat switch sensor locks into the latch of the wire harness connector
C
Seat
Wire From Seat
Switch Sensor
Seat Bracket
Sea_
Holes
/
/
D#BO:
unit, connect the wire from the seat switch
WARNING: For correct and safe operation of the sensor to the wire harness
CHECK THE LEVEL OF
SPECIAL MULCHER FEATURE
The mower housing has a special cover that lets you mulch the lawn for a clean, fine cut To operate the mower housing as a standard discharge unit or if used with a grass bagger the mu!eher cotter must be removed
THE | MOWER | HOUSING |
|
|
|
|
|
|
|
|
|
|
|
|
|
|
|
|
|
|
|
|
|
|
| ||||
|
|
|
|
|
|
|
|
|
|
|
|
| IMPORTANT: | There | are | several |
| different | types | of | grass | ||||||||
The lever of cut was | set | at the factory | After the unit is fully | assemble. |
| Because | of | the | different | textures | of | grass, | some | grass | is | ||||||||||||||
completely | read the | Operation | Section |
|
|
|
| mere | difficult | to | cut., | If | you | remove | the | mulcher | cover | and | |||||||||||
Make | sure | the level | of cut is set | at the | height | you llke for your lawn |
| the | performance | of | the | mower |
| discharge | or |
| grass | bagger | |||||||||||
Check | the | operation | of | the | mower | housing | Mow | a short | distance |
| accessory | is | not | acceptable |
| you | need | to | replace | the |
| mulcher | |||||||
and look at the area | that | was | cut | If the | mower | housing does not cut |
| blade | with | a | standard | blade | A | standard | blade, |
| part |
| number | ||||||||||
level, | see | the instructfons | on | "How | To | Level | The | Mower | Housing" |
| 56212, | is | available | from | your | nearest | Sears |
| Service | ||||||||||
|
|
|
|
|
|
|
|
|
| 1 1 | Department |
|
|
|
|
|
|
|
|
|
|
|
|
|
| ||||
