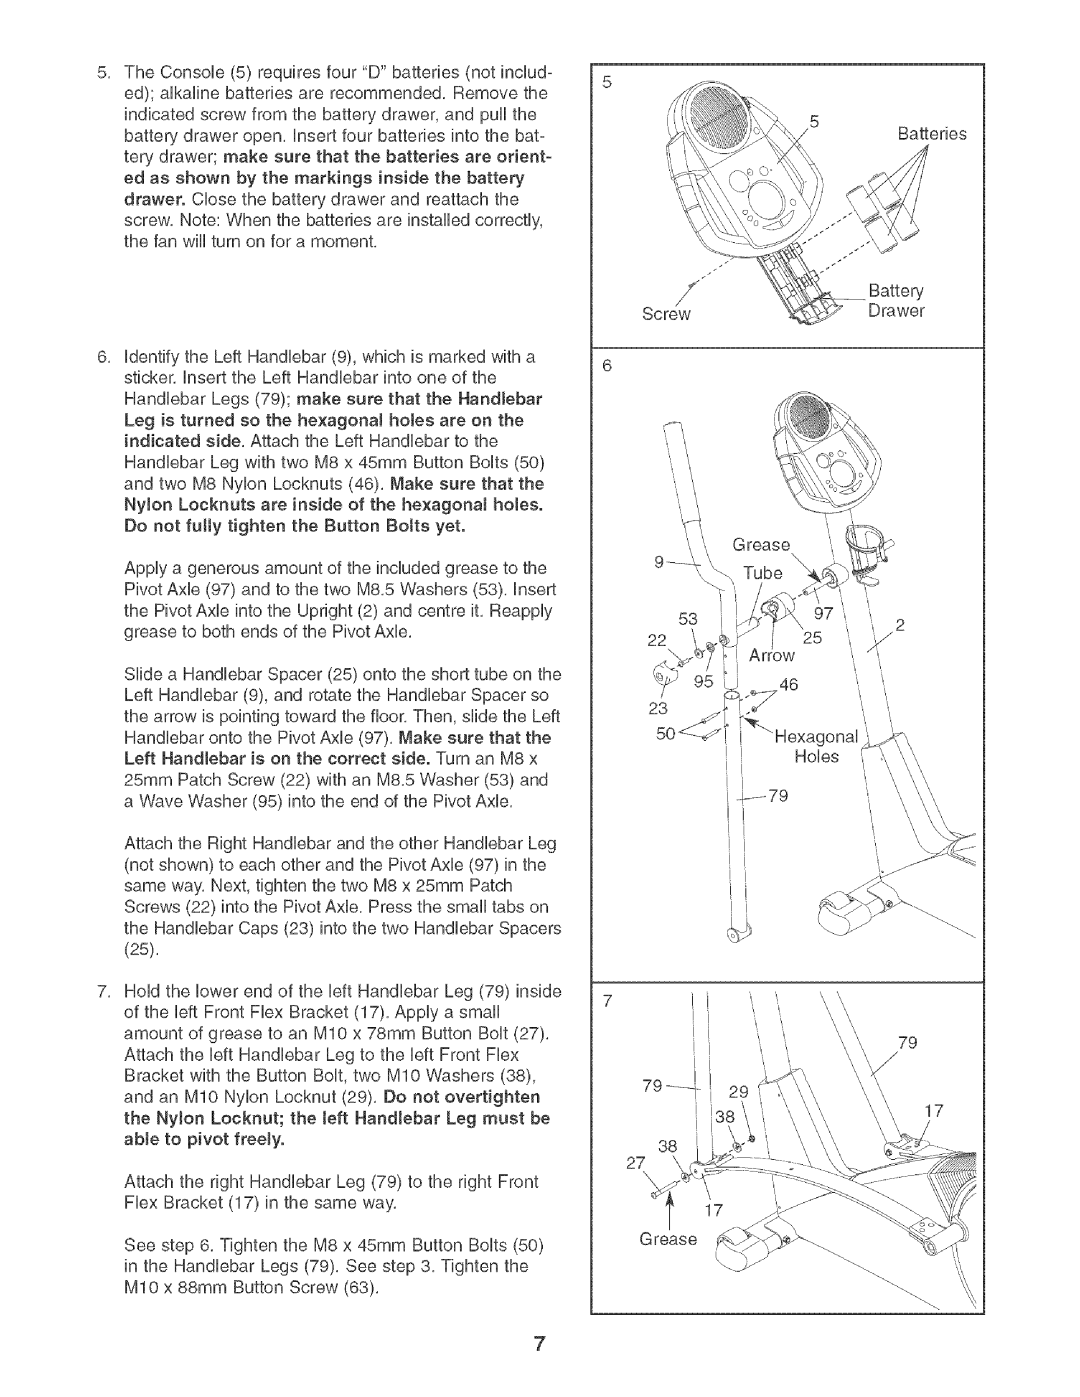
5, The ConsoUe (5) requires four "D" batteries (not incUud-

5

ed); aHkaHnebatteries are recommended, Remove the indicated screw from the battery drawer, and puHHthe battery drawer open, Hnsert four batteries into the bat- tery drawer; make sure that the batteries are orient- ed as shown by the markings inside the battery drawer. CHosethe battery drawer and reattach the

screw, Note: When the batteries are instaHHedcorrectly, the fan wHHturn on for a moment,

Hdentifythe Left HandHebar (9), which is marked with a sticker, Hnsertthe Left HandHebar into one of the

HandHebar Legs (79); make sure that the Handlebar

Leg is turned so the hexagonaJ holes are on the indicated side, Attach the Left HandHebar to the

HandHebar Leg with two M8 x 45mm Button BoHts(50) and two M8 NyHon Locknuts (46), Make sure that the NyJon Locknuts are inside of the he×agonat holes. Do not futty tighten the Button Bolts yet.

Apply a generous amount of the included grease to the Pivot Axle (97) and to the two M8,5 Washers (53), insert the Pivot Axle into the Upright (2) and centre it, Reappiy grease to both ends of the Pivot Axle,

Slide a Handlebar Spacer (25) onto the short tube on the Left Handlebar (9), and rotate the Handlebar Spacer so the arrow is pointing toward the floor, Then, slide the Left

Handlebar onto the Pivot Axle (97), Make sure that the Left Handlebar is on the correct side. Turn an M8 x

25mm Patch Screw (22) with an M8,5 Washer (53) and a Wave Washer (95) into the end of the Pivot AxHe,

Attach the Right HandHebarand the other HandHebar Leg (not shown) to each other and the Pivot AxHe(97) in the same way, Next, tighten the two M8 x 25mm Patch Screws (22) into the Pivot AxHe,Press the smaHHtabs on the HandHebar Caps (23) into the two HandHebar Spacers (25),

HoHdthe Howerend of the HeftHandHebar Leg (79) inside of the HeftFront FHexBracket (17), AppHya smaHH amount of grease to an MIO x 78mm Button BoHt(27), Attach the HeftHandHebar Leg to the HeftFront FHex Bracket with the Button BoHt,two MIO Washers (38), and an MIO NyHon Locknut (29), Do not overtighten the NyJon Locknut; the teft Handlebar Leg must be able to pivot freely.

Attach the right HandHebar Leg (79) to the right Front FHexBracket (17) in the same way,

See step 6, Tighten the M8 x 45mm Button BoHts(50) in the HandHebar Legs (79), See step 3, Tighten the MIO x 88mm Button Screw (63),

5

Batteries

/

/Battery

ScrewDrawer


Grease


Tube

t


53 /

!7 _'i

22

25


krrow

I

-p_79

I17

!

38

27

17

Grease

7

Page 7
Image 7
Sears 831.283521 user manual Tube

831.283521 specifications

The Sears 831.283521 treadmill stands out as a versatile and reliable piece of fitness equipment designed for home use. This model integrates essential features and advanced technologies to create an enjoyable and effective workout experience for users of all fitness levels.

One of the key features of the Sears 831.283521 is its powerful motor, typically around 2.0 to 2.5 horsepower. This allows for a smooth and consistent operation, ensuring that users can engage in various workout intensities without interruption. The treadmill usually offers a speed range of 0 to 10 miles per hour, catering to both walking and running preferences.

The running surface is another noteworthy aspect, commonly measuring around 16 inches wide and 50 inches long. This spacious design provides ample room for users to stride comfortably, reducing the risk of accidents while exercising. The tread belt is often constructed from durable materials, ensuring longevity and resistance to wear and tear.

For user comfort, the Sears 831.283521 typically features an adjustable incline. This allows individuals to customize their workouts by simulating uphill walking or running, effectively targeting different muscle groups and enhancing calorie burn. The incline settings often range from 0 to 10 percent, providing sufficient levels for various fitness goals.

In terms of technology, the treadmill usually comes equipped with an LCD display that tracks vital workout statistics such as distance traveled, time elapsed, calories burned, and heart rate. Some models also include built-in heart rate monitors in the handlebars, helping users maintain their targeted heart rate zones for optimized workouts.

Additionally, the Sears 831.283521 may offer built-in workout programs, ranging from weight loss to endurance-building sessions. These pre-set programs are designed to challenge users and keep their routines engaging. Coupled with the option for manual adjustments, the treadmill provides flexibility for users seeking different training methods.

To enhance the overall experience, the treadmill often has additional features like speakers for music playback, cup holders, and a space-saving folding design. When not in use, the treadmill can typically be easily folded up for storage, making it suitable for those with limited space.

Overall, the Sears 831.283521 is a dependable treadmill that combines functionality, comfort, and advanced features, making it an excellent choice for home fitness enthusiasts looking to maintain an active lifestyle.