Ice Service (continued)

Icemaker Water Line

Installation Requirements

You will need a shutoff valve, two 1/4" O D compression nuts, _vo compression sleeves and enough 1/4" O+D_copper tubing to connect refrigerator to water source (Your Sears Store or Catalog Sales Office has a kit available with a saddle- type shutoff valve and copper tubing. Before purchasing, make sure a saddle-type valve complies with your local plumbing codes) CAUTION: Do not install icemaker

tubing in areas where temperatures fat! below freezing

1.Find a 3/8" to 1" vertical COLD water pipe near the refrigerator When it is necessary to connect into a horizontal water pipe, make the connection to the top or side, rather than at the bottom to avoid drawing off any sediment from the water pipe

2.Measure from INLET on rear of

refrigerator to water pipe Add 7 feet to allow for moving refrigerator for cleaning This is the length of 1/4" O_D_copper tubing you will need for the job (length from water valve to water pipe PLUS 7 feet) l Be sure both ends of copper tubing are cut square,

3. Turn OFF main water supply.1

Turn on nearest faucet long enough to clear line of water

CAUTION: When using any electrical device (such as a power drill) to facilitate installation, be sure the device is insulated or wired

in a manner to prevent the hazard of electrical shock.

4.Using a grounded drill, drill a 3/16" hole in the vertical cold water pipe you have selected.

ways to connect

to water Typical supply

PIPE-! r --'-'-WAsHER

CLAMP_ ._ I

<_'_.. JJS_J _INLE'T

/

VERTICAL

iCOLD WATER

I _i" PiPE

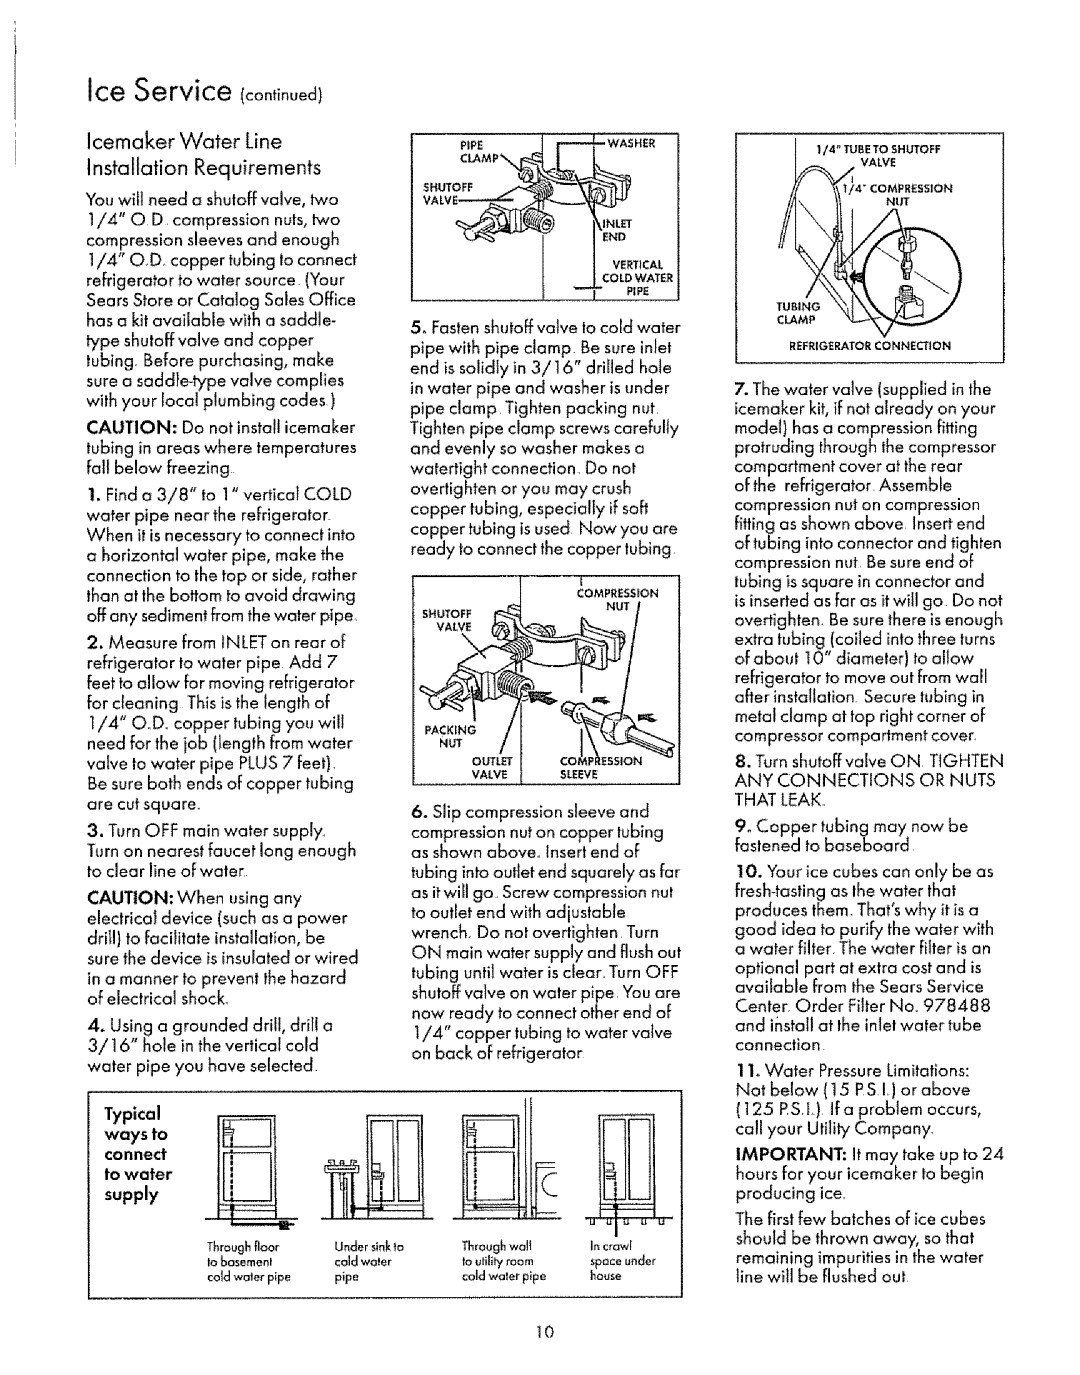
5o Fastenshutoff valve to cold water pipe with pipe clamp. Be sure inlet end is solidly in 3/16" drilled hole in water pipe and washer is under pipe clamp Tighten packing nut Tighten pipe clamp screws carefully and evenly so washer makes a watertight connection, Do not overtighten or you may crush copper tubing, especially if soft copper tubing is used Now you are ready to connect the copper tubing

I

COMPRESSION

SHUTOFF r_

VALVE (_

PACKING

NuT /

OUTLET

VALVESLEEVE

6.Slip compression sleeve and compression nut on copper tubing as shown above_ insert end of

tubing into outlet end squarely as far as it will go, Screw compression nut to outlet end with adjustable wrench, Do not overtighten Turn ON main water supply and flushout tubing until water is clear Turn OFF shutoff valve on water pipe You are now ready to connect other end of I/4" copper tubing to water valve on back of refrigerator

I/4"TUBETO SHUTOFF

VALVE

SION

NUT

TUBING

CLAMP

REFRIGERATOR CONNECTION

7.The water valve (supplied in the icemaker kit, if not already on your modet) has a compression fitting protrudinll through the compressor

compartment cover at the rear ofthe refrigerator Assemble

compression nut on compression fitting as shown above insert end of tubing into connector and tighten compression nut Be sure end of tubing issquare in connector and is inserted as far as it will go Do not overtighten_ Be sure there isenough extra tubing (coiled into three turns of about 10" diameter) to aIlow refrigerator to move out from wan after installation. Secure tubing in metal clamp at top right corner of compressor compartment cover,

8.Turn shutoff valve ON TIGHTEN ANY CONNECTIONS OR NUTS THAT LEAK°

9o Copper tubing may now be fastened to baseboard

10. Your ice cubes can only be as

fresh-tasting as the water that produces them, That s why it is a

good idea to purify the water with a water filter, The water filter is an

optional part at extra cost and is available from the Sears Service

Center Order Filter No, 978488 and install at the inlet water tube connection

11_Water Pressure Limitations: Not below (15 PS.L)or above (125 PSL)ifa problem occurs, call your Utility Company,

IMPORTANT: It may take up to 24 hours for your icemaker to begin producing ice,

Through floor

Under sinkto

Through wali

In crawl

1o basement

cold water

toutillty room

space under

cold wc_terplpe

pipe

cold waler pipe

house

The first few batches of ice cubes should be thrown away, so that

remaining impurities in the water line will be flushed out

10

Page 10
Image 10
Sears 8EAIRS owner manual Icemaker Water Line Installation Requirements, Ways to connect To water Typical supply

8EAIRS specifications

Sears 8EAIRS is a significant innovation in the realm of air conditioning systems, designed to deliver efficient and effective cooling for both residential and commercial spaces. One of its standout features is the multi-stage cooling system, which allows users to select their desired comfort level while promoting energy efficiency. This feature is particularly beneficial during extreme weather conditions, ensuring that indoor environments remain serene and comfortable without overly taxing energy resources.

Another notable aspect of the Sears 8EAIRS is its advanced inverter technology. This technology enables the unit to adjust its compressor speed based on the current cooling demands. By operating at lower speeds when less cooling is required, the system minimizes energy consumption while maintaining optimal temperatures. As a result, users can enjoy significant savings on their energy bills, making this unit an economically viable option for budget-conscious consumers.

The Sears 8EAIRS also boasts a robust air filtration system. Equipped with high-efficiency particulate air (HEPA) filters, it captures dust, pollen, and other airborne pollutants, improving indoor air quality. This is particularly advantageous for individuals who have allergies or respiratory issues, as it helps create a cleaner and healthier living space.

Furthermore, the unit features a user-friendly digital interface that allows for seamless operation. With programmable timers and remote control capabilities, users can easily customize their cooling experience. The smart thermostat capability enables the system to learn the household’s cooling patterns, automatically adjusting settings for maximum comfort and efficiency.

The design of the Sears 8EAIRS is another highlight. With a sleek and modern aesthetic, it seamlessly integrates into various interior decor styles. Additionally, its compact size makes it suitable for installations in tight spaces, ensuring that functionality does not compromise style.

Durability is also a key characteristic of the Sears 8EAIRS. Built with high-quality materials, the unit is designed to withstand varying environmental conditions, ensuring longevity and consistent performance over time.

In summary, the Sears 8EAIRS stands out for its multi-stage cooling system, inverter technology, advanced filtration, user-friendly interface, elegant design, and robust build quality. It represents a blend of comfort, efficiency, and modern technology, making it an excellent choice for anyone looking to enhance their indoor climate.