ENFORCER |
|
TABLE OF CONTENTS |
|
Introduction | 2 |
Dimensions | 2 |
Unique Features | 3 |
Wiring – Basic Diagram | 4 |
Specifications | 5 |
Output 2 (NPN Transistor Open Collector) | 6,7 |
Wiring – Example, with Connection to Lock Device and Alarm Arm/Disarm | 7 |
User Code Worksheet | 8,9 |
Wiring – 2 Keypads with Mantrap Interlock | 10 |
Wiring – Auxiliary Accessories | 11 |
Programming Notes | 12 |
LED Indicators | 12 |
Preparing to Program | 13 |
Getting Started | 13 |
User Programming | 13 |
Installer Programming | 14 |
Reprogram the Keypad (Select Data) | 15 |
Reprogram the Keypad (Complete Data Refresh) | 15 |
Delete User | 15 |
Master Code Bypass (DAP jumper) | 15 |
Quick Reference Guide | 16 |
INTRODUCTION
The
The
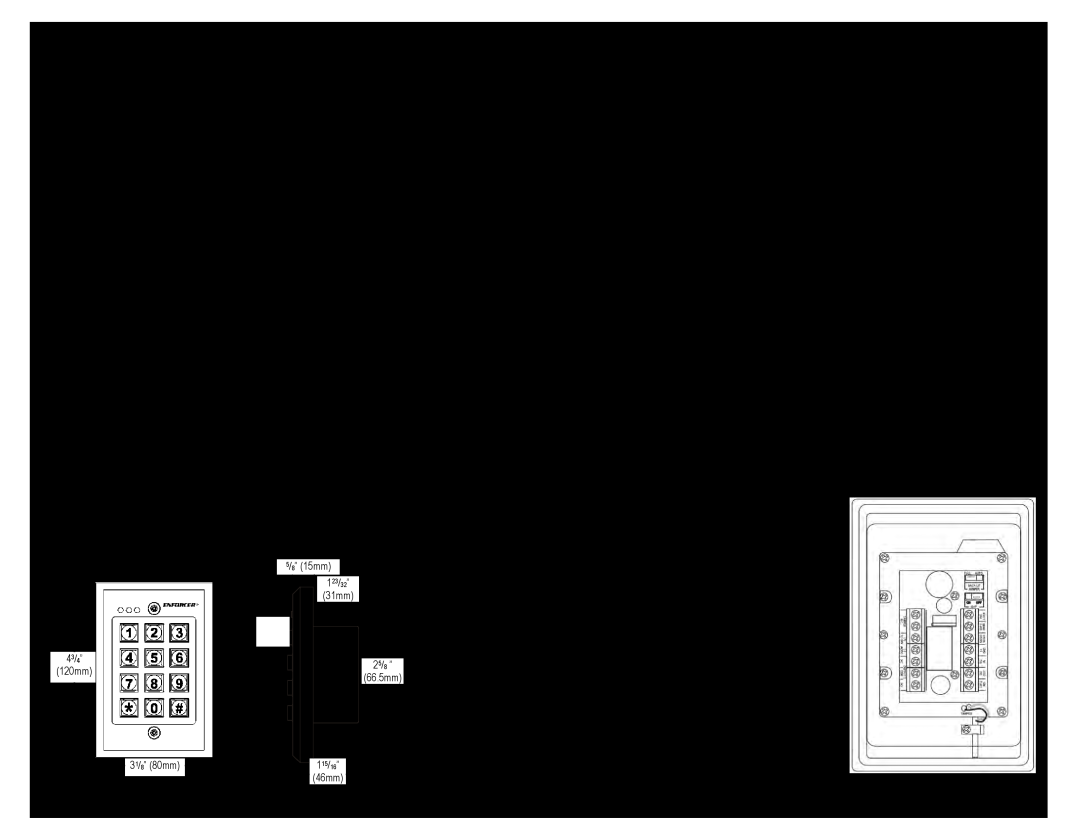
DIMENSIONS |
|
|
|
|
| PARTS LIST | ||||||||
| 5/8‖ (15mm) |
| ||||||||||||
|
|
|
|
|
|
|
|
|
|
|
|
|
|
|
|
|
|
|
|
|
|
|
| 123/32‖ |
|
| |||
|
|
|
|
|
|
|
|
| ||||||
|
|
|
|
|
|
|
|
|
| |||||
|
|
|
|
|
|
|
|
|
|
| ||||
|
|
|
|
|
|
|
|
| (31mm) |
| Keypad x 1 | |||
|
|
|
|
|
|
|
|
|
|
|
|
|
| |
|
|
|
|
|
|
|
|
|
|
|
|
|
| Diode x 1 |
|
|
|
|
|
|
|
|
|
|
|
|
| ||
|
|
|
|
|
|
|
|
|
|
|
|
|
| Security screw x 2 |
|
|
|
|
|
|
|
|
|
|
|
|
|
| Security wrench x 1 |
|
|
|
|
|
|
|
|
|
|
|
|
| ||
|
|
|
|
|
|
|
|
|
|
|
|
|
|
|
| 43/4‖ |
|
|
|
|
|
|
|
|
|
| |||
|
|
|
|
|
|
|
|
| 25/8 | ‖ |
| |||
| (120mm) |
|
|
|
|
|
|
| ||||||
|
|
|
|
|
|
|
|
| (66.5mm) |
| ||||
|
|
|
|
|
|
|
|
|
|
|
|
| ||
|
|
|
|
|
|
|
|
|
|
|
|
|
|
|
31/8‖ (80mm) | 115/16‖ |
(46mm)
ENFORCER
REPROGRAM THE KEYPAD (SELECT DATA)
To change certain data in the keypad (such as to delete or change user codes), do the following:
1. Enter programming mode by keying in the master code and the ![]()
![]() key:
key:
x x x x | The keypad is now in the programming mode. |
2.Use the programming instructions on page 13 and 14 to make desired changes to the keypad’s data.
3.Exit the programming mode by pressing the ![]()
![]() key.
key.
REPROGRAM THE KEYPAD (COMPLETE DATA REFRESH)
Sometimes it may be necessary to completely erase all current data (except the master code) and input new data. An example of when this may be necessary is the sale of a protected building to a new owner. In such a situation, do the following:
1.Enter the programming mode by keying in the master code and the ![]()
![]() key, then enter the refresh code, 8
key, then enter the refresh code, 8 ![]()
![]() 9
9 ![]()
![]() 0
0 ![]()
![]() 1 and the # key:
1 and the # key:
x |
| x |
| x |
| x |
|
| The keypad is now in the programming mode. |
|
|
|
|
|
|
| All old data is cleared and the keypad is ready for new data. | ||
8 |
| 9 |
| 0 |
| 1 |
| # | |
Note: The master code does NOT change.
2.Use the programming instructions on pages 13 and 14 to enter the keypad’s data.
3.Exit the programming mode by pressing the ![]()
![]() key.
key.
DELETE USER
To delete a user who no longer has authority to enter the protected area:
1. Enter program mode by keying in the master code and the |
| key: | ||||||||||
|
|
|
|
|
|
|
|
|
|
| ||
| x |
| x |
| x |
| x |
|
| The keypad is now in the programming mode. | ||
2. Enter the output #, user ID number, and the # key.
To delete user ID 05 from output #1, press |
| 1 |
| 0 |
| 5 |
| # | |
|
|
|
|
|
|
| |||
To delete user ID 1 from output #2, press |
| 2 |
|
| 1 |
| # | ||
3. Exit the programming mode by pressing the |
|
|
| key. |
|
| |||
|
|
|
|
| |||||
MASTER CODE BYPASS (DAP JUMPER)
If the master code has been forgotten or does not work, use the DAP (direct access to program) jumper to override the forgotten code and permit direct entry into the programming mode as follows:
1.Disconnect the power supply.
2.Move the DAP jumper from OFF to ON.
3.Reconnect the power supply. The keypad will start beeping.
4.Move the DAP jumper back to the OFF position. The keypad will stop beeping as soon as the jumper is removed.
5.Key in a new master code as follows:
Option* | Key in New Code | Confirm | Exit | |||||||||||||
| 0 |
|
| x |
| x |
| x |
| x |
|
| # |
|
|
|
*Zero ―0‖ is for new master code only; see page 13 and 14 for other options.
Note: DAP reset does not change any previously configured settings. DAP will only give direct access to programming by bypassing the master code requirement.
Page 2 | Page 15 |