AR-203E
Contents
Flow chart shown below provides printing overview
Printing Overview
Basic Printing
Make sure that Sharp AR-xxxx is selected as
Current printer. If you intend to change any print
Windows 2000/XP/Vista
Windows 98/Me
Printer Driver Settings
Printing a Watermark
Print sample
Screen
Click the Paper tab in the printer driver setup
Fitting the Printed Image to the Paper
Check the Fit To Page box
Printing Multiple Pages on One
Outline of the Print Status Window
Sharing the Printer Using Windows
Shared Printer Settings
Panel
Client Settings part
Click the start button, and click Control
Click Add a printer in Printer Tasks
Select settings in the Default Printer screen
Select Browse for a printer, and click
Next button
When scanning from Scanner Using the unit to begin scanning
Scanning Overview
After starting TWAIN-compliant application, click
Place the original s you wish to scan on
Document glass/SPF
File menu and select Select Scanner
Which you placed the original in Platen
Open the scanner driver setup screen
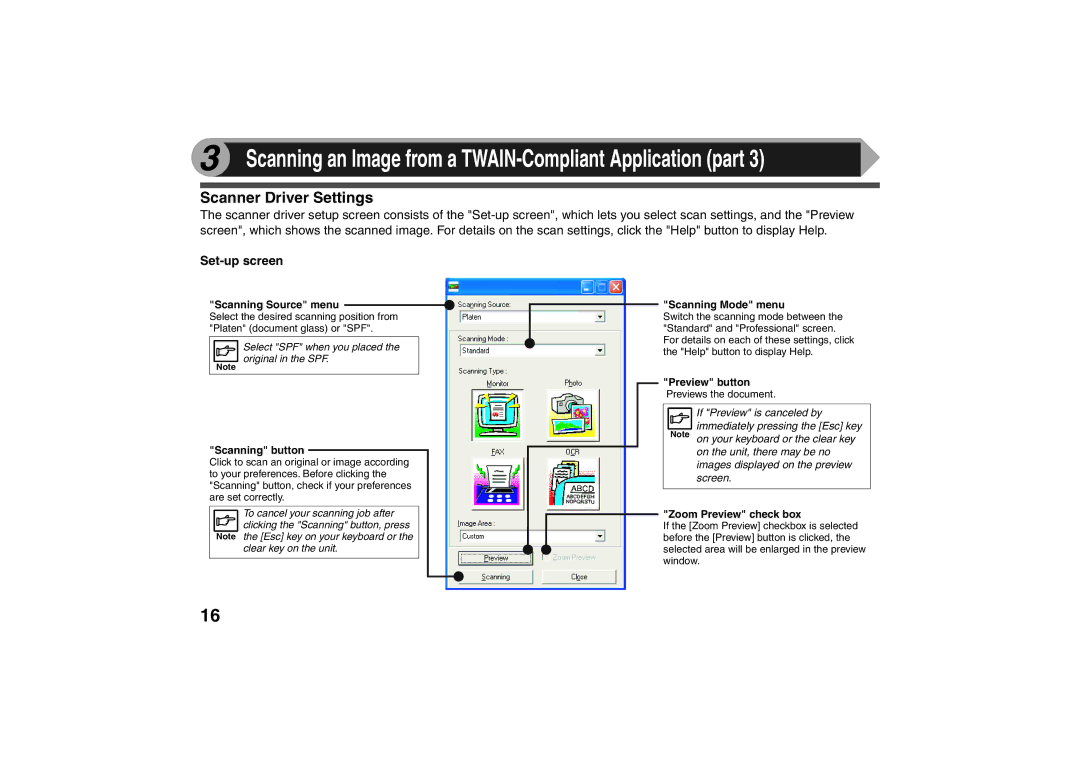
Scanning Source menu, select the position
Document glass or SPF
Set-up screen
Preview window
Preview screen
Auto Scan Area Judgement button
Rotate button
After starting Paint, click the File menu and select
Place the original you wish to scan on the document
Glass/SPF
From Scanner or Camera
Select the paper source and picture type, and click
Preview button
Click the Scan button
Scanners and Cameras
Click the start button, click Control Panel, click
Printers and Other Hardware, and then click
Click the Sharp AR-xxxx icon and then click Get
Original is sent to the original exit area, so you
Click the Finish button
Outline of Button Manager
Scan Setup area
Show Twain setting screen when scanning
Application Selection area
Button Manager Settings
Identifying Unit Problems
Printing trouble
What type of trouble do you have?
CHECK2 Is the interface cable connected securely?
If the USB cable becomes disconnected
USB cable
Check Your Computer
CHECK1 Is there enough computer memory or hard disk space?
CHECK2 Is your hard disk fragmented?
Plug and Play Screen does not Appear
When you make sure that the USB port is enabled
Install the software, referring to Installing
Click the icon beside the Universal Serial Bus
Failed to Install the Driver Windows 2000/XP
Faint, Uneven or Smeared Print Output
CHECK2 Is the orientation of document setting correct?
CHECK3 Is the paper loaded correctly?
CHECK2 Is the on Line indicator off?
Nothing Prints
CHECK1 Has a paper jam occurred?
CHECK1 Is the original clean?
CHECK2 Have you specified a suitable resolution?
Poor Scanning Result
Scanned Image is Incorrectly Positioned
SPF?
Unable to Scan the Image
CHECK1 Is your application compliant to TWAIN?
CHECK4 Is there enough computer memory?
Main
Printer Driver Features part
User Settings
Paper
Image Adjustment
Index
Page
Page
Page
AR-203E