AR-651 AR-810
For Your Records
FCC Notice
AR-651/810 Copier model Base model Off Mode
Off Mode Default Time
Automatic Energy Save Default Time
Sleep Mode Default Time
User Safety
Preface
Features of the AR-651/810
Preface
Table of Contents
Table of Contents
When the graphic symbols flash on the touch panel
Maintenance
Disclaimer Notice
Precautions
Installation
Precautions
General Precautions
Be sure to disconnect the power-cord plug
Handle and use the copier gently and carefully
Certification Label
Fixing the adjusters stoppers
Before Making Copies
Main Components
Optional Equipment Configuration
Optional Equipment
Control Panel
Timer lamp
Clear ALL key
Stop key
Start key
Touch Panel
Message Display
Touch-keys
Settings set functions confirmation key
Clearing the Functions Selected
Turning on the Power Switch
Turning on the Power Switch/Auto Job Start
Turning on the Power Switch Turn on the power switch
Controlling the Use of the Copier with Account Numbers
After Copying is Finished
Page
HOW to Make Copies
General Copying Procedures
When Coming Across the Situations below
When paper is exited with its printed side up
Exiting Copy Papers
To make multiple sets of copies
Acceptable Copy Paper Types and Sizes
Feeder Paper Type Paper Size Remarks
Handling and Storing Paper
Pay attention to the following points
Setting Copy Paper
Changing the Paper Size of the Drawer
Setting the Drawer for Special Uses
If you want to select the Cover , Insert , or TAB , make
Setting Originals
Acceptable Original Types and Sizes
Setting Originals
When Placing an Original on the Glass
Sheet Originals
When Using the Reversing Automatic Document Feeder
Exiting Originals
Continuous Feed Mode
After aligning the edges of originals well, place them
Face up and align the slides to the width of the originals
Auto JOB Start JOB Preset
Confirming and Cancelling Auto Job Start
Confirming auto job start
Interrupt Copying
Press the Interrupt key
Replace the original with a new one.
Interrupt key again
Stopping the Copy Operation
Deleting or Changing Order of Pending Jobs
Deleting the Job
Changing order is completed
Page
Setting of Basic Copy Modes
Paper Selection
Automatic Paper Selection APS
Manual Paper Selection
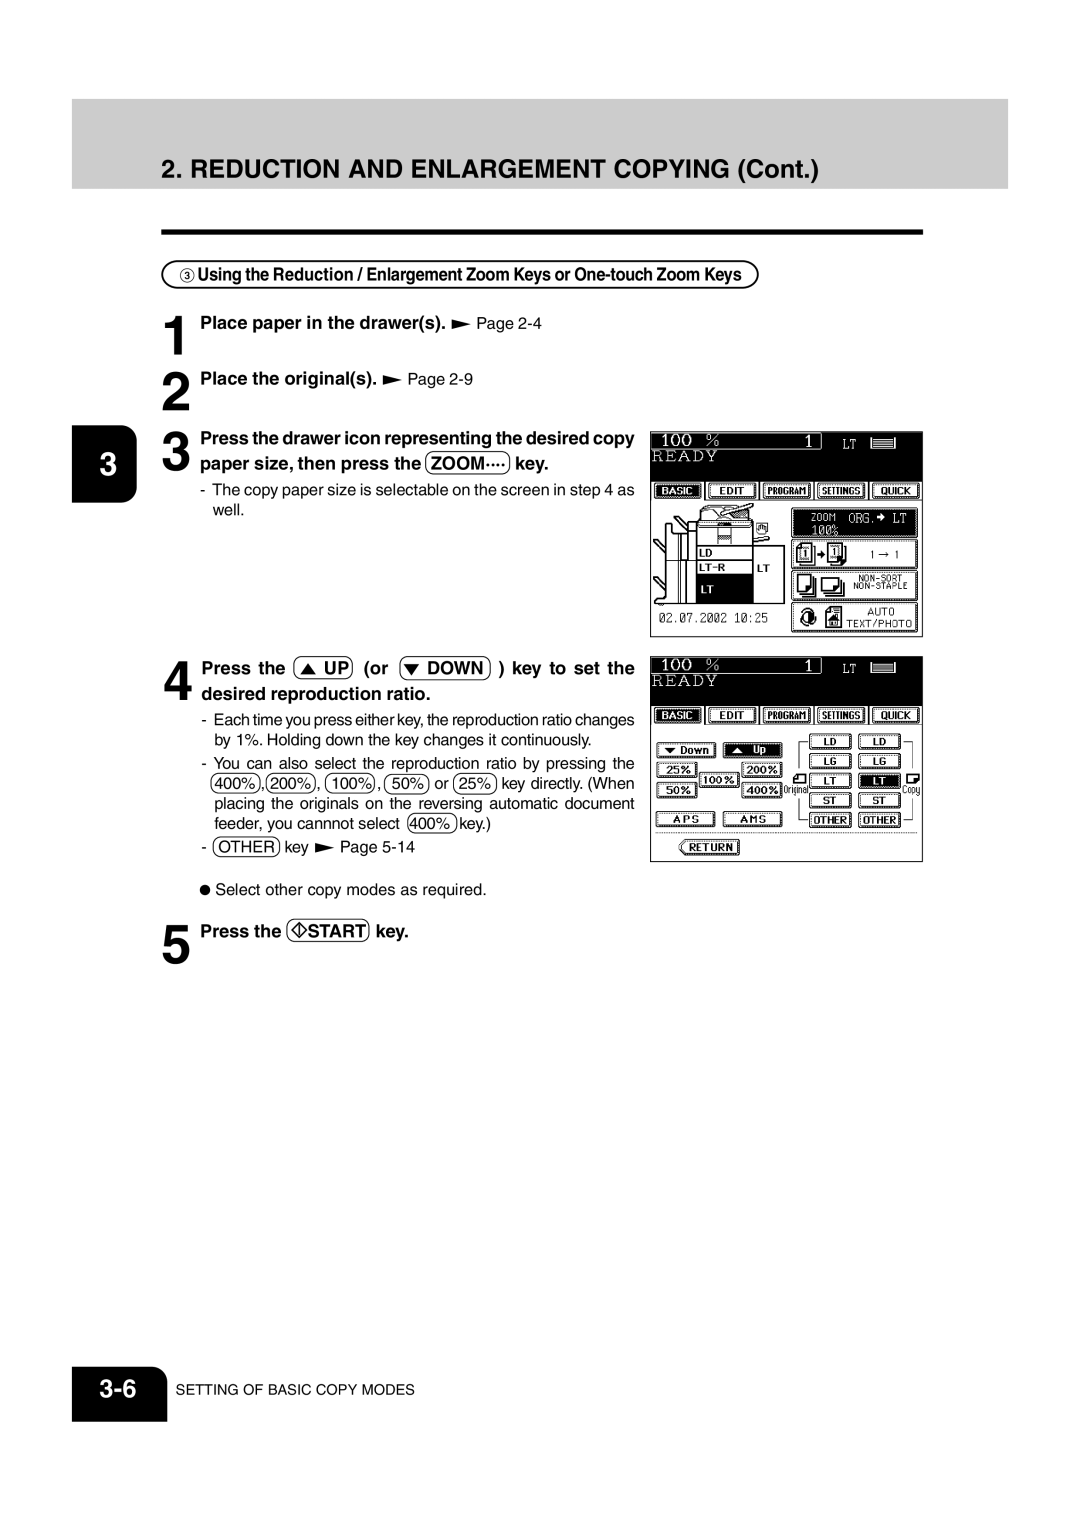
Reduction and Enlargement Copying
Place the originals.
Press the Original Size key of the same size as the original
Reduction and Enlargement Copying
Paper size, then press the ZOOM···· key
Press the drawer icon representing the desired copy
Duplex Copying 1-SIDED, 2-SIDED, BOOK-TYPE
Follow the same procedure 1 to 3 as shown above
Duplex Copying 1-SIDED, 2-SIDED, BOOK-TYPE
Book-Type Originals 2-Sided Copies
Bypass Copying on Non-Standard Size Paper
SET key
Data stored in the MEMORY. Then press the lower
Bypass Copying on Non-Standard Size Papercont
Storing a Non-Standard Size in the Memory
Perform steps 1 to 3 on Press the NON-STANDARD key
Weekly Timer
Set the ON/OFF times for each day of the week
Setting the Other Size KEY
Setting the Date and Time
Check that the settings are all correct
Setting the Clock fore Daylight Saving Time
Setting the Automatic Energy Save Mode
Clearing the Automatic Energy Saving Mode
Activated
Setting the Automatic OFF-MODE
Clearing the Off-Mode/Sleep Mode
Switching Languages
Press the key of the desired language
Account Numbers
Account Numbers
Input the master number name, and press the SET key
Master number name is displayed in the account
Registration / Change / Deletion of Account Number
22USING the Special Functions
Page
24USING the Special Functions
Press the YES key
Counter reset is completed
Print out account number
Entering Letters
Entering Letters
Example Correct Meeting to Meeting
Entering Letters
Selecting Finishing Modes
Finishing Modes and Finishers Optional
Names of the Main Components
SORT/GROUP Copying
Press the Sort or Group key
Staple Sorting Optional
Maximum Number of Sheets that can be Stapled
Magazine Sort & Saddle Stitch Mode Booklet Mode
Place paper in the drawers. Set the paper size
Press Start key
Availabe Conditions for Saddle Stitch
Hole Punch Mode Optional
Number of punch holes and available paper sizes
Inserter Mode Optional
Paper Acceptable to Set in the Inseter
Inserter Mode OPTIONALCont
Setting the Inserter
Press the Start key
Sheet Insertion
Using only Staple and Hole Punch
Set with the control panel of the inserter
Page
When the Graphic Symbols Flash on the Touch Panel
Description of the Flashing Graphic Symbols
ADD Paper Symbol
Adding Paper to the Drawers
Place the paper in the drawer
ADD Paper Symbol
Adding Paper to the Tandem LCF Large Capacity Feeder
Pull the tandem LCF out carefully until it comes to a stop
Tray B
Place the paper on the elevator tray
Close the cover of the external LCF
Replace Toner Cartridge Symbol
Following message appears Wait adding toner
Replace Toner Cartridge Symbol
Additional Explanation
Dispose of Used Toner
Replace Toner Bag
Clear Paper Symbol
Connecting with the copier
Moving the finisher optional
Separating it from the copier
Clear Paper Symbol
Lift the blue handle second as shown on the right
Paper Misfeed inside of the Copier Open the paper feed cover
Remove any misfed paper Open the bypass cover
Open the exit cover
Remove any misfed paper
Turn the handle in the direction of the arrow
Pull the transfer unit out until it comes to a stop
Lift the grip, then turn the knob in the direction
Arrow to remove any misfed paper
Pick the lever of the transfer unit as shown on
Page
Return the external LCF to its original position
Paper Misfeed in the Inserter optional
Pull the inserter optional away from the copier
Slowly

 Using the Reduction / Enlargement Zoom Keys or
 UP (or
 DOWN ) key to set the desired reproduction ratio.
 Page
 Select other copy modes as required.
 START key.