Manuals
/
Sharp
/
Home Audio
/
Headphones
Sharp
HT-X1W
operation manual
To install the main unit on the wall, E-61, Advanced Features
Models:
HT-X1W
1
62
71
71
Download
71 pages
17.29 Kb
59
60
61
62
63
64
65
66
Troubleshooting
Specifications
Install
Controls and indicators
Connecting the system
Maintenance
To scan the preset stations
HT-X1W Accessories
Battery installation
button to adjust the level
Page 62
Image 62
Page 61
Page 63
Page 62
Image 62
Page 61
Page 63
Contents
HT-X1W
05/2/2
HT-X1WLA FR.fm
HOME THEATER WITH DVD HOME THEATER CON DVD
General Information
Introduction
Special notes
ENGLISH
TINSZA048AWZZ
General Information
05/2/2 HT-X1WLAE1.fm
General
HT-X1W Accessories
Information
General Information
Contents
Advanced Features
Audio CD Operation
General
Precautions
Volume control
General Information
General Information
Description of discs
Types of playable discs
Super video CD/video CD/audio CD
Description of discs continued
DVD-Video
DVD-R/DVD-RW/DVD+R/DVD+RW
General Information
Icons used on DVD discs
Discs that cannot be played
Controls and indicators
E-10
General Information
General Information
Controls and indicators continued
E-11
General Information
E-12
Remote control
05/2/2
E-13
3 1
General
Controls and indicators continued
E-14
System installation
Preparation for
Placing the speaker system
Preparation for Use
Installation methods
Main unit preparation
E-15
Connecting the AC power lead
Aerial connection
Connecting the system
System connections
E-17
Connecting the system connection cable
System connections continued
Aerial connection
Attaching the optional floor speaker stand
E-18
Speaker connection
Preparation for
System connections continued
E-19
TV connection
Preparation for Use
Preparation for Use
E-20
Connecting to a TV with an S-videoinput socket
TV Notes
Attaching the back cover
Headphones
E-21
System connections continued
E-22
Connecting the AC power lead
To turn the power on
for Use
Test of the remote control
Remote control
Battery installation
E-23
Muting
General control
E-24
To change the display brightness 2 levels
E-25
HT-X1W Playing a disc
DVD Operation
Caution when inserting disc
E-26
When the menu appears on the TV screen
DVD Operation
To resume playback after stopping resume play
Playing a disc continued
E-27
DVD Operation
To locate the beginning of a chapter/track skip
Basic operation
E-28
Fast forward/Fast reverse search
DVD Operation
Basic operation continued
E-29
To change the subtitle language
Useful operation
E-30
DVD Operation
To change the audio language audio output
Useful operation continued
E-31
To brighten an image
DVD Operation
E-32
To improve the image quality
To select a subtitle or audio language from the
E-33
To select a title from the top menu of the disc
disc menu
To zoom in on an image zoom
E-34
To change the angle
DVD Operation
To play in the desired order programmed play back
Operation
E-35
Useful operation continued
Operation
E-36
To play repeatedly repeat play
Useful operation continued
E-37
To change the display on the main unit
DVD Operation
DVD Operation
E-38
To change the display on TV screen
E-39
Playing an audio CD
Audio CD Operation
To play in random order random play
E-40
Audio CD Operation
Playing a super video CD or video CD with P. B
Playing a super video CD or video CD
E-41
C. playback control
E-42
Playing an MP3, WMA or JPEG disc
WMA and JPEG Disc
Operation
MP3, WMA and
Playing an MP3, WMA or JPEG disc continued
JPEG Disc Operation
E-43
Radio
Tuning
Listening to the radio
E-44
Listening to the radio continued
To scan the preset stations
To erase entire preset memory
E-45
Radio
Setting the AM/FM interval
E-46
E-47
Advanced Features
Enjoying surround sound sound mode
CD,VCR etc
Advanced Features
Audio Signal/Speaker Indicators
E-48
Listening to 2 channel stereo sounds
Enjoying surround sound sound mode continued
E-49
Advanced Features
DVD Dolby Digital or DTS
E-50
Advanced Features
2 channel stereo sound CD, videotapes, etc
Advanced Features
Changing the default setting of the amplifier
E-51
button to select SP DELAY
Speaker delay setting
E-52
and then press the ENTER button
E-53
Features
Speaker level setting
button to adjust the level
Advanced Features
Changing the initial setting of DVD
E-54
button to select the main
Advanced Features
Changing the initial setting of DVD continued
E-55
Features
Advanced
E-56
Changing the initial setting of DVD continued
Other language settings
E-57
Parental level setting
Advanced Features
Language code list for disc language
E-58
ENGLISH
Advanced Features
Sleep operation
E-59
Connection for the digital tuner sound or other
Audio connection to other equipment
E-60
optical digital equipment such as an MD player
Advanced Features
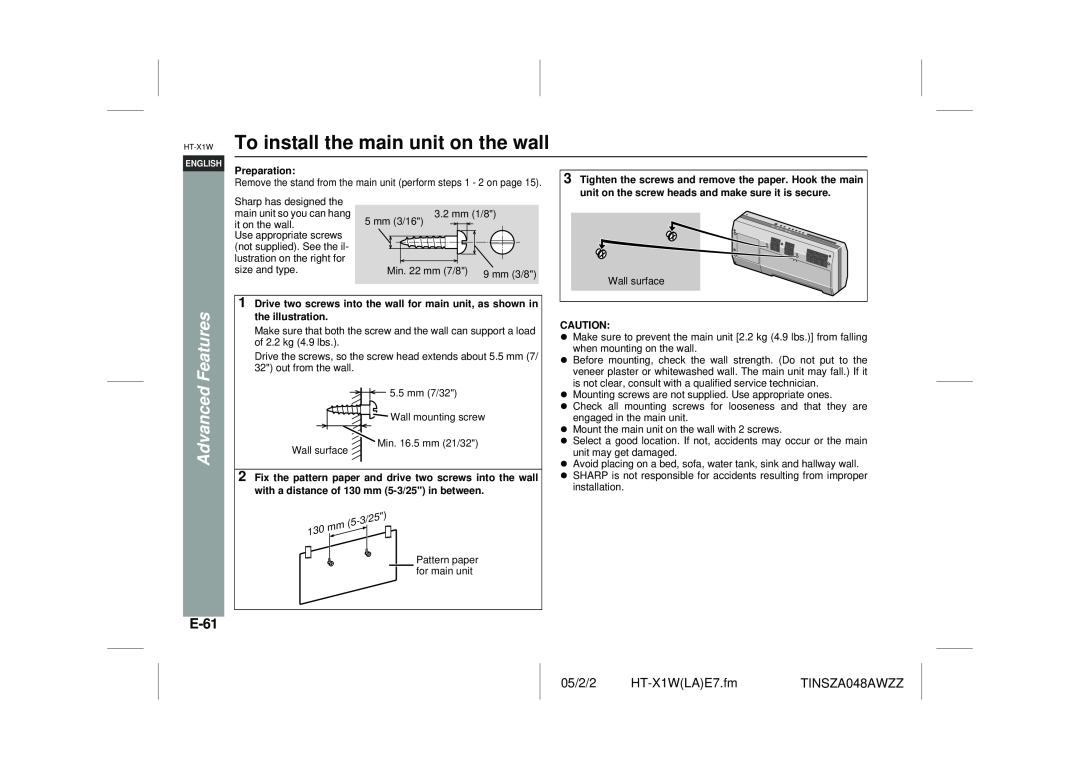
To install the main unit on the wall
E-61
E-62
Troubleshooting chart
References
DVD player
E-63
Troubleshooting chart continued
Clearing all the memory reset
Tuner
Optional accessory
Maintenance
Error indicators and warnings
Cleaning the cabinet
Main unit
Specifications
E-65
Front speakers
References
E-66
Surround speakers
Centre speaker
MEMO/MEMORÁNDUM
05/2/2 HT-X1WLA MEMO.fm
TINSZA048AWZZ
SHARP TINSZA048AWZZ LA
05/2/2 HT-X1WLA MEMO.fmTINSZA048AWZZ
MEMO/MEMORÁNDUM
05/2/2
SHARP CORPORATION
HT-X1WLA BA.fm
0401 A5
05/1/19
HT-X1W
HOME THEATER WITH DVD
HT-X1WLA SP.fm
Top
Page
Image
Contents