Instructions

Using the oven.

To avoid possible burns, place the shelves in the desired position before you turn the oven on.

Safety

Operating Instructions

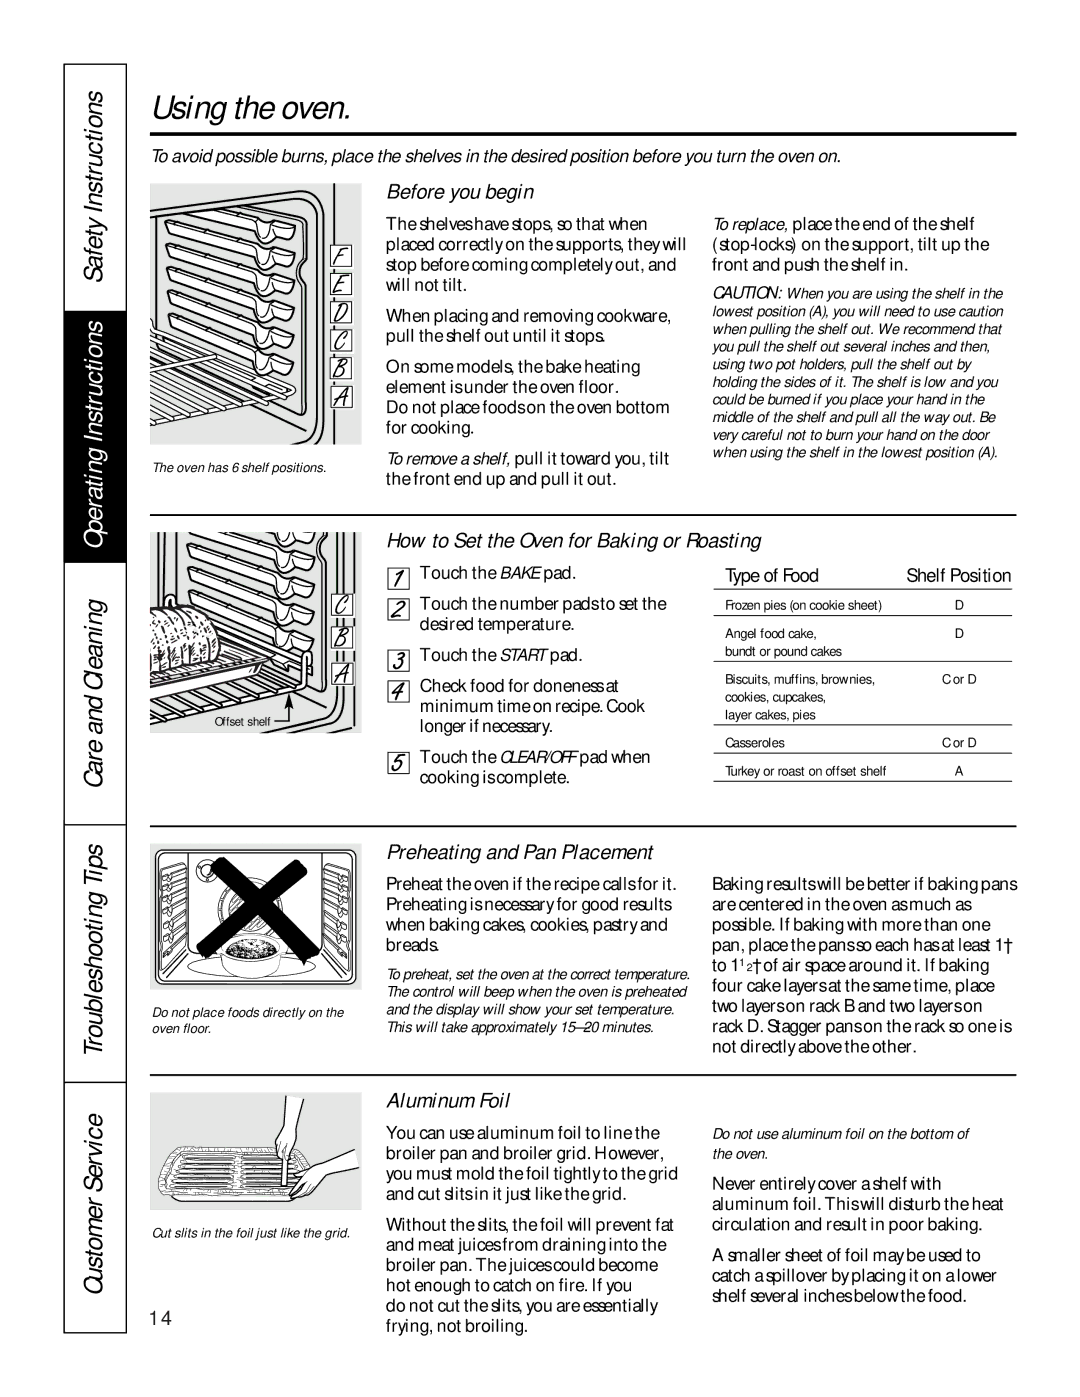
The oven has 6 shelf positions.

Before you begin…

The shelves have stops, so that when placed correctly on the supports, they will stop before coming completely out, and will not tilt.

When placing and removing cookware, pull the shelf out until it stops.

On some models, the bake heating element is under the oven floor.

Do not place foods on the oven bottom for cooking.

To remove a shelf, pull it toward you, tilt the front end up and pull it out.

To replace, place the end of the shelf (stop-locks) on the support, tilt up the front and push the shelf in.

CAUTION: When you are using the shelf in the lowest position (A), you will need to use caution when pulling the shelf out. We recommend that you pull the shelf out several inches and then, using two pot holders, pull the shelf out by holding the sides of it. The shelf is low and you could be burned if you place your hand in the middle of the shelf and pull all the way out. Be very careful not to burn your hand on the door when using the shelf in the lowest position (A).

How to Set the Oven for Baking or Roasting

Care and Cleaning

Offset shelf

Touch the BAKE pad.

Touch the number pads to set the desired temperature.

Touch the START pad.

Check food for doneness at minimum time on recipe. Cook longer if necessary.

Touch the CLEAR/OFF pad when cooking is complete.

Type of Food

Shelf Position

Frozen pies (on cookie sheet)

D

Angel food cake,

D

bundt or pound cakes


Biscuits, muffins, brownies,

C or D

cookies, cupcakes,


layer cakes, pies


Casseroles

C or D

Turkey or roast on offset shelf

A

Tips

Preheating and Pan Placement

Troubleshooting

Do not place foods directly on the oven floor.

Preheat the oven if the recipe calls for it. Preheating is necessary for good results when baking cakes, cookies, pastry and breads.

To preheat, set the oven at the correct temperature. The control will beep when the oven is preheated and the display will show your set temperature.

This will take approximately 15–20 minutes.

Baking results will be better if baking pans are centered in the oven as much as possible. If baking with more than one pan, place the pans so each has at least 1″ to 11⁄2″ of air space around it. If baking four cake layers at the same time, place two layers on rack B and two layers on rack D. Stagger pans on the rack so one is not directly above the other.

Customer Service

Cut slits in the foil just like the grid.

14

Aluminum Foil

You can use aluminum foil to line the broiler pan and broiler grid. However, you must mold the foil tightly to the grid and cut slits in it just like the grid.

Without the slits, the foil will prevent fat and meat juices from draining into the broiler pan. The juices could become hot enough to catch on fire. If you

do not cut the slits, you are essentially frying, not broiling.

Do not use aluminum foil on the bottom of the oven.

Never entirely cover a shelf with aluminum foil. This will disturb the heat circulation and result in poor baking.

A smaller sheet of foil may be used to catch a spillover by placing it on a lower shelf several inches below the food.

Page 14
Image 14
Sharp JB960 Tips, Troubleshooting, Before you begin…, Aluminum Foil, Do not use aluminum foil on the bottom of the oven

JB965, JB960, JB940, JBP85 specifications

The Sharp JBP85, JB940, JB960, and JB965 are advanced kitchen appliances designed to elevate cooking experiences with innovative technologies and user-friendly features. These models, part of Sharp's renowned line of countertop convection ovens, combine modern design with efficient functionality, catering to the needs of both amateur cooks and experienced culinary enthusiasts.

The Sharp JBP85 stands out with its versatile cooking capabilities, offering various cooking methods, including baking, broiling, and toasting. Its spacious interior can accommodate a wide range of dishes, making it ideal for family meals or entertaining guests. The model is equipped with a digital control panel that simplifies operation, allowing users to select from pre-programmed settings tailored to specific dishes.

Moving on to the JB940, this model incorporates advanced sensor technology that ensures precise temperature control throughout the cooking process, resulting in consistently perfect meals. With a sleek design and an easy-to-read display, the JB940 not only enhances kitchen aesthetics but also provides a hassle-free cooking experience.

The JB960 takes innovation a step further by integrating Sharp's proprietary Superheated Steam technology. This feature introduces steam into the cooking chamber, helping to retain moisture and nutrients in food while promoting even cooking. The JB960 also includes a range of pre-programmed settings, which allow users to prepare a variety of dishes with just the touch of a button, making it the perfect appliance for busy households.

Lastly, the JB965 offers a combination of modern design and functionality. This model boasts an intuitive interface that allows users to customize cooking times and temperatures for a variety of recipes. Additionally, the JB965 features an energy-saving mode, which reduces power consumption during idle periods, making it an eco-friendly choice.

Each model in the Sharp JBP series is designed with safety in mind, incorporating features such as auto shut-off and cool-touch exteriors to prevent burns and ensure user safety. These models are also designed for easy cleaning, with removable trays and non-stick surfaces that simplify maintenance.

In summary, the Sharp JBP85, JB940, JB960, and JB965 are distinguished by their advanced cooking technologies, user-friendly interfaces, and safety features, making them valuable additions to any modern kitchen. These appliances not only streamline cooking processes but also achieve exceptional culinary results, appealing to a broad spectrum of users.