LC-15B5M LC-20B5M
LC-15B5M LC-20B5M
Dear Sharp customer
Important Safety Precautions
Antenna cable AC cord
Supplied Accessories
AC adapter Cable holder
Installing Batteries in the Remote Control
Using Remote Control
Precautions regarding batteries
Preparation
Power Connection
Listening with Headphones
Headphones
Preparation
Part Names of Main Unit
Part Names of Main Unit
How to fix the cables
Carrying handle
Part Names of Remote Control
Turning On and Off the Main Power
Basic Operation
Standby
To turn off the LCD TV
Sound Volume Changing Channels
Basic Operation
Preset
Upper control panel
Presetting the Channels Manual
Preset
A weak reception area, or under bad reception conditions
Channel Setting Clock Setup
Backup
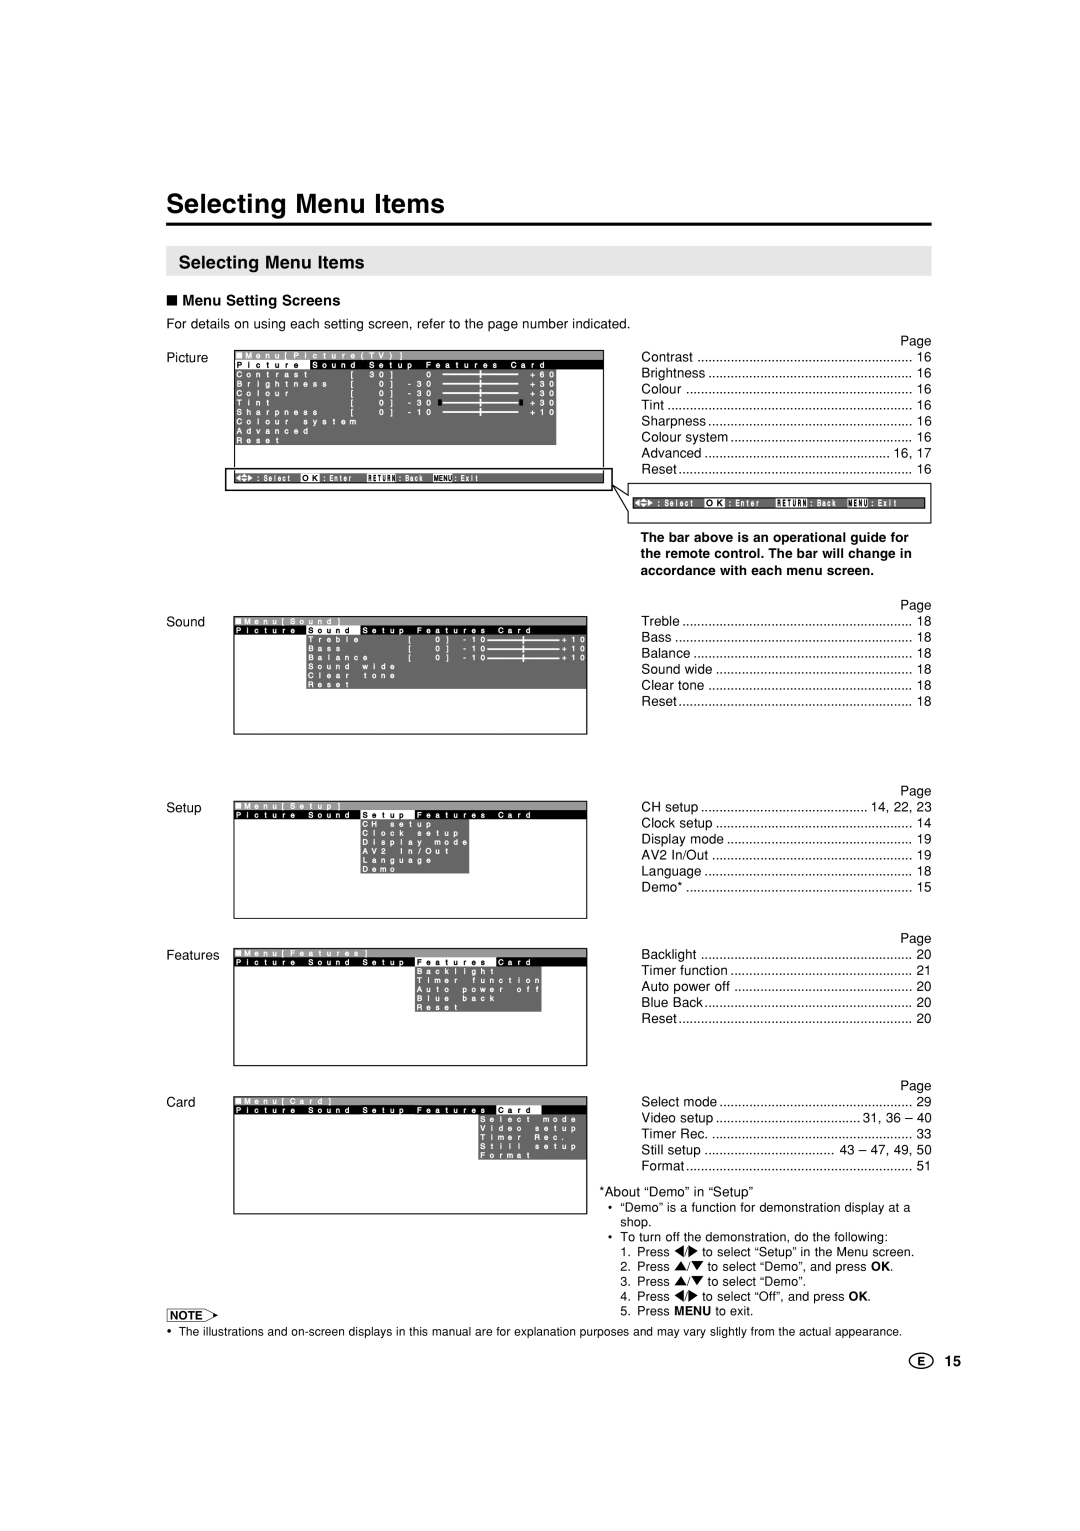
Selecting Menu Items
Menu Setting Screens
Selecting Menu Items
Basic Adjustment Settings
Picture Adjustments
Setup
Colour System Only AV1 or AV2 Mode
Basic Adjustment Settings
Film Mode
DNR Digital Noise Reduction
Cool Climate
Sound Adjustments On-screen Display Language Setting
Press / to select the desired language, and press
Display Mode
AV2 In/Out
Press / to select AV2 In/Out, and press OK
Press / to select the desired mode, and press OK
Directly setting the Backlight
Features
Press //\/to set each item in each setting screen
Timer Function
Press / to select Sleep timer, and press OK
Press / to select the desired adjustment item,
Press \/ to adjust them. Press OK to set
Nicam Broadcast Selection
A2 Stereo Broadcast Selection
Teletext
Changing subpages Using Teletext menu
Using the TOP table
Useful Features for Teletext
Teletext
Before Using Memory Cards
About Memory Cards
Commercially Available Memory Cards
Preparing a Memory Card
Trademarks
Changing from Card Mode to the TV mode
Loading a PC Card Adapter
Loading a PC Card Adapter
Inserting/Removing a PC Card
Select Mode
Playing Back Mode
Press \/to select the desired mode, and press OK
When Recording Still Pictures
When Playing Back Motion Pictures
When Playing Back Still Pictures
Recording/Playing Back a Memory Card
Recording on a Memory Card Video Setup
Rec Mode Pre-Recording
Press / to select SP, LP or EP, and press OK
Press Menu to exit
Recording a TV Programme in Real-time
Recording as a Motion Picture
Easy Recording
To Pause Recording
Adjusting the Clock
Setting Timer Recording
Timer Rec
Checking the Programme List
Setting Timer Recording
To change the programme
If There is not Sufficient Space on a Memory Card
Checking the Recording Mode At the Set Time
Press Cyan
Normal Playback
Playing Back Motion Pictures Normal Mode
Repeat
When One File is Specified for Repeat Playback
Playing Back Motion Pictures Special Mode
Slowmotion
Playing Back Motion Pictures Special Mode
Screen When Slowmotion is Specified
Screen When Zoom is Specified
Zoom
Protecting/Deleting Motion Pictures
Protecting Motion Picture Files
Unprotecting Motion Picture Files
Press / to select Protect, and press OK
Protecting/Deleting Motion Pictures
Press / to select the file you want to delete,
Press OK
Perform steps 1 to 4 in Protecting Motion Picture
Playing Back Still Pictures
Modes for Playing Back Still Pictures
Playing Back Still Pictures
Listing Still Pictures Index
Displaying One Picture at a Time
Fast paging in forward/backward direction
Press / to select Order. Press \/ to select
Press / to select Slideshow start, and press OK
Press \/OtoK select Yes,M andE press OK
Press / to select Repeat. Press \/to select On or Off
Press Menu to display the Menu screen
My Programme
Press / to select Slideshow start, and press OK
Switching Files
Rotate
Press \/to select Yes, and press OK
Press / to select Rotate, and press OK
Off TV AV1
Audio Select
Press / to select Audio select, and press OK
Shutter Click
Recording on a Memory Card
Press / to select Shutter click, and press OK
Capturing a TV Programme in Real-time
Capturing as Still Pictures
Whenever you want to record an image, press Capture
Press Capture
Protecting/Deleting Still Pictures
Protecting Still Picture Files
Unprotecting Still Picture Files
Press / to select Protect, and press OK
Protecting/Deleting Still Pictures
Press //\/to select the file you want to delete Press OK
Press OK again
File display motion picture/still picture
Formatting the Card
Press OK again to start formatting
Connecting with External Devices
Example of external devices that can be connected
Connecting with External Devices
To S-VIDEO input terminal
To S-video output terminal To AV-IN1 or AV-IN2 terminal
To audio/video output terminal Camcorder
Outputting video and audio video output
Connect to a VCR, audio amplifier, etc
Troubleshooting
LCD TV set
Troubleshooting
Antenna
Specifications
LC-15B5M LC-20B5M
Time Zone Table
Region Time difference with global standard time
LC-15B5M
Dimensional Drawings
Unit mm
Dimensional Drawings
LC-20B5M

![]() M e n u [ S o u n d ]
M e n u [ S o u n d ]![]() M e n u [ S e t u p ]
M e n u [ S e t u p ]![]() M e n u [ C a r d ]
M e n u [ C a r d ]