PG-D3510X PG-D3010X PG-D2710X
Model No Serial No
Iii
Page
Void the users authority to operate this equipment
See bottom of projector
Information Product Disposal
Maintenance Troubleshooting Index
Using the Menu Screen
For Future Reference
Contents
Reference
Adjusting the Projector Function PRJ ADJ1/2 Menu
Power Sources
Cleaning
Accessories
Power-Cord Protection
Replacement Parts
Damage Requiring Service
Safety Check
Overloading
Avoid locations with extremes of temperature
Rest your eyes occasionally
Do not block the exhaust and intake vents
Temperature monitor function
Using the projector in other countries
Other connected equipment
Closed Caption uses Bitstream Vera fonts
When you want to view the Setup Manual
For Windows
For Macintosh
Optional accessories
Accessories
Front View
Part Names and Functions
Rear View Terminals
Using the Kensington Lock
VOL +/- Volume buttons
For automatically adjusting images when
Break Timer button
Picture Mode button
Remote control signal transmitters
Inserting the Batteries
Usable Range
When connecting equipment other than a computer, see pages
Setup and Projection
On the projector On the remote control
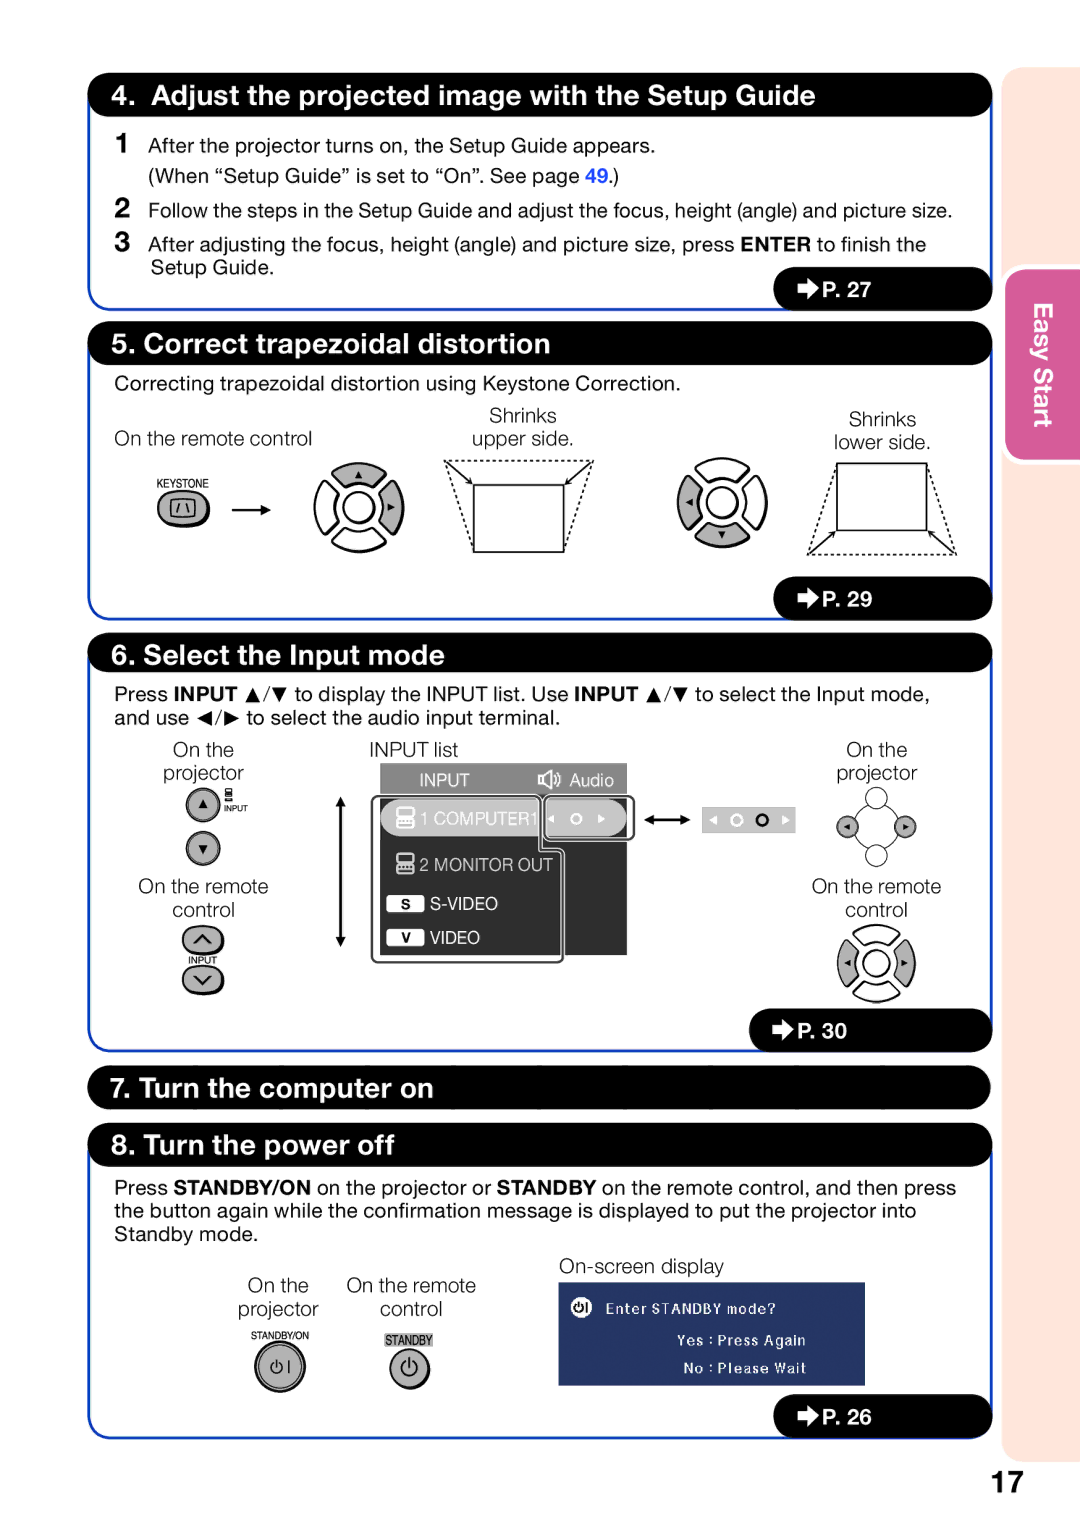
Easy Start
Turn the computer on Turn the power off
Setting Up the Projector
Setting Up the Projector
Standard Setup Front Projection
Signal Input 169 Mode
Signal Input Normal Mode
Screen Size and Projection Distance
Screen Lens center
Ceiling-Mount Setup
Projection PRJ Mode
Terminals on the Projector
Connecting the Projector to Other Equipment
Connecting the Projector to Other Equipment
RGB
Controlling the Projector by a Computer
Connecting the Power Cord
When connecting to the LAN terminal using a LAN cable
AC socket To AC outlet Power cord supplied
Turning the Projector On/Off
Power indicator Lamp indicator
Turning the Projector On
Standby button On button
Adjusting the Projected Image Adjusting the Focus
About the Setup Guide
Press Enter to exit the Setup Guide screen
Image Projection
Adjusting the Picture Size
Adjusting the Height
Use the rear adjustment foot to make the projector level
Make small adjustments Height Adjust lever
Press P/Q or O/R to adjust Keystone Correction
Press Keystone to enter the Keystone Correction mode
Correcting Trapezoidal Distortion
Press Keystone
Adjusting the Volume
Switching the Input Mode
Input buttons AV Mute button VOL +/- Volume buttons Buttons
On-screen display
Press Resize
Resize Mode
About Copyrights
Displaying and Setting the Break Timer
Operating with the Remote Control
Using the Spot Function
Switching the Eco+Quiet Mode
Freezing a Moving Image
Selecting the Picture Mode
When moving the cursor
Using the Remote Control as the Wireless Computer Mouse
When left-clicking
When right-clicking
Picture menu
Menu Items
Main menu
Network menu
Menu Selections Quick Start Menu
Using the Menu Screen
Press Menu
Example
Quick Start Menu
Example Adjusting Bright
Menu Selections Complete Menu
Following items can be configured on the Quick Start Menu
Press P or R and select Bright to adjust
To adjust the projected image while watching it
Press O or Q to adjust the item selected
Press Enter
Picture Adjustment Picture Menu
Selecting the Picture Mode
Menu operation n
Adjusting the Color Temperature
Adjusting the Image
Adjusting the Colors
Adjusting Hue, Saturation, or Value
Selecting the Film Mode
Eco+Quiet
Reducing Image Noise DNR
Signal Adjustment SIG-ADJ Menu
Signal Type Setting
Resolution Setting
When reproducing Ntsc signals in PAL video equipment
Setting the Video Setup
Setting the Resize Mode
Adjusting the Projected Image SCR-ADJ Menu
Adjusting the Image Position
Keystone Correction
Setting the On-screen Display
Setting the Overscan
Closed Caption
For Americas only
Selecting the Background Image
Selecting the Setup Guide
Reversing/Inverting Projected Images
Selecting the Wall Color
Auto Power Off Function
Auto Sync Auto Sync Adjustment
Speaker Setting
Auto Restart Function
Preset keycode in Old Code
Fan Mode Setting
System Lock Function
Press the 4 buttons on the remote
Keylock Function
Adjusting the Projector Function PRJ-ADJ1/2 Menu
Selecting the Quick Start Menu
COMPUTER2 Select
Standby Mode
Setting the Function Button Operation
Returning to the Default Settings
Checking the Lamp Life Status
Select Password, then press Enter or Q
Setting a Password
Enter the same password in Reconfirm, then press Enter
On the projector, press
TCP/IP Setting
Dhcp Client Setting
Returning to Default Settings Network
Enter IP Address using P, R, Q O, then press Enter
Setting Up the Projector Network Environment Network Menu
Confirming the Projector Information
You can confirm the following items
Cleaning the projector
Maintenance
Cleaning the lens
Cleaning the exhaust and intake vents
Maintenance Indicators
About the temperature warning indicator
About the lamp indicator
Red on Abnormally high Are high Lower than 95F +35ºC
Regarding the Lamp
Lamp
Replacing the Lamp
Remove the lamp unit cover
Removing and Installing the Lamp Unit
Lamp unit
STANDBY/ON button AC socket
Resetting the Lamp Timer
Storing the Projector
How to Use the Storage Case
Open the cover of the storage case
Place the projector into the storage case
Computer
Computer Compatibility Chart
21-25
Troubleshooting
57, 58
Sharp Electronics Corporation
Specifications
Dimensions
Index