Manuals
/
Sharp
/
Kitchen Appliance
/
Toaster
Sharp
R-1900J
operation manual
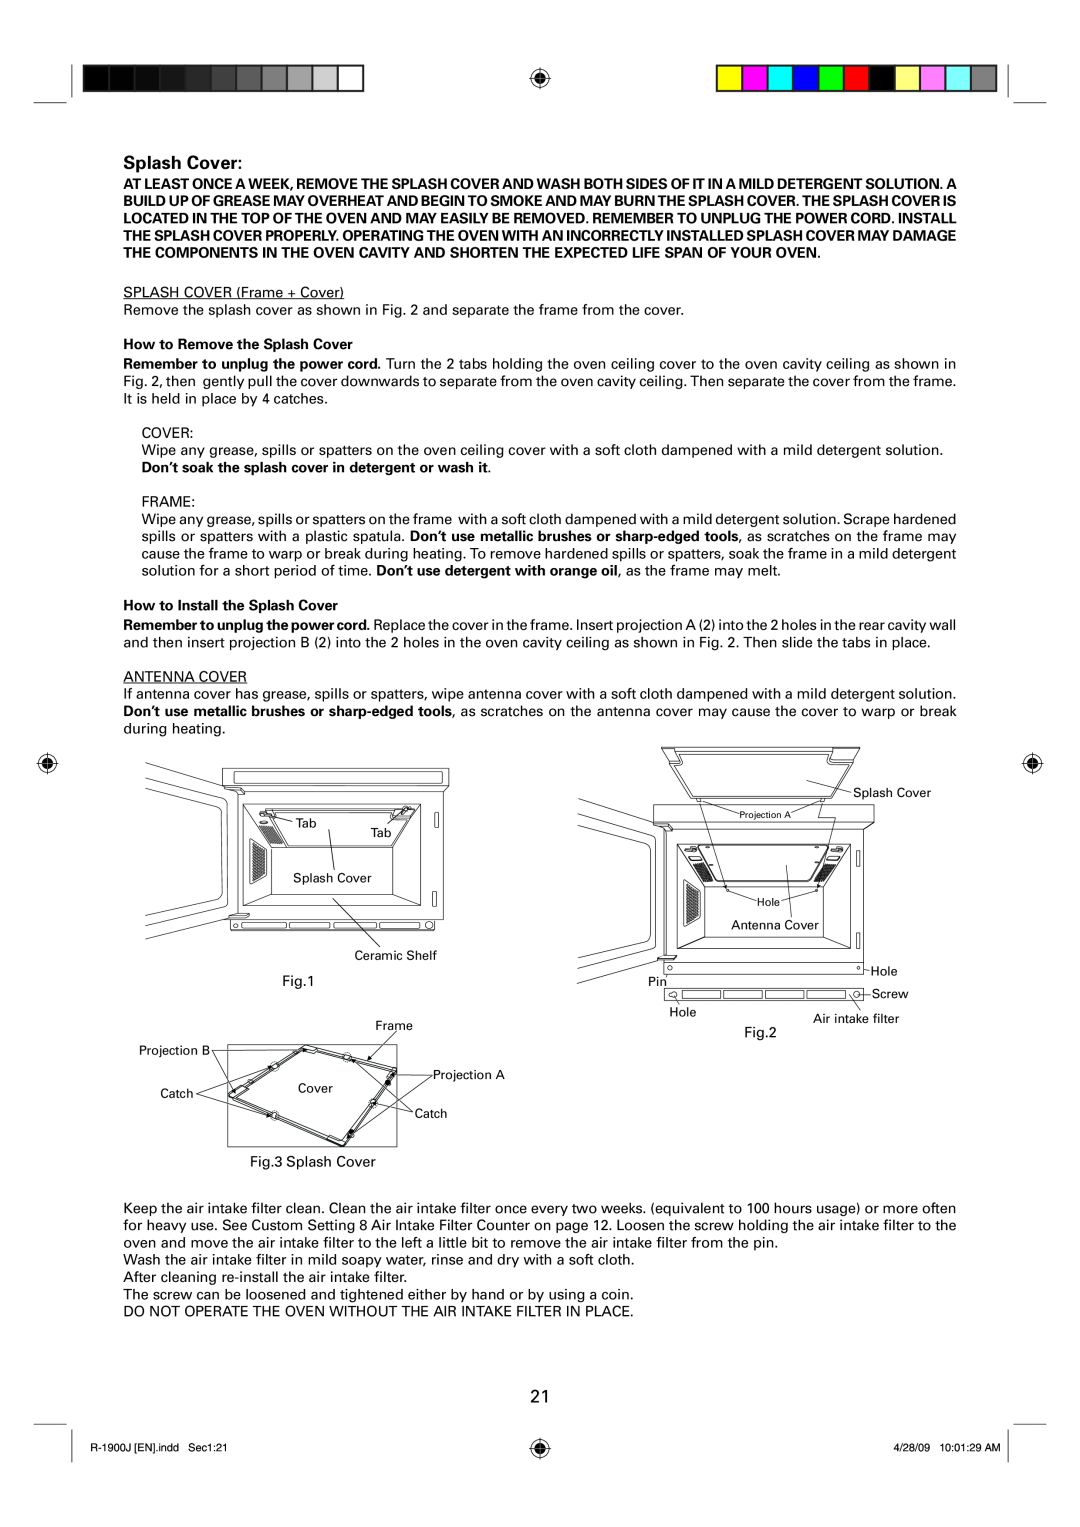
How to Remove the Splash Cover, How to Install the Splash Cover
Models:
R-1900J
1
22
33
33
Download
33 pages
37.9 Kb
19
20
21
22
23
24
25
26
Page 22
Image 22
Page 21
Page 23
Page 22
Image 22
Page 21
Page 23
Contents
COMMERCIAL MICROWAVE OVEN
CONTENTS
MODEL R-1900J
OPERATION MANUAL AND COOKING GUIDE
a. Do not overcook food
SPECIAL NOTES AND WARNINGS
DON’T
INSTALLATION INSTRUCTIONS
NOTE External Equipotential Earthing Terminal
OVEN DIAGRAM
Before Operation
OPERATION OF TOUCH CONTROL PANEL
MEMORY OPERATION
Memory Cooking
Procedure
Cooking Double/Triple Quantity with Memory
x2/x3
HELPFUL TIPS for the Display of Memory Input Status and the START Pad
3 0
MANUAL OPERATION
2 3
Express Defrost with Memory
Repeat Cooking
Express Defrost Chart
Express Defrost
Food
3. Programme Lock Setting
Custom Setting
PROGRAMME AND CUSTOMISE
1. Selecting Memory Input Method
To Set Cooking Completion Signal Volume
Operation when Programme Lock ON is set
4. Audible Signal Sound Volume Setting
5. Cooking Completion Signal Setting
Input memory number
To Check More than One Counter
Total each
memory usage
To Reset the Air Intake Filter Counter
x 2 8
To Reset the Counter to “0”
8. Air Intake Filter Counter
Air Filter Cycle
2 5
x 2 x2/x3
10. Multiplication Factors for Double/Triple Quantity
11. Express Defrost Setting
Pause Timing
Saving Memories
1 0
1. Setting time and power level for Single Stage Single Digit Input
Repeat Digit Input
4 0
Dual Digit Input
2. Programming Multi Stage Cooking
3 0 0
3. Setting Total Cooking Time of Express Defrost
Maximum Cooking Time
OTHER CONVENIENT FEATURES
Error Mode
Demonstration Mode
CLEAN THE OVEN AT REGULAR INTERVALS
CARE AND CLEANING
Maintenance Mode
Exterior
How to Remove the Splash Cover
Splash Cover
How to Install the Splash Cover
→ →
SERVICE CALL CHECK
SPECIFICATIONS
INPORTANT
Advice
HELPFUL HINTS
COOKWARE AND UTENSIL GUIDE
Utensil
FOOD
CHARTS
Defrosting Chart
DEFROSTING TIME
Cooking Chart
COOKING TIME
COOKING TIME
HOT SANDWICHES
Reheating Chart
BREAKFAST
PREPARED DISHES
SAVOURY BREAD AND PASTRY
CANNED FOODS
FRESH VEGETABLES
MEAT PORTIONS
SWEET PORTIONS
Consumer Electronic Products
WARRANTY PERIODS
WARRANTY
Congratulations on Your Purchase
SHARP CUSTOMER SERVICES
SHARP APPROVED SERVICE CENTRE
SHARP APPROVED SERVICE CENTRE
1300 135
Top
Page
Image
Contents