R216LS

3.Discharge high voltage capacitor.

4.Push the lever of positive lockconnector.

5.Pull down on the positive lockconnector.

CAUTION: WHEN CONNECTING THE POSITIVE LOCKCONNEC- TORS TO THE TERMINALS, INSTALL THE POSITIVE LOCKSO THAT THE LEVER FACES YOU.

Terminal

Positive lock¨ connector

1

Push

Lever

2

Pull down

[7] CONTROL PANEL ASSEMBLY REMOVAL

1.Disconnect the power supply cord and remove outer case.

2.Open the door and block it open.

3.Discharge high voltage capacitor.

4.Disconnect the leads from the control unit.

Figure C-1. positive lockconnector

5.Remove the one (1) screw holding the control panel decoration to the oven cavity front plate.

6.Remove the one (1) screw holding the control panel to the front plate of the oven cavity.

7.Now, the control panel assembly is free.

[8] GRAPHIC SHEET AND MEMBRANE SWITCH REPLACEMENT

1. REMOVAL

1.Disconnect the power supply cord and then remove outer case.

2.Open the door and block it open.

3.Discharge high voltage capacitor.

4.Remove the control panel assembly, referring to chapter of CON-

TROL PANEL ASSEMBLY REMOVAL.

5.Remove the three (3) screws holding the control unit to the control panel frame. And remove the control unit.

6.Remove the rubber connector from the long slit on the control panel frame.

7.Tear away the graphic sheet from the control panel frame.

8.Tear away the membrane switch from the control panel frame.

2. REINSTALL

1.Remove remaining adhesive on the control panel frame surfaces with a soft cloth soaked in alcohol.

2.Tear the backing paper from the new membrane switch.

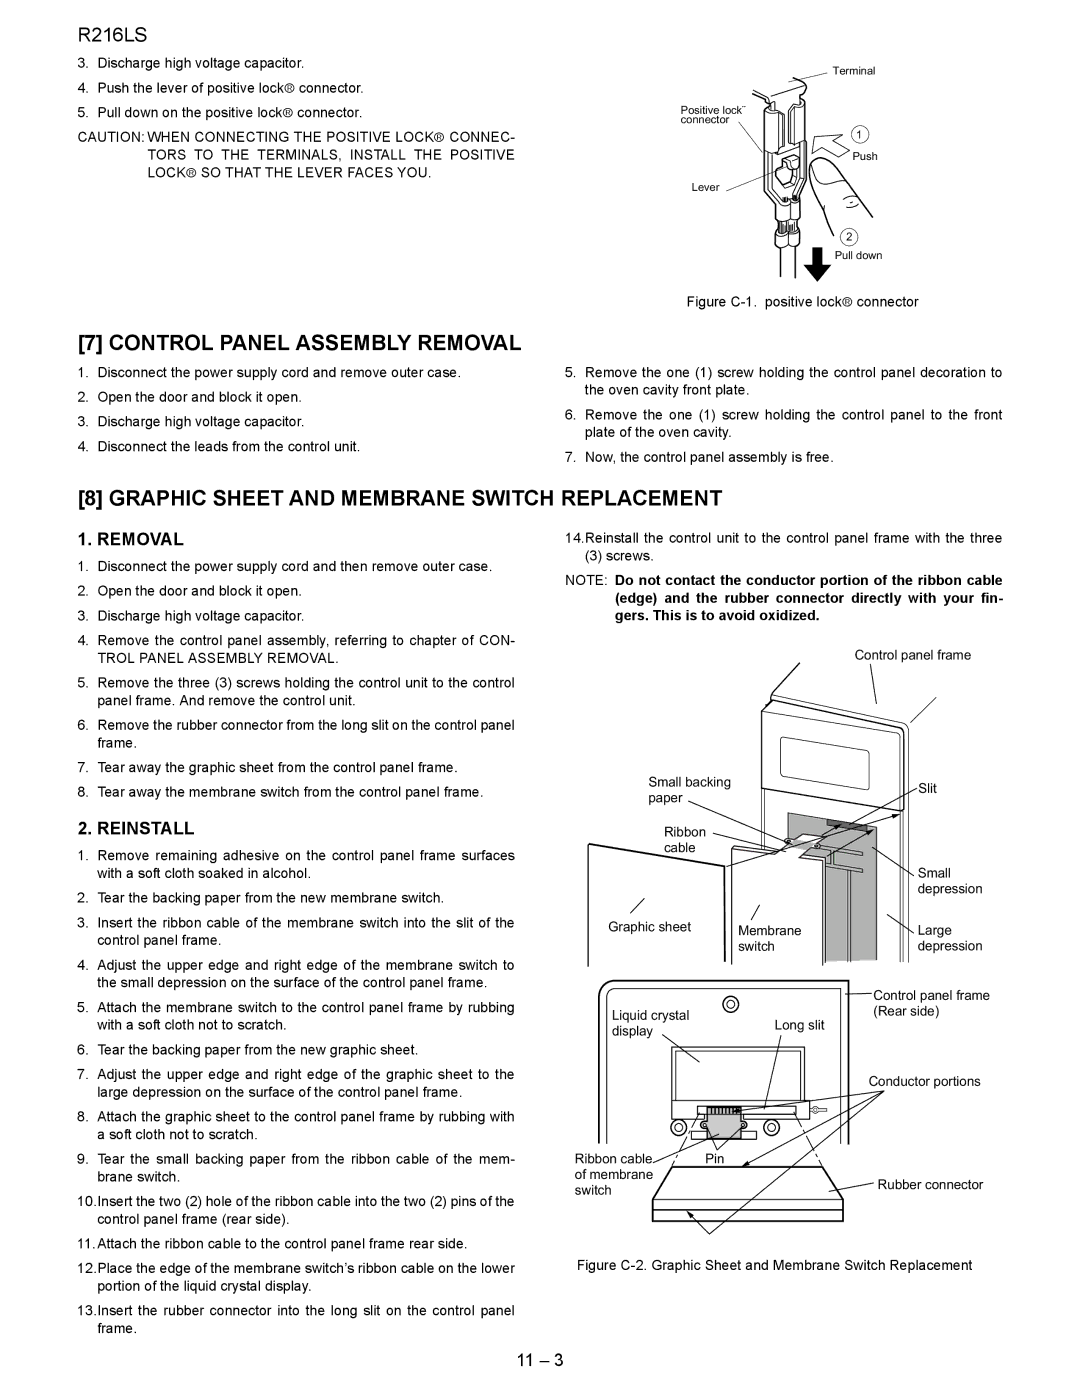
3.Insert the ribbon cable of the membrane switch into the slit of the control panel frame.

4.Adjust the upper edge and right edge of the membrane switch to the small depression on the surface of the control panel frame.

5.Attach the membrane switch to the control panel frame by rubbing with a soft cloth not to scratch.

6.Tear the backing paper from the new graphic sheet.

7.Adjust the upper edge and right edge of the graphic sheet to the large depression on the surface of the control panel frame.

8.Attach the graphic sheet to the control panel frame by rubbing with a soft cloth not to scratch.

9.Tear the small backing paper from the ribbon cable of the mem- brane switch.

10.Insert the two (2) hole of the ribbon cable into the two (2) pins of the control panel frame (rear side).

11.Attach the ribbon cable to the control panel frame rear side.

12.Place the edge of the membrane switch’s ribbon cable on the lower portion of the liquid crystal display.

13.Insert the rubber connector into the long slit on the control panel frame.

14.Reinstall the control unit to the control panel frame with the three

(3) screws.

NOTE: Do not contact the conductor portion of the ribbon cable (edge) and the rubber connector directly with your fin- gers. This is to avoid oxidized.

Control panel frame

Small backing

Slit

paper


Ribbon


cable


Small


depression

Graphic sheet

Membrane

Large


switch

depression


Control panel frame

Liquid crystal


(Rear side)

Long slit


display


Conductor portions

Ribbon cable

Pin


of membrane


switch

Rubber connector


Figure C-2. Graphic Sheet and Membrane Switch Replacement

11 – 3

Page 26
Image 26
Sharp R-216LS Control Panel Assembly Removal, Graphic Sheet and Membrane Switch Replacement, Trol Panel Assembly Removal

R-216LS specifications

The Sharp R-216LS is a versatile microwave oven that combines affordability with a range of features designed to enhance your cooking experience. Compact yet powerful, this model is especially suitable for small kitchens or dorm rooms, where space is at a premium.

One of the standout features of the Sharp R-216LS is its impressive 800 watts of cooking power. This ensures quick and efficient heating, allowing users to prepare meals in a fraction of the time compared to conventional ovens. The microwave also features a variety of power levels, providing flexibility for different types of cooking and reheating tasks, from defrosting frozen food to cooking delicate items like baked goods.

The R-216LS comes equipped with a spacious 20-liter capacity, which is surprisingly roomy for its size. This allows for ample space to heat up large dishes or multiple servings at once. The interior is designed with easy cleaning in mind, featuring a non-stick coating that prevents food from adhering to the surfaces and simplifies maintenance.

In terms of usability, the Sharp R-216LS boasts a user-friendly interface with straightforward knobs and buttons. It includes a timer and a range of pre-programmed cooking options, enabling users to cook a variety of foods with just the touch of a button. This is particularly beneficial for those new to microwave cooking or for busy individuals looking to save time.

The microwave also incorporates advanced technologies, including inverter microwave technology, which provides a continuous stream of cooking power for more even heating and defrosting. This ensures that your food is cooked thoroughly without the risk of hot and cold spots.

Safety is another priority in the design of the R-216LS. It features a child safety lock, which prevents accidental operation, making it a perfect choice for families with young children. The model also has an automatic shut-off feature, ensuring that the microwave turns off when not in use.

In summary, the Sharp R-216LS is a compact microwave that offers a blend of power, convenience, and safety features, making it an excellent choice for anyone seeking a reliable cooking appliance. Whether for reheating leftovers, cooking meals, or defrosting ingredients, this microwave is designed to meet the diverse needs of modern kitchens. With its combination of thoughtful design and functionality, the R-216LS stands out as a worthy investment for those looking for efficiency and performance in their cooking appliances.