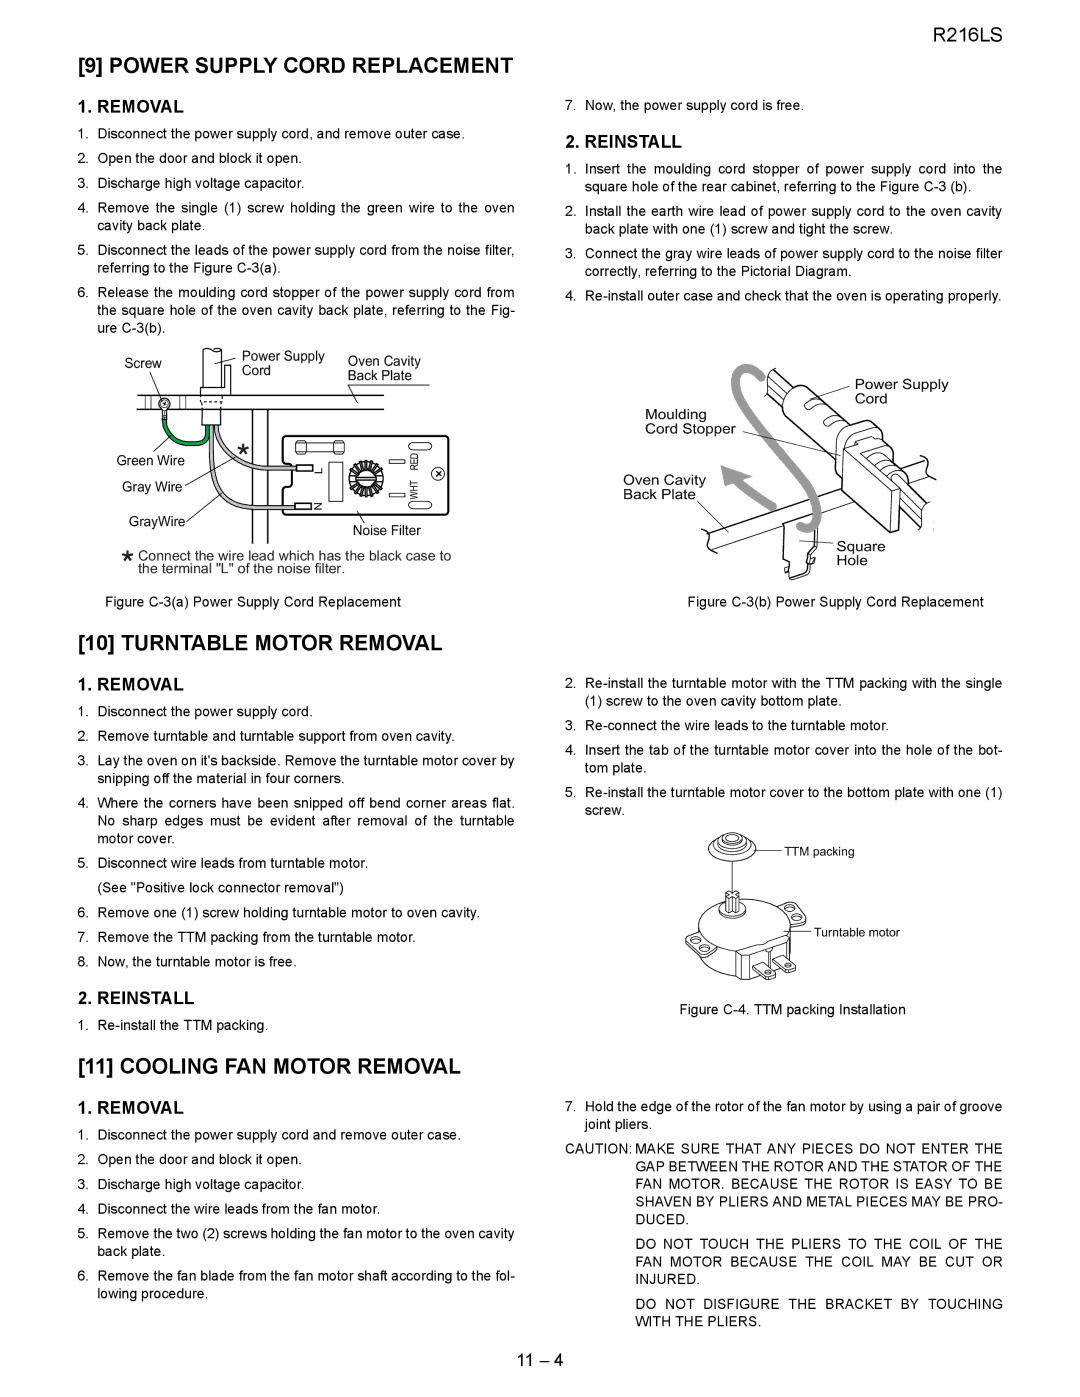
[9] POWER SUPPLY CORD REPLACEMENT

1. REMOVAL

1.Disconnect the power supply cord, and remove outer case.

2.Open the door and block it open.

3.Discharge high voltage capacitor.

4.Remove the single (1) screw holding the green wire to the oven cavity back plate.

5.Disconnect the leads of the power supply cord from the noise filter, referring to the Figure C-3(a).

6.Release the moulding cord stopper of the power supply cord from the square hole of the oven cavity back plate, referring to the Fig- ure C-3(b).

Screw

Power Supply

Oven Cavity

Cord


Back Plate


Green Wire

L

RED


Gray Wire


WHT


N


GrayWire


Noise Filter


Connect the wire lead which has the black case to the terminal "L" of the noise filter.

Figure C-3(a) Power Supply Cord Replacement

[10] TURNTABLE MOTOR REMOVAL

1. REMOVAL

1.Disconnect the power supply cord.

2.Remove turntable and turntable support from oven cavity.

3.Lay the oven on it's backside. Remove the turntable motor cover by snipping off the material in four corners.

4.Where the corners have been snipped off bend corner areas flat. No sharp edges must be evident after removal of the turntable motor cover.

5.Disconnect wire leads from turntable motor. (See "Positive lock connector removal")

6.Remove one (1) screw holding turntable motor to oven cavity.

7.Remove the TTM packing from the turntable motor.

8.Now, the turntable motor is free.

2. REINSTALL

1. Re-install the TTM packing.

[11] COOLING FAN MOTOR REMOVAL

1. REMOVAL

1.Disconnect the power supply cord and remove outer case.

2.Open the door and block it open.

3.Discharge high voltage capacitor.

4.Disconnect the wire leads from the fan motor.

5.Remove the two (2) screws holding the fan motor to the oven cavity back plate.

6.Remove the fan blade from the fan motor shaft according to the fol- lowing procedure.

R216LS

7. Now, the power supply cord is free.

2. REINSTALL

1.Insert the moulding cord stopper of power supply cord into the square hole of the rear cabinet, referring to the Figure C-3 (b).

2.Install the earth wire lead of power supply cord to the oven cavity back plate with one (1) screw and tight the screw.

3.Connect the gray wire leads of power supply cord to the noise filter correctly, referring to the Pictorial Diagram.

4.Re-install outer case and check that the oven is operating properly.

Power Supply

Cord

Moulding

Cord Stopper

Oven Cavity

Back Plate

Square

Hole

Figure C-3(b) Power Supply Cord Replacement

2.Re-install the turntable motor with the TTM packing with the single

(1) screw to the oven cavity bottom plate.

3.Re-connect the wire leads to the turntable motor.

4.Insert the tab of the turntable motor cover into the hole of the bot- tom plate.

5.Re-install the turntable motor cover to the bottom plate with one (1) screw.

TTM packing

Turntable motor

Figure C-4. TTM packing Installation

7.Hold the edge of the rotor of the fan motor by using a pair of groove joint pliers.

CAUTION: MAKE SURE THAT ANY PIECES DO NOT ENTER THE GAP BETWEEN THE ROTOR AND THE STATOR OF THE FAN MOTOR. BECAUSE THE ROTOR IS EASY TO BE SHAVEN BY PLIERS AND METAL PIECES MAY BE PRO- DUCED.

DO NOT TOUCH THE PLIERS TO THE COIL OF THE FAN MOTOR BECAUSE THE COIL MAY BE CUT OR INJURED.

DO NOT DISFIGURE THE BRACKET BY TOUCHING WITH THE PLIERS.

11 – 4

Page 27
Image 27
Sharp R-216LS service manual Power Supply Cord Replacement, Turntable Motor Removal, Cooling FAN Motor Removal

R-216LS specifications

The Sharp R-216LS is a versatile microwave oven that combines affordability with a range of features designed to enhance your cooking experience. Compact yet powerful, this model is especially suitable for small kitchens or dorm rooms, where space is at a premium.

One of the standout features of the Sharp R-216LS is its impressive 800 watts of cooking power. This ensures quick and efficient heating, allowing users to prepare meals in a fraction of the time compared to conventional ovens. The microwave also features a variety of power levels, providing flexibility for different types of cooking and reheating tasks, from defrosting frozen food to cooking delicate items like baked goods.

The R-216LS comes equipped with a spacious 20-liter capacity, which is surprisingly roomy for its size. This allows for ample space to heat up large dishes or multiple servings at once. The interior is designed with easy cleaning in mind, featuring a non-stick coating that prevents food from adhering to the surfaces and simplifies maintenance.

In terms of usability, the Sharp R-216LS boasts a user-friendly interface with straightforward knobs and buttons. It includes a timer and a range of pre-programmed cooking options, enabling users to cook a variety of foods with just the touch of a button. This is particularly beneficial for those new to microwave cooking or for busy individuals looking to save time.

The microwave also incorporates advanced technologies, including inverter microwave technology, which provides a continuous stream of cooking power for more even heating and defrosting. This ensures that your food is cooked thoroughly without the risk of hot and cold spots.

Safety is another priority in the design of the R-216LS. It features a child safety lock, which prevents accidental operation, making it a perfect choice for families with young children. The model also has an automatic shut-off feature, ensuring that the microwave turns off when not in use.

In summary, the Sharp R-216LS is a compact microwave that offers a blend of power, convenience, and safety features, making it an excellent choice for anyone seeking a reliable cooking appliance. Whether for reheating leftovers, cooking meals, or defrosting ingredients, this microwave is designed to meet the diverse needs of modern kitchens. With its combination of thoughtful design and functionality, the R-216LS stands out as a worthy investment for those looking for efficiency and performance in their cooking appliances.