VL-Z5E VL-Z3E
English
Specifications are subject to change without notice
Trademarks
Information for Australia/New Zealand Only
Contents
Useful Features Advanced Features
Using the Mode Screens
Recording in LP Long Play Recording Mode
Displaying the Manual Setting Screen
Contents
Supplied Accessories
Precautions
What is dew formation?
Dew Formation
Precautions Dirty Video Heads
Using a Cleaning Tape Commer- cially Available
Remove the cleaning tape
Causes of video head clogging
Part Names
Operation References
DV terminal pp Tripod socket
Operation References
Pp , 63, 64
Pp , 51
Pp , 9
Battery is almost depleted. Replace it with
Fully charged battery pack see pages 6
Cleaned see
Battery is almost depleted when
Card has no images recorded in the format the camcorder can
Card has not been formatted with this camcorder. Format
Selected image cannot be read by this camcorder. Format
You cannot record any image with a file number bigger than
Attaching Removing the Battery Pack
Attaching
Take the battery pack out
Removing
Charging the Battery Pack
Preparation
Open the DC in jack cover
Insert the DC plug into the DC in jack of the camcorder
Powering the Camcorder from an AC Outlet
Hold down the Lock button and set the Power switch to v or w
Perform above, then take out the cassette
Inserting and Removing a Cassette
Inserting
About the write-protect switch
Write-protect Switch Label Clipped corner
Inserting Removing a Card
Close the card slot cover securely
Removing the Memory Battery
Installing the Lithium Batteries
Installing the Memory Battery
Installing the Battery to Remote Control VL-Z5 only
Insert the battery holder back into position
Setting the Date and Time
Hold down the Lock button and set the Power switch to
Press the Display button until the mode screen appears
0 0
Using the Lens Cap
Changing to the 12-hour Time Mode
SE T T I NG
10 3 0 0
Open the hand strap flap 1 and grip strap
Adjusting the Hand Strap
Using the Grip
Pull out the viewfinder completely
Using the Viewfinder
Detaching the Lens Hood
Push in the viewfinder completely
Adjusting the dioptre
Closing the viewfinder
Using the LCD Monitor
Do not use excessive force when moving the LCD monitor
Closing the LCD monitor
LCD monitor rotates 270 vertically
Tips on Recording Positions
Holding the camcorder
Basic posture
Shooting from a high angle
Selecting the Camcorder Mode
Tape Camera mode Tape Playback mode
Card Camera mode Card Playback mode
Camcorder modes
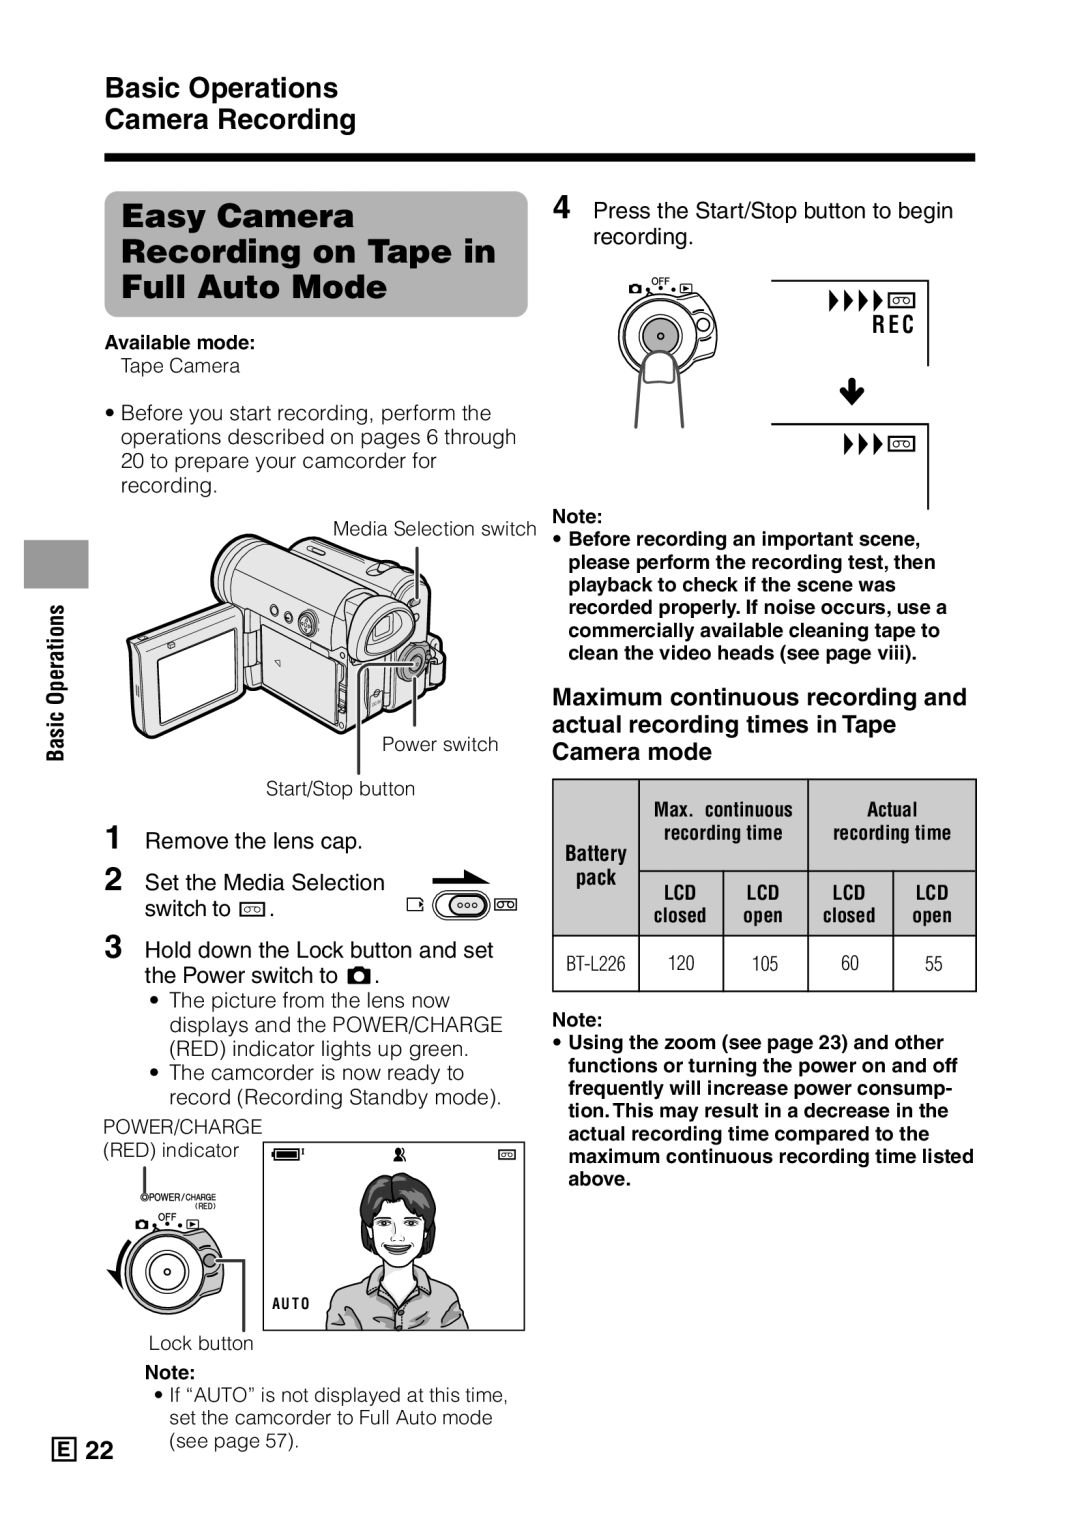
Easy Camera Recording on Tape in Full Auto Mode
Basic Operations Camera Recording
Press the Start/Stop button to begin recording
Operations
To turn the power off
Zooming
To pause recording
Zooming
Power Standby Mode
Turning on/off Backlight
To resume operation
To turn on the backlight
Auto Focus Macro Shots
Available modes Tape Camera, Card Camera
Remaining Battery Power Display
Remaining Recording Time Display
Set the Power switch to OFF without
To stop playback
Watching the playback in the viewfinder
Press l
Volume Control Video Search
Still
Basic Operations Playback
Searching for a Scene Near the Current Tape Position
Press the Display button to turn off Menu screen
Using Earphones Commercially Available, VL-Z5 only
Adjusting the Phones Volume VL-Z5 only
TV or VCR
Watching Playback on a TV
Open the terminal cover on the camcorder see
Control Buttons Using the Mode Screens
To turn off the mode screen
Useful Features
Operation button
DG T L Zoom 4
Using the Menu Screens
Useful Features
Setting the Digital Zoom
Power Zoom
To use optical zoom only
Select OFF in above
Useful Features Camera Recording
Press the Display button to turn off the mode screen
To cancel the backlight compensa- tion function
Backlight Compensation BLC
To cancel the gain-up function
Gain-up
Using
Features
To cancel Fade mode
To use Fade Out only
Quick Return
A R C H
To cancel the still image
Edit Search
Still Recording on Tape
Press the Start/Stop button
To cancel DIS function
Select OFF in above. The z indicator will disappear
Digital Image Stabilization DIS
SO N
Set the Power switch to
Self Recording
Normal self recording
Or u
Self recording with reversed grip
Wide Screen
To return to normal screen
Recording in LP Long Play Recording Mode
To return to SP mode
Audio dubbing is not possible with LP mode recording
AP E SP E E D LP
To cancel Windbreak
When recording
Windbreak
Windbreak function allows you to
Select 12bit in above
Selecting the 16-bit Audio Recording Mode
To return to 12-bit audio recording mode
Using the Remote Control Only supplied with VL-Z5
Example screens shown are for Tape Playback mode
Operating
Activating
Reverse Playback
Slow
Frame Advance
To return to normal playback, press the Play button t
Date D I S P. DA T E
Useful Features Playback
Selecting the Date Time Recording Display
Types
To cancel Picture Effect Playback
Picture Effect Playback
To cancel Rotate Playback
Rotate Playback
Press the centre of the Operation button in above
Press m to begin Rotate Playback
Copying an Image
From Tape to Card
Press the Photo button to copy
Image to the card
MF appears when the on-screen indicators are turned on
Manual Focus
Returning to Auto Focus
Displaying the Manual Setting Screen
Focus setting returns to Auto Focus mode
Advanced Features Camera Recording
To return to Auto White Balance mode
To return to Full Auto mode
White Balance Lock
To return to Auto Iris mode
Manual Iris
To return to Auto Gain mode
Manual Gain
Setting the Camcorder to Full Auto Mode
To cancel the scene setting
Sport a When you want to record a fast-moving subject
Selected scene setting displays on the mode screen
Scene Menu Program AE
Using the Time Code
0 0 0 1 0 2
ME COD E on
OU T
Audio Recording
Audio Dubbing Feature
Advanced Features Playback
To cancel audio dubbing
Audio Dubbing
Press m to begin audio dubbing. Record your narration
To pause audio dubbing
You can select any of the following audio playback modes
Selecting the Audio Playback Mode
AUD I O
Editing
Cutting Unwanted Se- quences
To stop editing
Recording VCR
Recording
Recording from an External Source
Playback VCR or TV
To Record from an External Source
Editing with the DV Terminal IEEE1394
To Record to Video Equip- ment
To Record from Video Equip- ment
Press the Start/Stop button on the camcorder
Press m on the Operation button to begin recording
To stop recording
Using the Camcorder as a Converter
Recording Digital equipment
Press the Record button on the digital equipment
Card Recording
Press the Photo button fully to begin recording
RE C Mode E C Onomy
Digital Still Camera Features
Picture quality Approx. number of images Setting
Selecting the Picture Quality
Self-timer
Digital Still Camera Features Camera Recording
To cancel the countdown
To cancel the self-timer
Menu screen displays when formatting finishes
Formatting a Card
L E no
Setting the File Numbering Method
Digital Still Camera Features
Press the centre of the Operation button
Card Playback
Available Operations during Full-screen Display
During Card Playback, press the Zoom T button to zoom
Digital Still Camera Features Playback
To cancel Playback Zoom
To cancel the protection setting
Press the Display button to finish the setting
Delete Protection
Press j, k,l or m to select the image for delete protection
Delete indicator appears
Deleting Stored Images
Deleting One Stored Image
Press j, k, l or m to select the image to be deleted
To cancel the setting, select no
Delete ALL? indicator appears
Deleting All Stored Images
You can delete all stored images on a card in one operation
Print Order
About Dpof
Assigning Print Order to an Image
Press l or m to select PRI
To cancel the print order for an image
To cancel the print order for all images
Assigning Print Order to All Images
Press l or m to select YES, then
Installing the USB Driver
Transferring Data on Card to Computer
System Requirements
Turn on the PC
Click the USB driver button
Click the Next button
Disconnecting the USB cable
Still Camera Features
Windows Me/2000/XP
Windows
Slide Show Playback
To stop slide show playback
Picture/Backlight Adjustments
Adjusting the Picture
Decrease
Darker Brighter
Adjusting the Backlight
AC K L I GHT BR I GH T
Turning off
Confirmation Sound
Appendix
E P
Setting the Camcorder to Factory Presettings
Demonstration Mode
Demo Mode on
Cancelling
Watching
About Print Image Match- ing L
Useful Information
Hints for Better Shooting
Precautions when using a Mini DV cassette Appendix
Appendix Mini DV Cassette
Copyright Protection
Accidental erasure
SD\ Memory Card and MultiMediaCard\
Removable Storage Care
Battery Pack
This camcorder uses a lithium-ion type battery pack
Charging
Use
Cleaning
Extending battery pack life
AC Adapter
Replacing the Fluorescent Lamp
Appendix Using Your Camcorder Abroad
AC Adapter Supplied Accessory
Troubleshooting
Power Camera mode Symptom Possible cause Suggested solution
Mode Symptom Possible cause
Card mode General Symptom Possible cause Suggested solution
POWER/CHARGE
General Symptom Possible cause Suggested solution
AC Adapter UADP-A016WJZZ
Specifications
Camcorder
VL-Z5 only Phones VOL does not appear with VL-Z3
Tape Camera mode
On-screen Display Index
103
Card Camera mode
104
105
Page
Sharp Corporation