Console Side Mount Method (B)
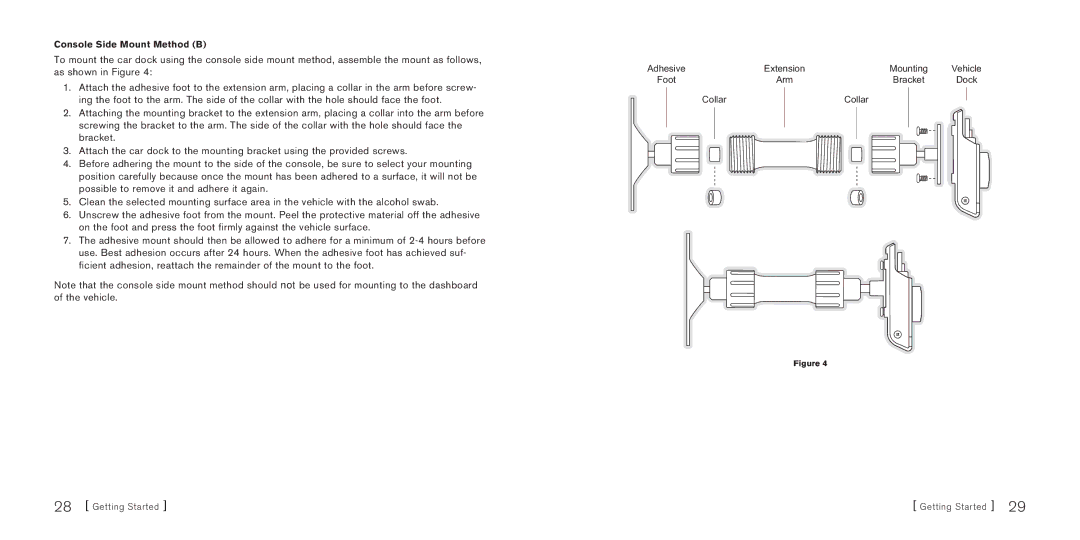
To mount the car dock using the console side mount method, assemble the mount as follows, as shown in Figure 4:
1.Attach the adhesive foot to the extension arm, placing a collar in the arm before screw- ing the foot to the arm. The side of the collar with the hole should face the foot.
2.Attaching the mounting bracket to the extension arm, placing a collar into the arm before screwing the bracket to the arm. The side of the collar with the hole should face the bracket.
3.Attach the car dock to the mounting bracket using the provided screws.
4.Before adhering the mount to the side of the console, be sure to select your mounting position carefully because once the mount has been adhered to a surface, it will not be possible to remove it and adhere it again.
5.Clean the selected mounting surface area in the vehicle with the alcohol swab.
6.Unscrew the adhesive foot from the mount. Peel the protective material off the adhesive on the foot and press the foot firmly against the vehicle surface.
7.The adhesive mount should then be allowed to adhere for a minimum of
Note that the console side mount method should not be used for mounting to the dashboard of the vehicle.
Adhesive |
| Extension |
|
|
|
| Mounting | Vehicle | ||||||
Foot |
| Arm |
|
|
|
| Bracket | Dock | ||||||
|
| Collar |
| Collar |
|
|
| |||||||
|
|
|
|
|
|
|
| |||||||
|
|
|
|
|
|
|
|
|
|
|
|
|
|
|
|
|
|
|
|
|
|
|
|
|
|
|
|
|
|
|
|
|
|
|
|
|
|
|
|
|
|
|
|
|
|
|
|
|
|
|
|
|
|
|
|
|
|
|
|
|
|
|
|
|
|
|
|
|
|
|
|
|
|
|
|
|
|
|
|
|
|
|
|
|
|
|
|
|
|
|
|
|
|
|
|
|
|
|
|
|
|
|
|
|
|
|
|
|
|
|
|
|
|
|
|
|
|
|
|
|
|
|
|
|
|
|
|
|
|
|
|
|
|
|
|
|
|
|
|
|
|
|
|
|
|
|
|
|
|
Figure 4
28 [ Getting Started ] | [ Getting Started ] 29 |
