DCR-DVD610/DVD710 DVD810
Use
Service
Installation
For customers in the U.S.A.
Read this before operating your camcorder
For customers in the U.S.A
Owner’s Record
Battery pack
For the State of California, USA only
Types of the disc you can use in your camcorder
Read this before operating your camcorder
Using the camcorder
Types of Memory Stick you can use in your camcorder
Do not hold the camcorder by the following parts
About menu items, LCD panel, viewfinder, and lens
About language setting
On recording
About disposal/transfer DCR- DVD810
About the marks used in this manual
About this manual
Table of Contents
Troubleshooting
Shooting
Subject examples and solutions
Enjoy using various Media according to your needs
Selecting media
Dubbing from one type of media to another
Media for your camcorder
Disc features
Recording format for DVD-RW
Enjoying with Your Camcorder
Media for your camcorder
Recording time of movies
Media type
Do you want to delete or edit images on your camcorder? Yes
Using your camcorder
Disc? Yes
Available functions depend on the selected media
Features of a finalized disc depend on disc type
Using your camcorder
Playback compatibility
Viewing images on a TV p
Home and Option
Settings category*1
Categories and items of the Home Menu Camera category
View Images category
Using the Home Menu
Home and Option Taking advantage of two types of menus
To hide the Home Menu screen
Touch the item you want to know the content
Using the Option Menu
To deactivate the Help
Touch Help again in step
Checking supplied items
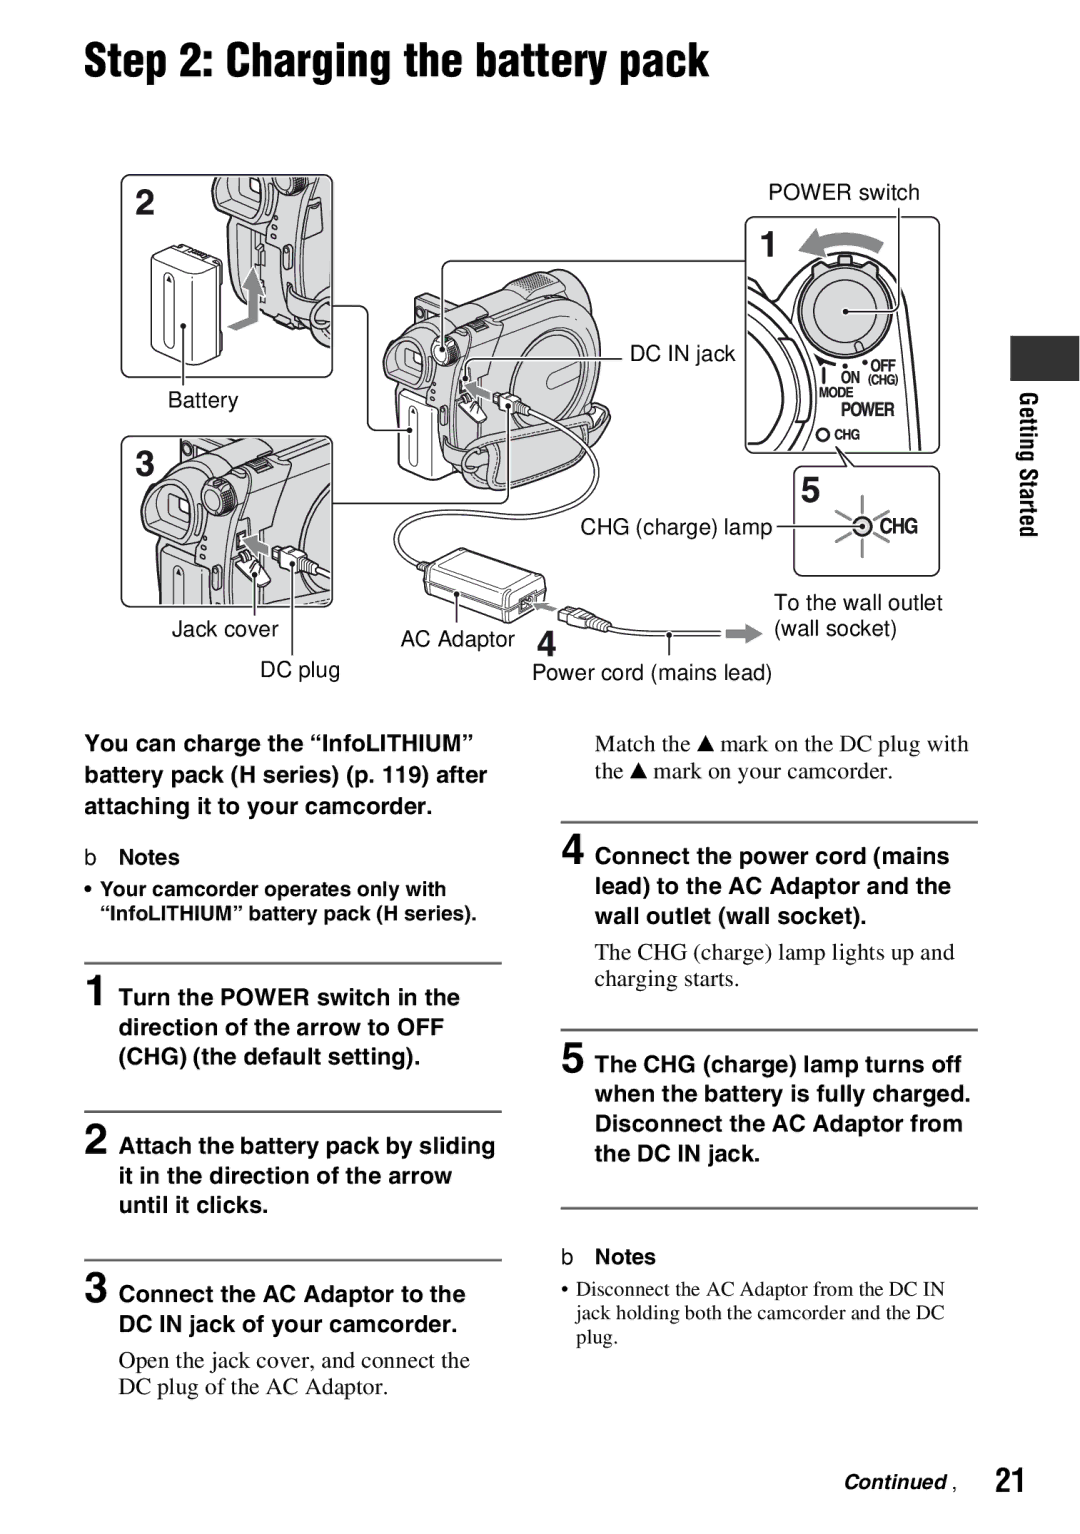
CHG charge lamp lights up and charging starts
Charging the battery pack
DC in jack of your camcorder
Open the jack cover, and connect DC plug of the AC Adaptor
Charging the battery pack
Playing time
When recording on a disc
DCR-DVD710/DVD810
Getting Started
290 330 NP-FH100 650 745
When playing a disc
To turn off the power
Turning the power on, and setting the date and time
Touch Home t Settings t CLOCK/ Lang t Clock SET
Set Y year with Select M with / , then set the month with
Changing the language setting
Making adjustments before recording
Adjusting the LCD panel
Slide the Lens Cover switch to Open
Adjusting the viewfinder
Adjust the viewfinder to your eyesight
Fastening the grip belt
Selecting media for movies
Selecting media
DCR-DVD610/DVD710
DCR-DVD810
Selecting media for still images DCR-DVD810
Touch YES When Completed. appears, touch
To confirm the selected media
Touch Home t Manage Media t Photo
Inserting a disc
Inserting a disc or a Memory Stick PRO Duo
DVD-RW/DVD+RW
DVD-R/DVD+R DL
DVD-RW
Touch YES When Completed. is displayed, touch
DVD+RW
To remove the disc
Inserting a disc or a Memory Stick PRO Duo
Inserting a Memory Stick PRO Duo
Open the LCD panel Insert the Memory Stick PRO Duo
Figures in are minimum recording time
To remove the Memory Stick PRO Duo
Again
To stop recording, press START/STOP
Touch the tab and the movie to be played back
Start playback Movies
Touch the tab and the still image to be played back
Still images
Menu settings during Easy Handycam operation
To cancel Easy Handycam operation
Invalid buttons during Easy Handycam operation
To view movies on a disc on other devices Finalize
START/STOP C
Recording
Recorded
To stop recording, press START/STOP again
Zooming
Recording
Recording in mirror mode
Adjusting the exposure for backlit subjects
Starting to record quickly Quick on
Recording in dark places NightShot plus
Recording
Playback
Default setting, images in the internal memory are played
Start playback
Playback
Touch the tab and the movie to be played back
Touch the tab and the still image to be played back
To adjust the sound volume of movies
Searching for scenes with pinpoint accuracy Film Roll Index
Searching for desired scenes by a face Face Index
Searching for desired images by date Date Index
Using PB zoom
You can efficiently search for desired images by date
Recording dates of images are displayed on the screen
Playing back a series of still images Slide show
V connecting cable supplied
When your TV is connected to a VCR
V connecting cable with S Video optional
Playing the images on a TV
Recording/Playback
You can delete images on the media p
Item list
You can edit the images on the media p
You can create and edit a Playlist p
Deleting images
Touch t YES When Completed. appears, touch
Deleting movies
To delete all movies at one time
Deleting still images
Deleting images
To delete the most recently recorded movie
To delete all still images at one time
Capture
Touch Home t Others t Photo
Photo Capture screen appears
Editing
Selected movie is played back
Capturing a still image from a movie
Movie pauses Play and pause toggles as you press
Touch
Dubbing/copying images to media within your camcorder
Dubbing movies
Touch DUB by select Touch the movie to be dubbed
To dub all the movies recorded on the same day at one time
Copying still images DCR- DVD810
To dub all movies in a Playlist p
To back up movies that have not been backed up yet
Touch Copy by select Touch the still image to be copied
Touch Home t Others t Photo Copy
Dividing movies
Touch at the point where you want to divide
To add all the movies to the Playlist
Creating the Playlist
Touch Home t Others t Playlist
Edit
Playing the Playlist
Creating the Playlist
To erase unnecessary movies from the Playlist
Touch Home t View Images t Playlist
To change the order within the Playlist
Touch t YES When Completed. appears, touch
Connect to the input jack of the other device
Connecting a device with the A/V connecting cable
Turn on your camcorder
Connecting a device with the USB cable
Press View Images
Insert the recording media in the recording device
Printing still images PictBridge compliant printer
USB Select screen appears on the screen
Touch Print
To finish printing
Touch Exec t YES When Completed. appears, touch
Touch the still image to be printed
Still image selection screen appears again
Manage Media category
You can select the media for movies p
You can select the media for still images p
Operation flow
Finalizing is required depending on the type of disc
Utilizing Media
Make a new recording
To add movies to a finalized disc p.74
Finalizing a disc
When finalizing is completed, touch
To select a DVD menu style
Finalize
Playing a disc on a computer
Playing a disc on other devices
Volume label of the disc
Date when the disc was first used is recorded
Touch Home t Manage Media t Media Info
Formatting the disc
Formatting media
If you format a finalized disc
On a finalized disc. Even after formatting
Touch Home t Manage Media t Media Format t Disc
When using a DVD-RW Video mode Unfinalizing
When using a DVD+RW
Touch YES t YES When Completed. appears, touch
Recording additional movies after finalizing
Finding the right disc
Touch Home t Manage Media t Disc
Select Guide
Repairing the image database file
Screen of formatting the internal memory appears
Empty screen appears
Change the setting, then touch
Touch Settings Touch the desired setup item
Turn on your camcorder, then press Home
If the item is not on the screen, touch / to change
SOUND/DISP SET*3 p
List of the Settings category items Movie Settings p
CLOCK/ Lang p
General SET p
How to set
Audio Mode DCR
Nightshot Light
Wide Select
Steadyshot
Digital Zoom
Guideframe
Remaining SET
SUB-T Date
Movie Settings
Index SET
Image Size
Reset
Flash Mode DCR
Flash Level DCR
Series
Data Code
Photo Settings
Items to customize the display
DATE/TIME
Zoom Link
Display
6IMAGES
12IMAGES
Beep
Volume
LCD Bright
LCD Color
TV Type
Home Menu t Default settings are marked with B
Disp Output
LCD Panel
Clock SET
Demo Mode
Area SET
DST SET/SUMMERTIME
Quick on Stby
5min
Never
Activating functions using the Option Menu
Viewing items on the Option Menu
Recording items on the Option Menu
Focus
Functions set in the Option Menu
Spot Focus
Tele Macro
Scene Selection
Exposure
Twilight
Candle
Portrait
Landscape
Spotlight
Outdoor
If you press START/STOP, the setting is cleared
Fader
White Fader Black Fader
BLT-IN Zoom MIC
SELF-TIMER
Micref Level
Sepia
Using a Macintosh computer
Installing the software
Environment for using Picture Motion Browser
What you can do with Windows computer
Installation procedure
What you can do with Windows computer
If the screen does not appear
Connecting your camcorder to a computer
Recommended USB cable connection
To disconnect the USB cable
100
Troubleshooting
Buttons do not work
Option button is not displayed
Troubleshooting
Batteries/Power sources
102
Media
LCD screen/Viewfinder
Recording
104
Movie aspect ratio 169/43 cannot be changed
Recording stops
Auto focus does not function
Steadyshot does not function
106
Playing back images on your camcorder
Playing back a disc on other devices
Editing images on your camcorder
Playing back a Memory Stick PRO Duo on other devices
Connecting/Dubbing to other devices
Connecting to a computer
108
109
Troubleshooting
Functions that cannot be used simultaneously
Your camcorder is not recognized by the computer
110
Self-diagnosis display/Warning indicators
Battery level warning Slow flashing
High temperature warning Slow flashing
Still image recording
112
Description of warning messages
Media
113
PictBridge compliant printer
Others
Power supply
Using your camcorder abroad
114
On TV color systems
Setting to the local time
115
World time difference
Image database files
116
Movie files MPEG2 files
Still image files Jpeg files
About the disc
Maintenance and precautions
Use of double-sided discs
Recording on the a side
118
Maintenance and precautions
About the Memory Stick
Care and storage of the discs
What is an InfoLITHIUM battery Pack?
About the InfoLITHIUM battery pack
On image data compatibility
On the Memory Stick Duo adaptor
120
About handling of your camcorder
When not using your camcorder for a long time
On use and care
Moisture condensation
On adjustment of the touch panel
To clean the LCD screen
122
LCD screen
123
Cleaning inside the viewfinder
On the pickup lens
About care and storage of the lens
124
Procedures
System
Specifications
Input/Output connectors
Specifications
126
General
Rechargeable battery pack NP-FH40
AC Adaptor AC-L200/L200B
On trademarks
On GNU GPL/LGPL applied software
128
Quick Reference
Identifying parts and controls
Identifying parts and controls
130
V Remote Connector 48, 62 Connect other optional accessories
To change the battery of the Remote Commander
Remote Commander DCR-DVD710/ DVD810
132
Data Code button
Indicators displayed during recording/playback
Playback folder When Photo Media SET is
Slide show button Visual Index button 35
Indicators when you made changes
Indicators displayed during recording/playback
134
Data code during recording
135
Glossary
136
Index
137
Index
138
Page
140
Paso 1 Comprobación de los componentes incluidos
Paso 2 Recarga de la batería
Desconecte el adaptador de ca de la toma DC
Spanish Quick Guide/Guía rápida en español
Paso 2 Recarga de la batería Continuación
142
Para extraer la batería
Tiempo de recarga
Al grabar en un disco
Tiempo de reproducción
Al reproducir un disco
144
Imagen fija para tomar
Película para grabar películas
Toque Home t Ajustes t AJ.REL./ IDIOM. t AJUS.RELOJ
Aparecerá la pantalla AJUS.RELOJ
146
Paso 4 Realización de ajustes antes de la grabación
Cambio del ajuste de idioma
Apertura de la tapa del objetivo
Ajuste del visor
147
Ajuste de la correa de sujeción
Que desaparezca
148
Paso 5 Selección de un medio
Selección de un medio para películas
Toque Home t Gestionar Soporte t
Selección de un medio para imágenes fijas DCR-DVD810
149
AJ.SOPORTE Foto
Toque el medio deseado
150
Paso 6 Inserción de un disco o un Memory Stick PRO Duo
Inserción de un disco
Verifique que la videocámara esté encendida
Toque la opción que desee en la pantalla
Para extraer el disco
Luego toque
Toque SÍ Cuando aparezca Finalizado
152
Inserción de un Memory Stick PRO Duo
Abra el panel de LCD Inserte el Memory Stick PRO Duo
Para extraer el Memory Stick PRO Duo
153
154
Grabación
Se oye el clic del obturador
155
Grabado la imagen
Español
156
Reproducción
Iniciar reproducción
157
Toque la ficha y la película que desea reproducir
Toque la ficha y la imagen fija que desee reproducir
Ajustar el volumen del sonido de las películas
158
Reproducción Continuación