4-4. MANUAL MODE

4-4-1. Outline of the function

The Manual mode is designed to perform adjustments and operational checks on the set’s operation according to each individual function.

Usually, no adjustments are made in this mode.

However, the Manual mode is used to clear the memory before performing automatic adjustments in the Overall Adjustment mode.

4-4-2. How to set the Manual mode

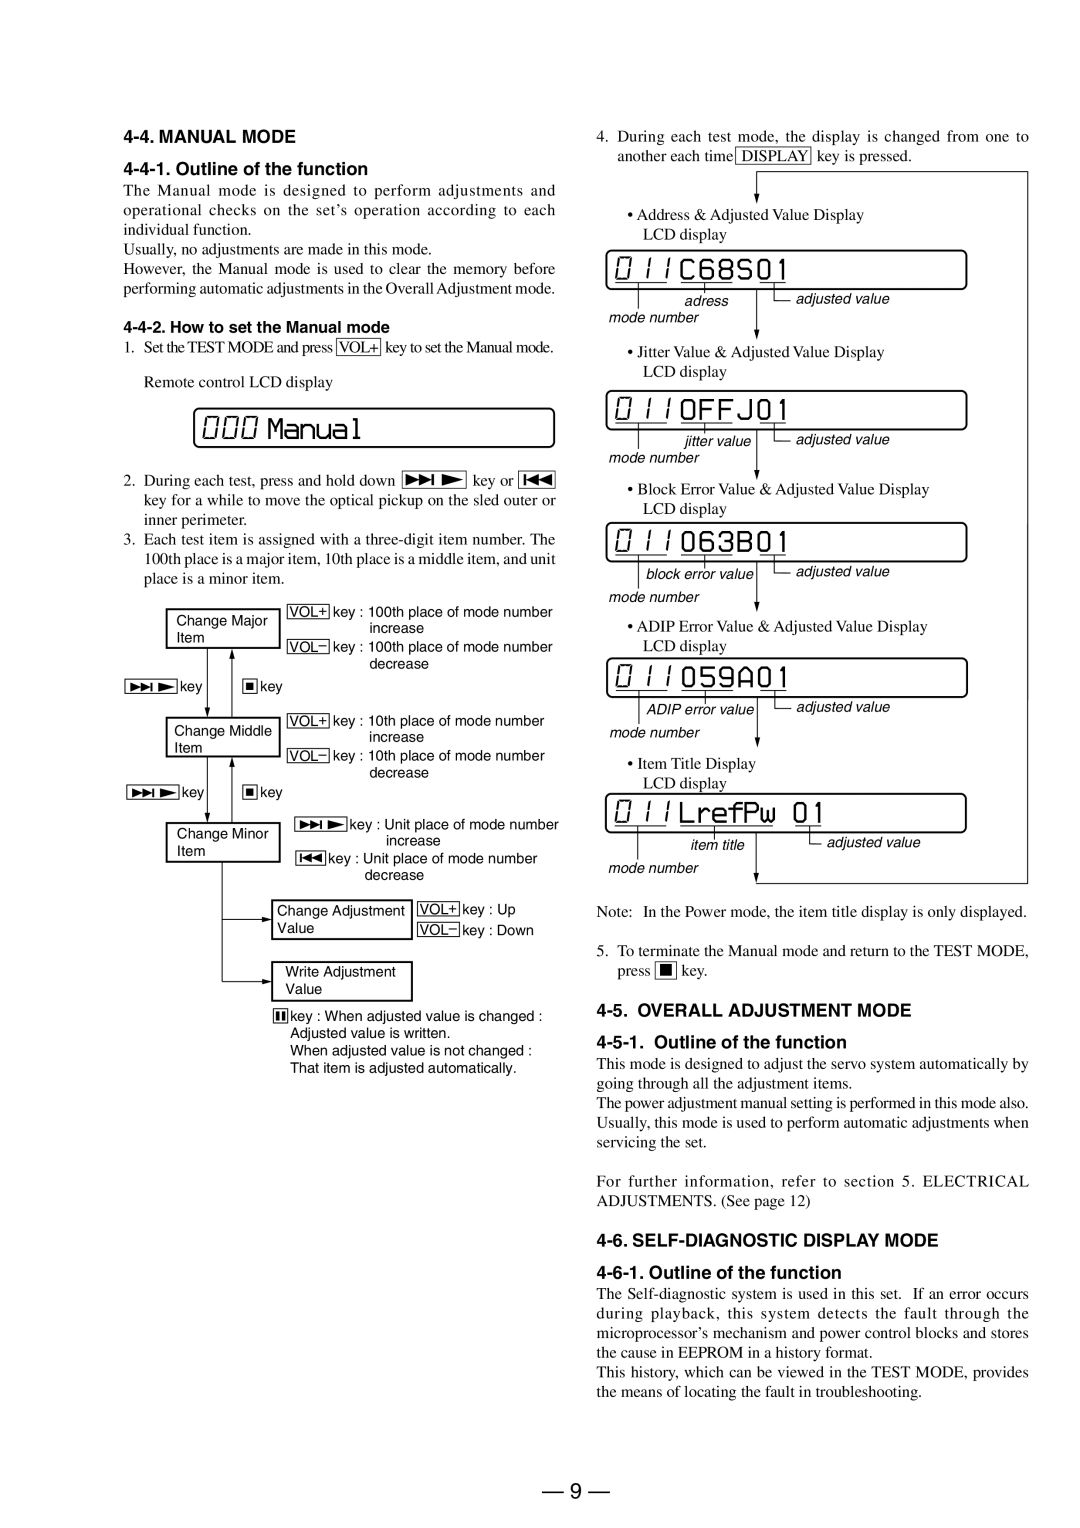
1.Set the TEST MODE and press VOL+ key to set the Manual mode. Remote control LCD display

000Manual

2.During each test, press and hold down > N key or . key for a while to move the optical pickup on the sled outer or inner perimeter.

3.Each test item is assigned with a three-digit item number. The 100th place is a major item, 10th place is a middle item, and unit place is a minor item.

4.During each test mode, the display is changed from one to another each time DISPLAY key is pressed.

Address & Adjusted Value Display LCD display

011C68S01

adress

adjusted value

mode number

Jitter Value & Adjusted Value Display LCD display

011OFFJ01

jitter value

adjusted value

mode number

Block Error Value & Adjusted Value Display LCD display

011063B01


adjusted value

block error value

mode number

Change Major

Item


key


x key


> N


Change Middle


Item


key


x key


> N


Change Minor


Item


VOL+ key : 100th place of mode number increase

VOL– key : 100th place of mode number decrease

VOL+ key : 10th place of mode number increase

VOL– key : 10th place of mode number decrease

>N key : Unit place of mode number increase

.key : Unit place of mode number decrease

ADIP Error Value & Adjusted Value Display LCD display

011059A01


adjusted value

ADIP error value

mode number

Item Title Display LCD display

011 LrefPw 01

item


title

adjusted value


mode number

Change Adjustment


VOL+

key : Up

Value


key : Down


VOL–


Write Adjustment

Value

Xkey : When adjusted value is changed : Adjusted value is written.

When adjusted value is not changed : That item is adjusted automatically.

Note: In the Power mode, the item title display is only displayed.

5.To terminate the Manual mode and return to the TEST MODE, press x key.

4-5. OVERALL ADJUSTMENT MODE

4-5-1. Outline of the function

This mode is designed to adjust the servo system automatically by going through all the adjustment items.

The power adjustment manual setting is performed in this mode also. Usually, this mode is used to perform automatic adjustments when servicing the set.

For further information, refer to section 5. ELECTRICAL ADJUSTMENTS. (See page 12)

4-6. SELF-DIAGNOSTIC DISPLAY MODE

4-6-1. Outline of the function

The Self-diagnostic system is used in this set. If an error occurs during playback, this system detects the fault through the microprocessor’s mechanism and power control blocks and stores the cause in EEPROM in a history format.

This history, which can be viewed in the TEST MODE, provides the means of locating the fault in troubleshooting.

— 9 —

Page 9
Image 9
Sony MX-E500 specifications Manual, 011 C68S01, OFFJ01, 011 063B01, 011 059A01, LrefPw

MX-E500 specifications

The Sony MX-E500 is a remarkable all-in-one audio system designed to deliver high-quality sound and cutting-edge features for music enthusiasts. Known for its powerful performance and user-friendly design, the MX-E500 integrates modern technology with a classic audio experience.

At the heart of the MX-E500 is its robust audio engine, which ensures clarity and depth in sound reproduction. The system is equipped with a high-power amplifier that is capable of producing rich bass and pristine highs, making it suitable for a variety of music genres. With a total power output that rivals larger setups, the MX-E500 fills any room with immersive audio.

One of the standout features of the MX-E500 is its Bluetooth connectivity, which allows users to wirelessly stream music from their smartphones, tablets, or computers. This feature makes it incredibly convenient to play music from various sources without the hassle of cables. Additionally, the system supports multiple Bluetooth connections, enabling users to pair to different devices effortlessly.

The MX-E500 also includes a built-in CD player, allowing users to enjoy their favorite physical albums. The incorporation of a USB port provides further flexibility, permitting playback from USB drives loaded with digital music files. This versatility ensures that regardless of the media format, users can enjoy their favorite tunes seamlessly.

Another noteworthy technology featured in the MX-E500 is its customizable sound settings. Users can adjust the equalizer settings to tailor the audio output to their preferences, enhancing the listening experience according to the type of music being played. This personalization enhances the overall audio quality and allows users to optimize their setup according to the room's acoustics.

The design of the MX-E500 is as appealing as its performance. With a sleek, modern aesthetic, the unit can fit into any home decor while making a statement. The intuitive control panel and bright display offer ease of use, making navigation between different modes and settings straightforward.

In summary, the Sony MX-E500 is not just an audio system, but a versatile entertainment hub that combines advanced technology with high-quality sound performance. With its multi-connectivity options, customizable sound features, and elegant design, it stands as a prime choice for anyone looking to enhance their music experience at home or during gatherings.