Temperature and Pressure Relief Valve

Explosion Harzard

Temperature-pressure relief valve must comply with ANSI Z21.22-CSA 4.4 and ASME code.

• Properly sized temperature- pressure relief valve must be installed in opening provided.

• Can result in overheating and excessive tank pressure.

• Can cause serious injury or death.

Manually operate the temperature and pressure relief valve at least once a year to make sure it is working

properly. To prevent water damage, the valve must be pro- perly connected to a discharge line which terminates at an adequate drain. Standing clear of the outlet (discharged water may be hot), slowly lift and release the lever handle on the temperature and pressure relief valve to allow the valve to operate freely and return to its closed position. See Figure 23. If the valve fails to completely reset and continues to release water, immediately shut off the manual gas control valve and the cold water inlet valve and call a qualified technician.

TEMPERATURE AND PRESSURE

RELIEF VALVE

MANUAL RELIEF

VALVE

DISCHARGE LINE TO DRAIN

FIGURE 23.

MAINTENANCE OF YOUR WATER HEATER

Replacement Parts

IMPORTANT: The following maintenance procedures are for the FVIR System components and should be performed by a qualified technician.

Replacement parts may be ordered through your plumber or the local distributor. Parts will be shipped at prevailing prices and billed accordingly. When ordering replacement parts, always have the following information ready:

1.model, serial, and product number

2.type of gas

3.item number

4.parts description

See Repair Parts Section for a list of available repair parts.

Removing the Manifold/Burner Assembly

1.Turn off the gas supply to the water heater at the manual gas shut-off valve. This valve is typically located beside the water heater. Note the position of the shut-off valve in the open/on position then proceed to turn it off (Figure 3).

2.Disconnect power supply to the heater.

3.Remove the outer door. Remove the 2 screw securing the manifold door assembly to the skirt.

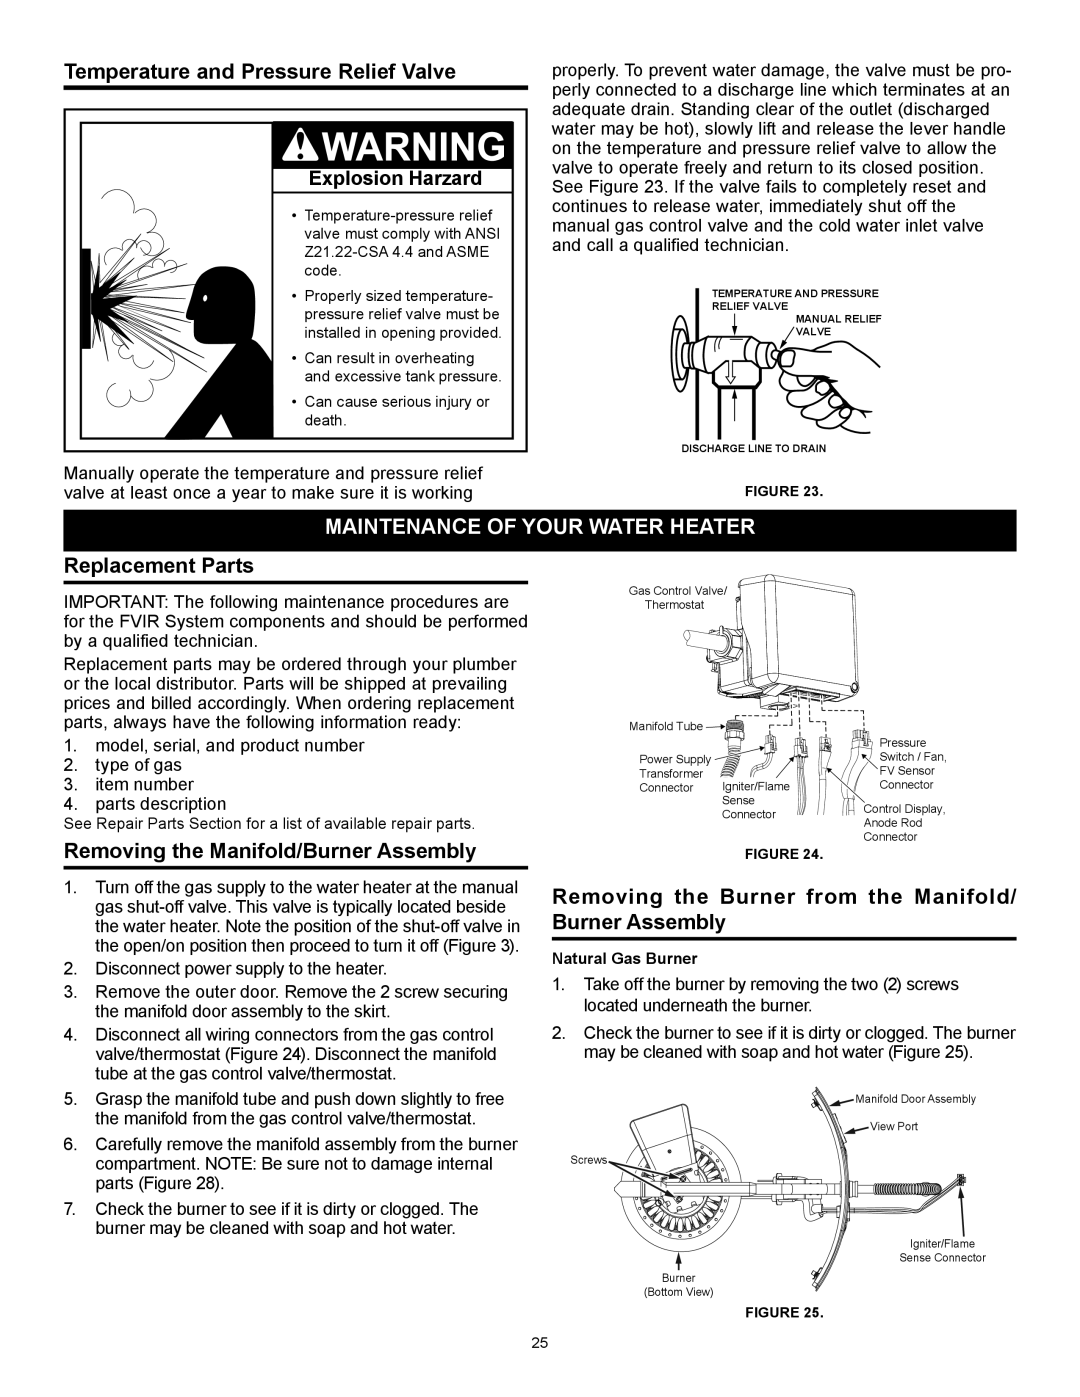
4.Disconnect all wiring connectors from the gas control valve/thermostat (Figure 24). Disconnect the manifold tube at the gas control valve/thermostat.

5.Grasp the manifold tube and push down slightly to free the manifold from the gas control valve/thermostat.

6.Carefully remove the manifold assembly from the burner compartment. NOTE: Be sure not to damage internal parts (Figure 28).

7.Check the burner to see if it is dirty or clogged. The burner may be cleaned with soap and hot water.

Gas Control Valve/

Thermostat

Manifold Tube


Pressure

Power Supply


Switch / Fan,

Transformer


FV Sensor

Connector

Igniter/Flame

Connector


Sense

Control Display,


Connector


Anode Rod


Connector

FIGURE 24.

Removing the Burner from the Manifold/ Burner Assembly

Natural Gas Burner

1.Take off the burner by removing the two (2) screws located underneath the burner.

2.Check the burner to see if it is dirty or clogged. The burner may be cleaned with soap and hot water (Figure 25).

Manifold Door Assembly

View Port

Screws

Igniter/Flame

Sense Connector

Burner

(Bottom View)

FIGURE 25.

25

Page 25
Image 25
State Industries GP 6 40YPC T 100, GP 6 50YPC T 100 Maintenance of Your Water Heater, Replacement Parts, Explosion Harzard

317998-002, GP 6 50YPC T 100, GP 6 40YPC T 100 specifications

State Industries has long been at the forefront of technological advancements and innovative design in the industrial market. The company has developed a range of high-efficiency products designed for various applications, including the GP 6 40YPC T 100 and GP 6 50YPC T 100 models, as well as the 317998-002 component. Each product in this lineup is characterized by specific features and cutting-edge technologies tailored to meet diverse operational needs.

The GP 6 40YPC T 100 model boasts a robust construction aimed at durability and resilience in demanding environments. Its design incorporates advanced materials that resist wear and corrosion, ensuring a prolonged lifespan and reduced maintenance requirements. The model operates efficiently even in high-pressure scenarios, making it suitable for various industrial applications, including manufacturing and processing.

In contrast, the GP 6 50YPC T 100 model is designed with a focus on maximizing performance and energy efficiency. It features an optimized airflow system that enhances heat dissipation, preventing overheating and maintaining operational integrity. This model is ideal for applications that require continuous operation, as it minimizes downtime and maximizes productivity. Additionally, the GP 6 50YPC T 100 is equipped with smart technology that monitors performance metrics, providing real-time feedback on operational efficiency.

The 317998-002 component serves as a critical element in both models, acting as a versatile interface that integrates seamlessly with existing systems. It is designed to enhance connectivity and facilitate communication between various industrial components, promoting improved efficiency and ease of integration.

Both the GP 6 models and the 317998-002 feature user-friendly interfaces, allowing operators to easily manage and adjust settings. This focus on user experience helps to reduce training time and improve overall operational efficiency. Furthermore, both models adhere to strict industry standards, ensuring reliability and safety in all conditions.

In summary, State Industries' GP 6 40YPC T 100 and GP 6 50YPC T 100 models, along with the 317998-002 component, represent the pinnacle of innovation and reliability in industrial solutions. Their advanced features, technologies, and characteristics make them suitable choices for organizations looking to enhance productivity and operational efficiency in a variety of applications. With a commitment to quality and performance, State Industries continues to set the standard for excellence in the industry.