STR36SP
Proposition 65WARNING
SILCOSIS/RESPIRATORYWARNINGS
Silicosis Warning
Table of Contents
Best Deal! Order via Internet Dealers Only
Parts Ordering Procedures
Order via Fax Dealers Only
Training Checklist
Machine layout, location of components, checking of engine
Daily PRE-OPERATION Checklist
Daily PRE-OPERATION Checklist
STR36SP-SERIES Safety Message Alert Symbols
You can be Injured if you do not follow these directions
Always wear approved respiratory protection
STR36SP-SERIES Safety Message Alert Symbols
Always wear approved eye and hearing protection
Do not operate or service this equipment
Fatigue, illness or taking medicine
Always keep the work area well organized
STR36SP-SERIES Rules for Safe Operation
Lifting the Ride-On Trowel
STR36SP-SERIES Rules for Safe Operation
Towing Safety Precautions
Battery
Transporting
Emergencies
Maintenance Safety
Always know the location of the nearest first aid kit
STR36SP-SERIES Operation and Safety Decals
Machine Safety Decals
STR36SP-SERIES- Specifications Trowel
TBD
STR36SP-SERIES- Specifications Engine
STR36 Engine Specifications
STR36SP-SERIES General Information
STR36SP-SERIES Controls and Indicators
STR36SP-SERIES Controls and Indicators
Safety Stop Switch Shuts down engine when seat is empty
Mixture
STR36SP-SERIES Basic Engine
Element
Flow of fuel
Control Handle Assembly
STR36SP-SERIES NEW Machine Setup Instructions
Trowel Pre-Set Up Instructions
Seat Assembly
Engine Oil Level Always check engine oil Before Each USE
Gearbox Oil Level
STR36SP-SERIES Operation
STR36SP-SERIES Operation
Steering
STR36SP-SERIES Maintenance
STR36SP-SERIES Maintenance
Removing the Drive Belt
Checking The Drive Belt
Have a 3/4 X 1 X 3-1/4 inch wooden block available
Wooden Block
STR36SP-SERIES- Maintenance
Reinstall the spare belt carrier and the drive belt guard
CV-Joint
STR36SP-SERIES- Maintenance
Spare Drive Belt Replacement
Drive System Theory of Operation
Torque Converter/Variable Pitch Pulley Drive Pulley
Blade Pitch
How It Works Figure Condition a Engine Idling
Clutch
Matching Blade Pitch for Both Sets of Blades
Trowel Arm adjustment Procedure
Stabilizer Ring Removal
Trowel Blade Removal
Trowel Arm Removal
Remove the trowel arm from the spider plate
Spider Plate Hex Head Bolt Zerk Fitting
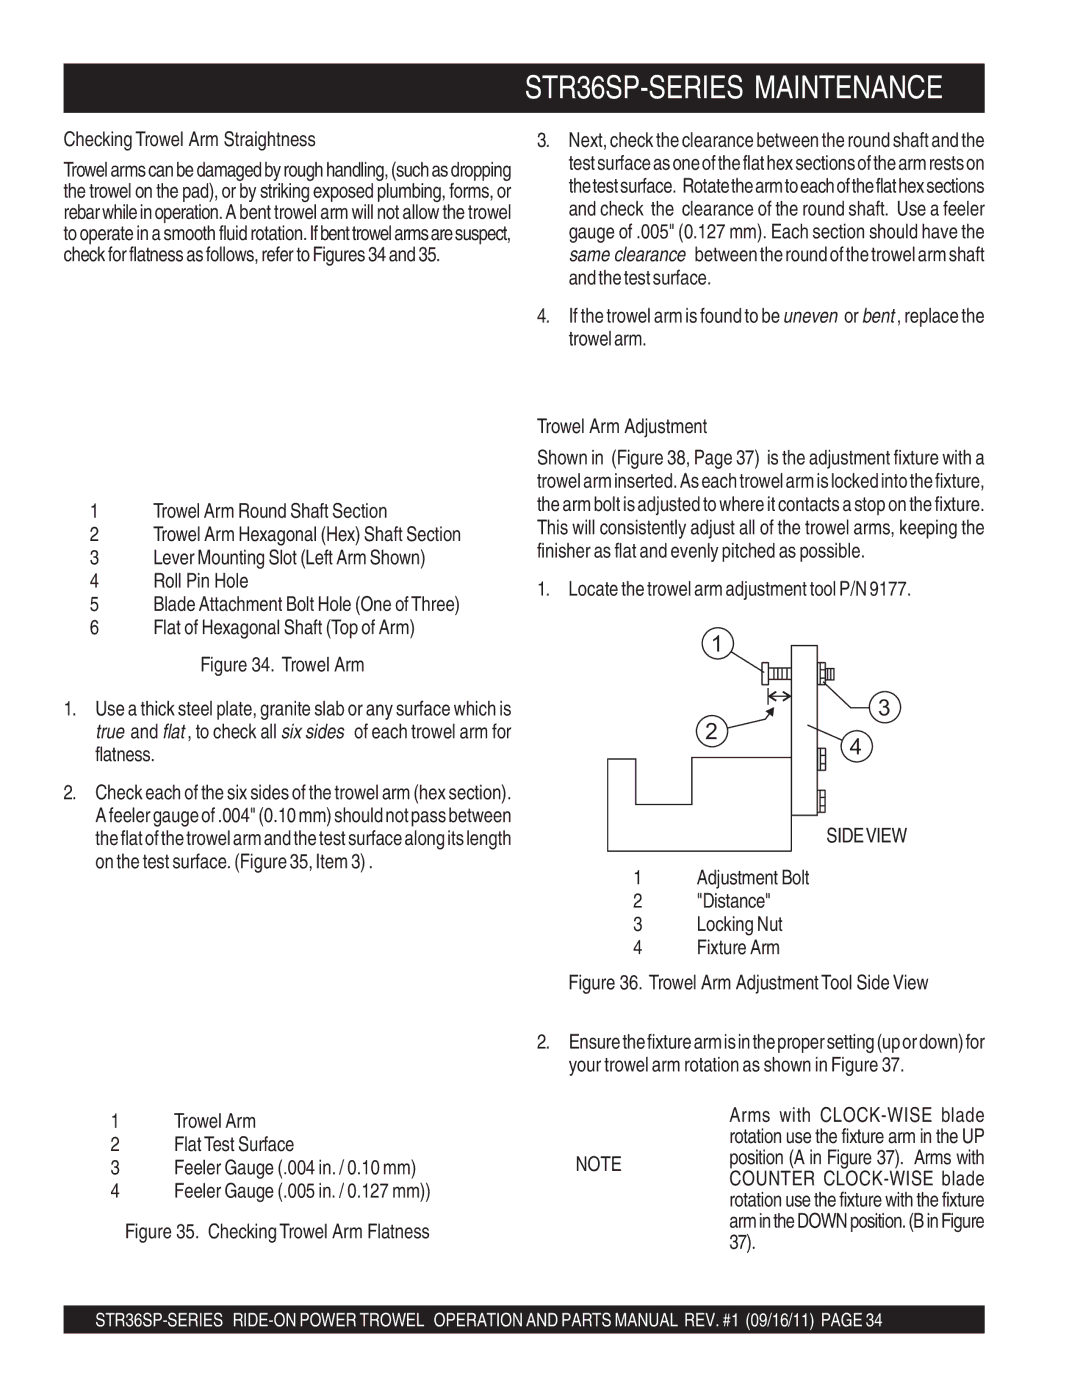
Trowel Arm Adjustment
Checking Trowel Arm Straightness
Trowel Arm Adjustment Setup
Re-Assembly
Installing Pans Onto Finisher Blades
Decommissioning Trowel/Components
STR36SP-SERIES -TROUBLESHOOTING Engine
STR36SP-SERIES -TROUBLESHOOTING Engine
STR36SP-SERIES-TROUBLESHOOTING Trowel
Troubleshooting
STR36SP-SERIES-TROUBLESHOOTING Trowel
Troubleshooting
STR36SP-SERIES Notes
STR36SP-SERIES Explanation of Codes in Remarks Column
Xxxxx only Not Used on
STR36SP-SERIES Suggested Spare Parts
STR36SP-SERIES Decals
Decals
DECAL, AL. Pitch RH TBD DECAL, AL. Pitch LH
DECAL, Spring Safety
DECAL, Powder Coated TBD DECAL, Stow
DECAL, Protective Clothing
STR36SP-SERIES Pivot ASSY. RIGHT/LEFT
Pivot ASSY. RIGHT/LEFT
Rocker BLOCK, 1.0 Hole
WASHER, LOCK, 3/8 MED
BAR, 1 Control Pivot
ARM, Pivot Right Hand
STR36SP-SERIES Steering Handles ASSY. Left and Right
Steering Handles ASSY, Left and Right
HANDLE, Tube
GRIP, Handle
ROD END, 3/8-24 Male RH
HANDLE, STEERING, Lower
STR36SP-SERIES Steering Control ASSY. Left and Right
Steering Control ASSY., Left and Right
WASHER, Flat 1/2 SAE
Assist ASSEMBLY, Steering
ROD END, 1/2-20 Male RH
WASHER, Lock 3/8 MED
STR36SP-SERIES Gearbox ASSY. Right Side
Gearbox ASSY. Right Side
12981
20065
5031A SCREW, RHM 1/4- 20 X 1/2 0948
20353
STR36SP-SERIES Gearbox ASSY. Left Side
Gearbox ASSY. Left Side
10% 12583 SPACER, X 11D X 1.168L 11%+ 9045
12982
10989 STUD, N10- 32 X 3/4 12907
12%+ 0232A
STR36SP-SERIES Single Pitch Handle ASSY. Left and Right
Single Pitch Handle ASSY. Left and Right
Spacer
Cable Assembly
Crank Knob
Crank Lever
STR36SP-SERIES Drive Assy
Drive Assy
PLATE, Bearing Mount
GASKET, CV Joint Boot
BOOT, CV Joint
KEY, Woodruff #9
STR36SP-SERIES MUFFLER/BELT Assy
MUFFLER/BELT Assy
WASHER, Lock 5/16 Medium
ENGINE, Honda 24 HP GX670
MUFFLER, 24 Honda
WASHER, Flat 5/16 USS
STR36SP-SERIES Belt Guard Assy
Belt Guard Assy
Belt Guard
STR36SP-SERIES Spider ASSY. Right
Spider ASSY. Right
PLATE, Wear Thrust Collar
SCREW, Trowel Adjustment
Blade Assembly
Wear Ring
STR36SP-SERIES Spider ASSY. Left
Spider ASSY. Left
LEVER, Trowel ARM Left Hand
SPRING, LH Trowel ARM Lever
ARM, Trowel Left
STR36SP-SERIES -YOKE Assy
Yoke Assy
Yoke
PIN, Yoke
STR36SP-SERIES Foot PEDALS/THROTTLE Assy
Foot PEDALS/THROTTLE Assy
WASHER, Flat #10 SAE
CABLE, Control 10-32 X 33 Long
SPRING, Throttle Return
RISER, Left Foot
STR36SP-SERIES Control Panel Assy
Control Panel Assy
BOOT, Toggle Switch
SWITCH,TOGGLE Electric #9061
Wire ASSEMBLY, 16 GA. X
HARNESS, Wire Honda Rider
STR36SP-SERIES FRAME/FUEL Assy
FRAME/FUEL Assy
Fuel CAP/GAUGE
Fuel Pump Assembly
TANK, Fuel Five Gallon
BUSHING, Rubber Fuel
STR36SP-SERIES Battery Assy
Battery Assy
BOX, Battery GR UI
Bracket Battery HOLD- Down
BOLT, Battery Hold Down
BOOT, Terminal
STR36SP-SERIES Seat Frame Assy
Seat Frame Assy
TERMINAL, Wire Pioneer
CONNECTOR, Relay
SWITCH, Kill COLE- HER #90036
Seat Plate
Honda GX-670 AIR Cleaner Assy
AIR Cleaner Assy
SEAL, AIR Cleaner Cover
CLIP, AIR Cleaner
SEAL, AIR Cleaner Housing
PLATE, AIR Cleaner Setting
Honda GX-670 Camshaft Assy
Camshaft Assy
ROD, Push
SPRING, Weight Return
SEAL, Valve Stem
ARM, Valve Rocker
Honda GX-670 Carburetor Assy
Carburetor Assy
CLIP, Breather Tube
GASKET, AIR Cleaner
TUBE, Breather
Gasket SET
Honda GX-670 Control Assy
Control 2 Assy
SPRING, Starter
Lever ASSEMBLY,THROTTLE
JOINT, ROD
ARM, Governor
Honda GX-670 Control BOX Assy
Control BOX Assy
SCREW, Special 6 X CLIP, Wire Harness
BRACKET, Wire Harness Clip SUB- Wire Harness Assembly
KEY Comp HOLDER, Stop Switch Wire
CASE, Control BRACKET, Case Mounting
Honda GX-670 Crankcase Cover Assy
Crankcase Cover Assy
HOLDER, Governor Weight
Cover ASSEMBLY, OIL Pump
WEIGHT, Governor
PIN, Governor Weight
Honda GX-670 Crankshaft Assy
Crankshaft Assy
Crankshaft COMP., T-TYPE
90401ZJ1000
Honda GX-670 Cylinder Barrel Assy
Cylinder Barrelassy
COVER, Breather
CLAMP, Wire
SWITCH, OIL Pressure
GASKET, Breather Cover
Honda GX-670 Cylinder Head Assy
Cylinder Head Assy
CLIP, Valve Guide
HANGER, Engine
GUIDE, Valve OS, Optional
GASKET, Cylinder Head
Honda GX-670 FAN Cover Assy
FAN Cover Assy
PLATE, Left Side
COVER, FAN *NH1* Black
PLATE, Right Side
SHROUD, Right
Honda GX-670 Flywheel Assy
FLY Wheel Assy
GRID, Screen P.T.O. Optional
PLATE, Cooling FAN Setting
FAN, Cooling
FLY Wheel Comp
Honda GX-670 Fuel Pump Assy
Fuel Pump Assy
TUBE, Fuel
Pump ASSEMBLY, Fuel
STAY, Fuel Pump
Tube B, Fuel
Honda GX-670 Ignition Coil Assy
Ignition Coil Assy
Coil ASSEMBLY, L.. Ignition
Coil Assembly R. Ignition
GROMMET, Ignition Wire
Coil ASSEMBLY, Charge 12V/20A
Honda GX-670 Labels Assy
Labels Assy
Honda GX-670 Labels Assy
MARK, Emblem
Honda GX-670 OIL Cooler Assy
OIL Cooler Assy
GRILLE, OIL Cooler
Collar 12MM
Cooler COMP., OIL
Hose A, OIL
Honda GX-670 Piston + Connecting ROD Assy
Piston + Connecting ROD Assy
Ring SET, Piston STD
ROD Assembly Connecting
BOLT, Connecting ROD 6 X
Ring SET, Piston 0.75 Optional
Honda GX-670 Starter Motor Assy
Starter Motor Assy
Collar SET, Clutch Stop
Switch ASSEMBLY, Magnet
RING, Snap Denso
LEVER, Pinion Drive
Terms and Conditions of Sale Parts
Payment Terms
STR36SP-SERIES-NOTES
HERE’S HOW to GET Help