Viewing Backup Footage on a PC (cont)
 Extract footage from a larger video clip
When dealing with larger backup files it may be necessary to extract smaller clips. The following describes how to extract footage and export to a new .VVF file.
1. | Open and play the clip to extract from. |
2. | Pause the clip where you want to start the extraction. |
3. | |
4. | Find and Pause the clip at the end of the extraction. |
5. |
DVR Layout
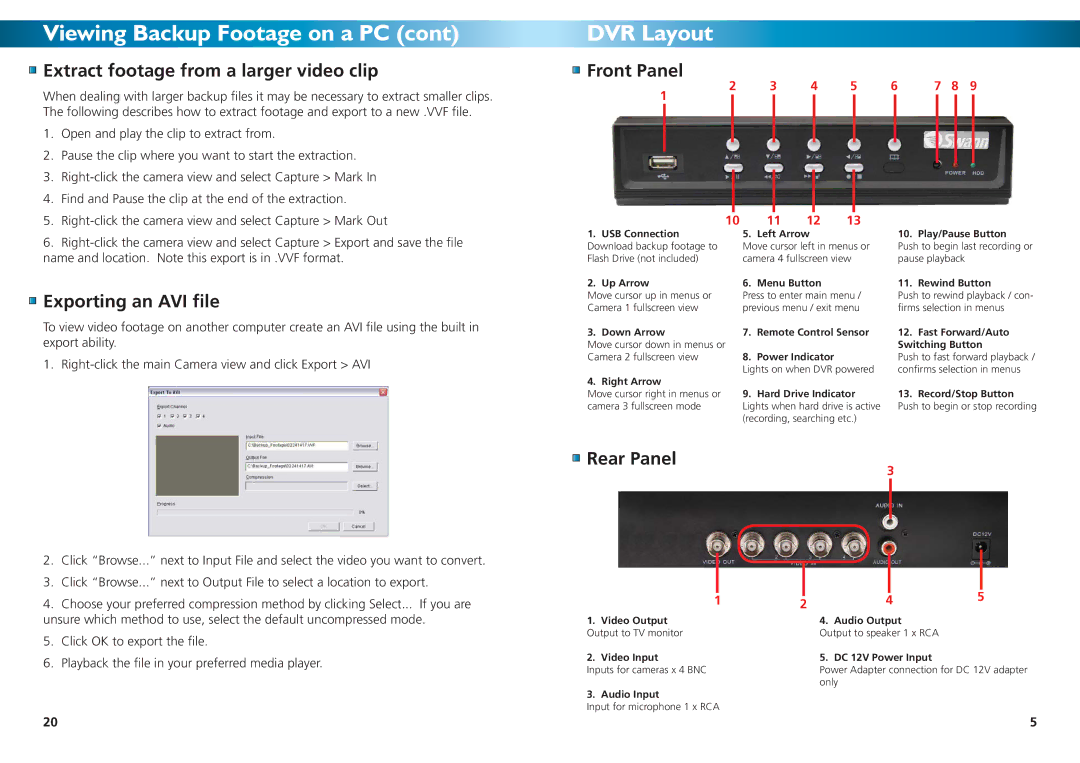
 Front Panel
2 | 3 | 4 | 5 | 6 | 7 | 8 | 9 | |||||||||
1 |
|
|
|
|
|
|
|
|
|
|
|
|
|
|
| |
|
|
|
|
|
|
|
|
|
|
|
|
|
|
| ||
|
|
|
|
|
|
|
|
|
|
|
|
|
|
|
|
|
|
|
|
|
|
|
|
|
|
|
|
|
|
|
|
|
|
|
|
|
|
|
|
|
|
|
|
|
|
|
|
|
|
|
10 11 12 13
6. |
name and location. Note this export is in .VVF format. |
 Exporting an AVI file
To view video footage on another computer create an AVI file using the built in export ability.
1.
1.USB Connection Download backup footage to Flash Drive (not included)
2.Up Arrow
Move cursor up in menus or Camera 1 fullscreen view
3. Down Arrow
Move cursor down in menus or Camera 2 fullscreen view
4. Right Arrow
Move cursor right in menus or camera 3 fullscreen mode
5. Left Arrow
Move cursor left in menus or camera 4 fullscreen view
6. Menu Button
Press to enter main menu / previous menu / exit menu
7.Remote Control Sensor
8.Power Indicator
Lights on when DVR powered
9.Hard Drive Indicator Lights when hard drive is active (recording, searching etc.)
10. Play/Pause Button
Push to begin last recording or pause playback
11. Rewind Button
Push to rewind playback / con- firms selection in menus
12.Fast Forward/Auto Switching Button
Push to fast forward playback / confirms selection in menus
13.Record/Stop Button Push to begin or stop recording
2.Click “Browse...” next to Input File and select the video you want to convert.
3.Click “Browse...” next to Output File to select a location to export.
4.Choose your preferred compression method by clicking Select... If you are unsure which method to use, select the default uncompressed mode.
5.Click OK to export the file.
6.Playback the file in your preferred media player.
 Rear Panel
3
|
|
|
|
|
|
|
|
|
|
|
|
|
|
|
|
|
|
|
|
|
|
|
|
|
|
|
| 1 | 2 | 4 | 5 | ||||
1. | Video Output | 4. | Audio Output |
|
| |||
Output to TV monitor |
| Output to speaker 1 x RCA |
|
| ||||
2. | Video Input | 5. | DC 12V Power Input |
|
| |||
Inputs for cameras x 4 BNC |
| Power Adapter connection for DC 12V adapter | ||||||
|
|
|
| only |
|
| ||
3. | Audio Input |
|
|
|
|
|
| |
Input for microphone 1 x RCA |
|
|
|
|
|
| ||
20 | 5 |